My complete and total apologies are in order. I have been out of this whole “blogging” world for a long while, but I’m back. Unfortunately, (or fortunately, depending on how you look at it) this is what happens to a teacher when you are on a year round schedule. Please don’t hate me, but I’m returning on Monday from a glorious FIVE WEEK BREAK! What??? I know, it’s crazy…and I must admit wonderful. And you know all those plans we make when we’re off, how much stuff we will get done, how many projects we will tweek and improve, etc…..
Well, let’s just say that I’ve accomplished about 5% of my “teaching” goals, but on the positive side, I’ve had a wonderful break with my adorable two year old, family and friends. I even made it out to Disneyland! Enough about that. Just wanted to shoot out a quick post promoting my Tpt salebeginning on Black Friday. It’s the perfect opportunity to buy any item at a great price. I will be uploading more projects soon so be sure to follow me (and the blog–because I always show photos of the projects in action here).
Happy Thanksgiving to all! Don’t forget to count your blessings!
This year I made a firm decision that no matter what happens, I would include science experiments in my instruction. It is my belief that we are not truly teaching science, if we are not conducting science experiments in our classrooms. How else will the students begin to genuinely think like a scientist and understand the scientific method without actually experimenting in class? The answer is simple. They won’t.
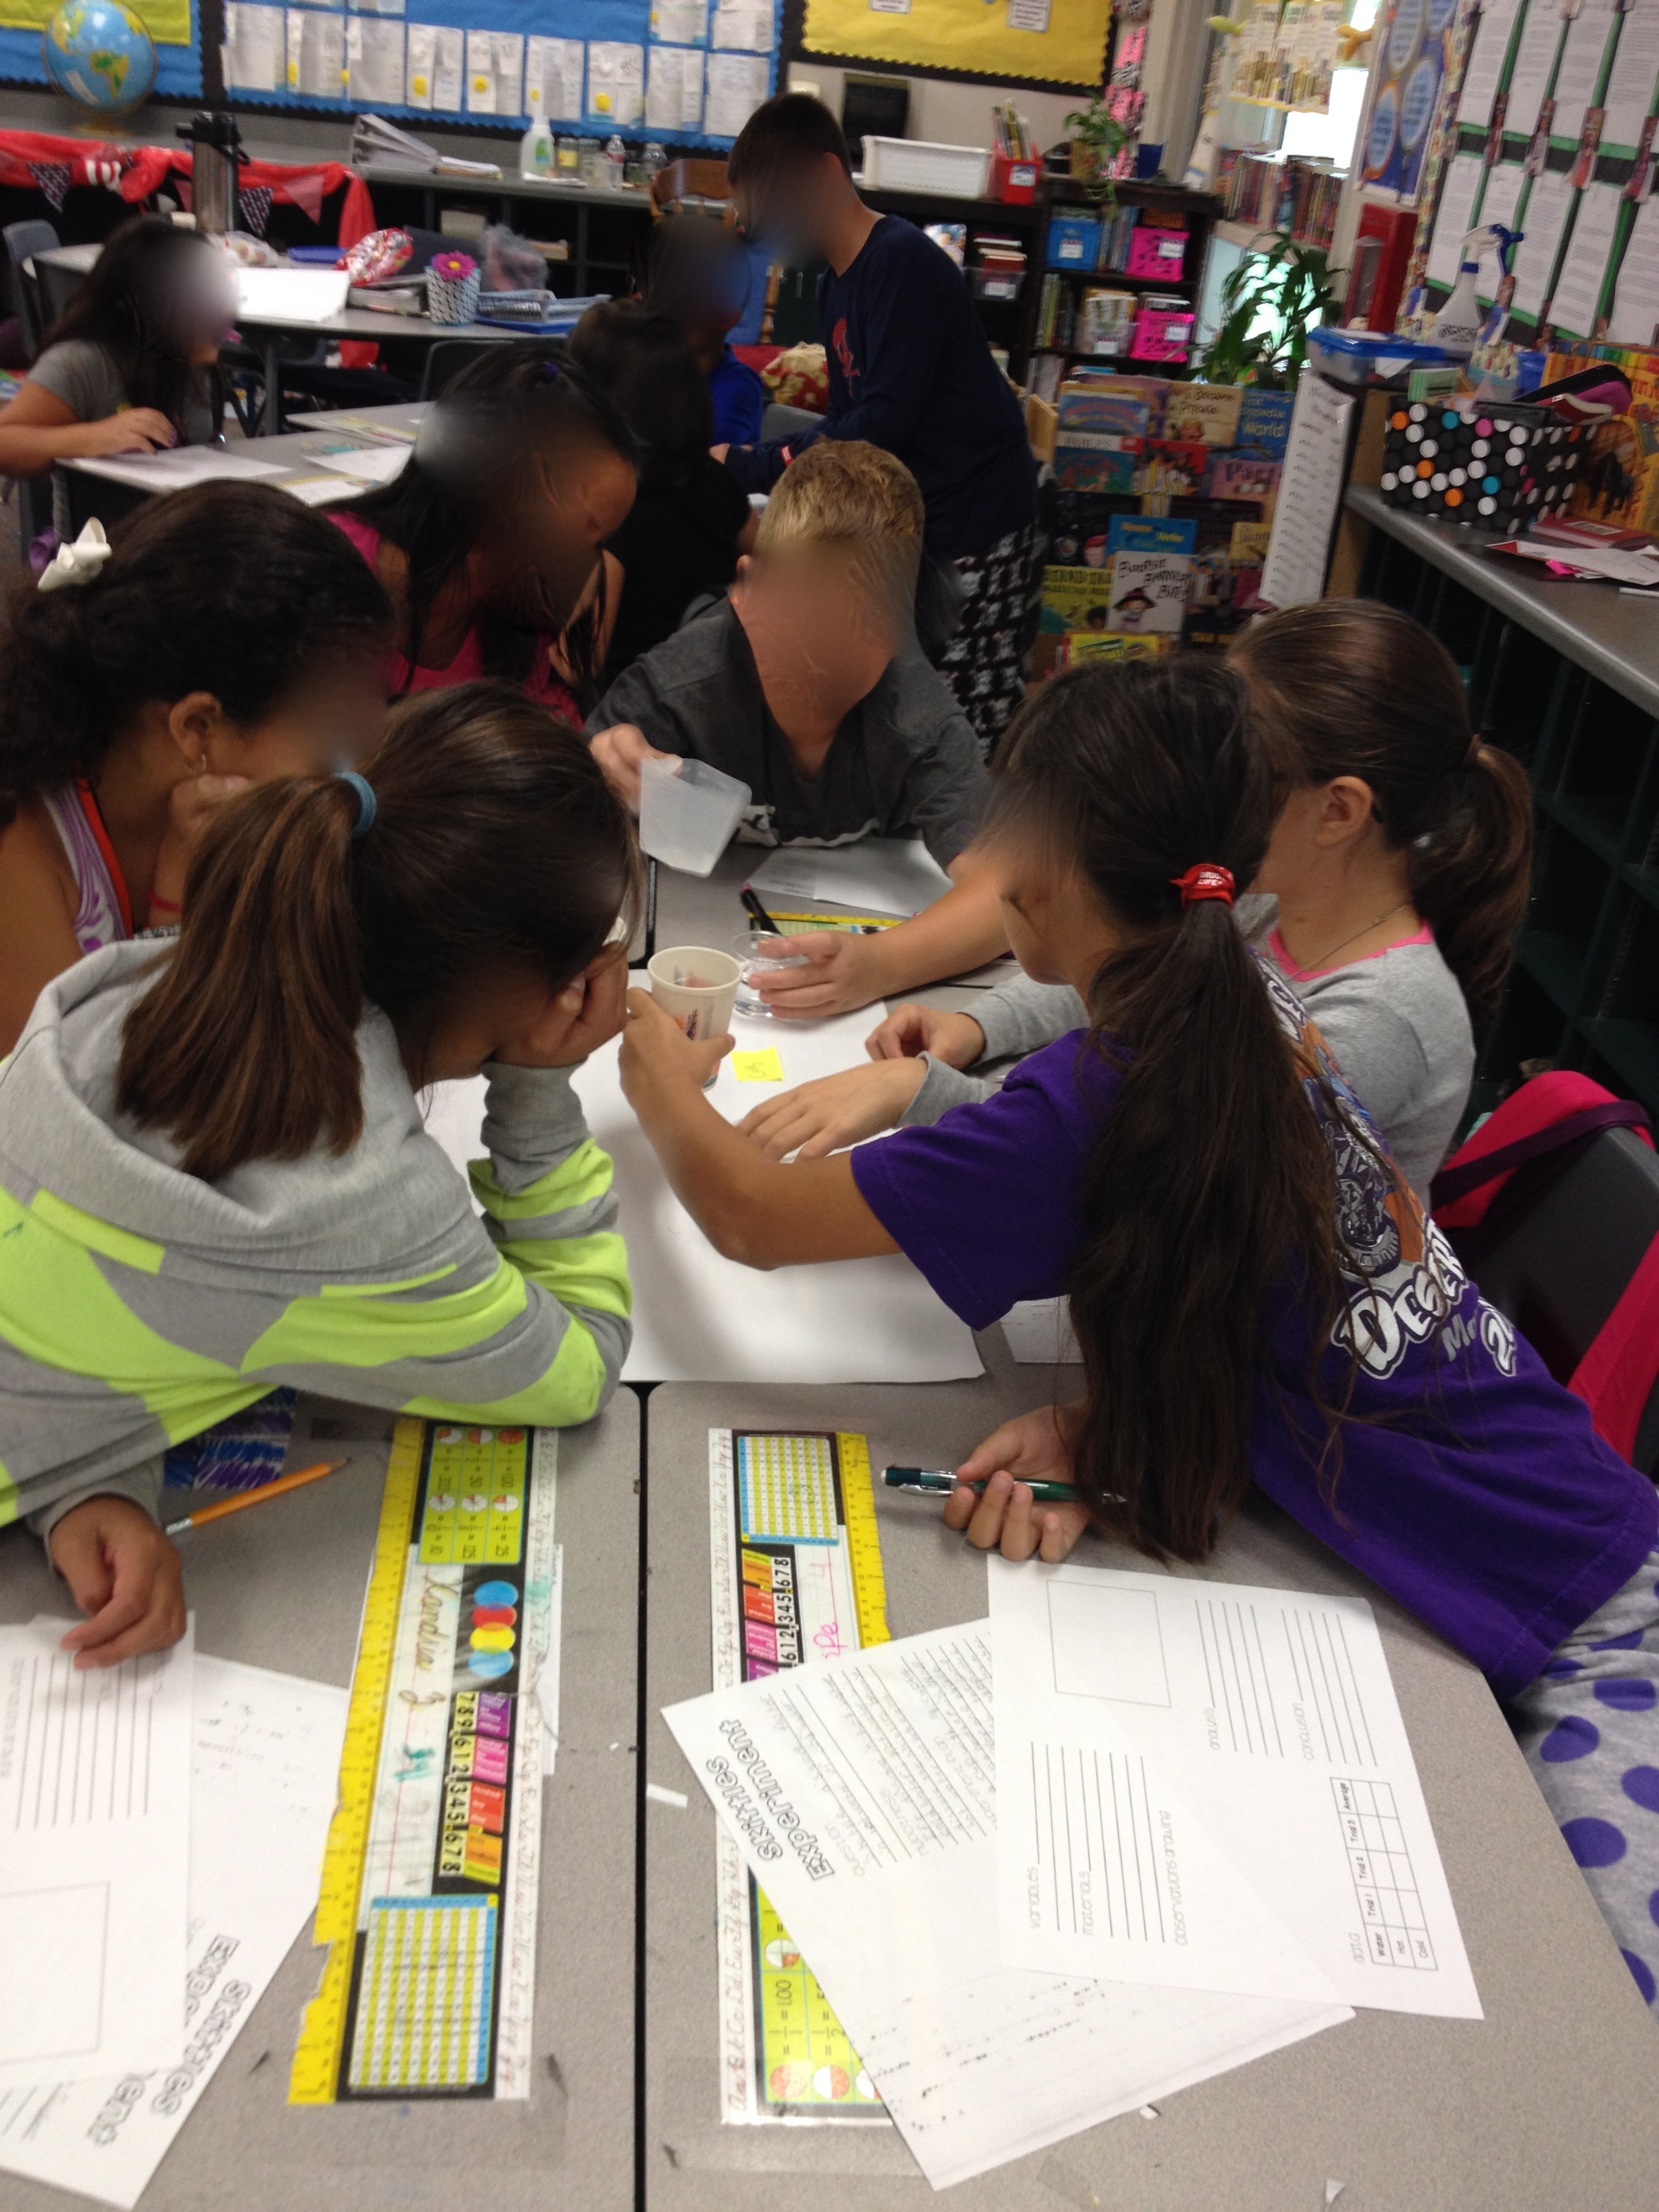
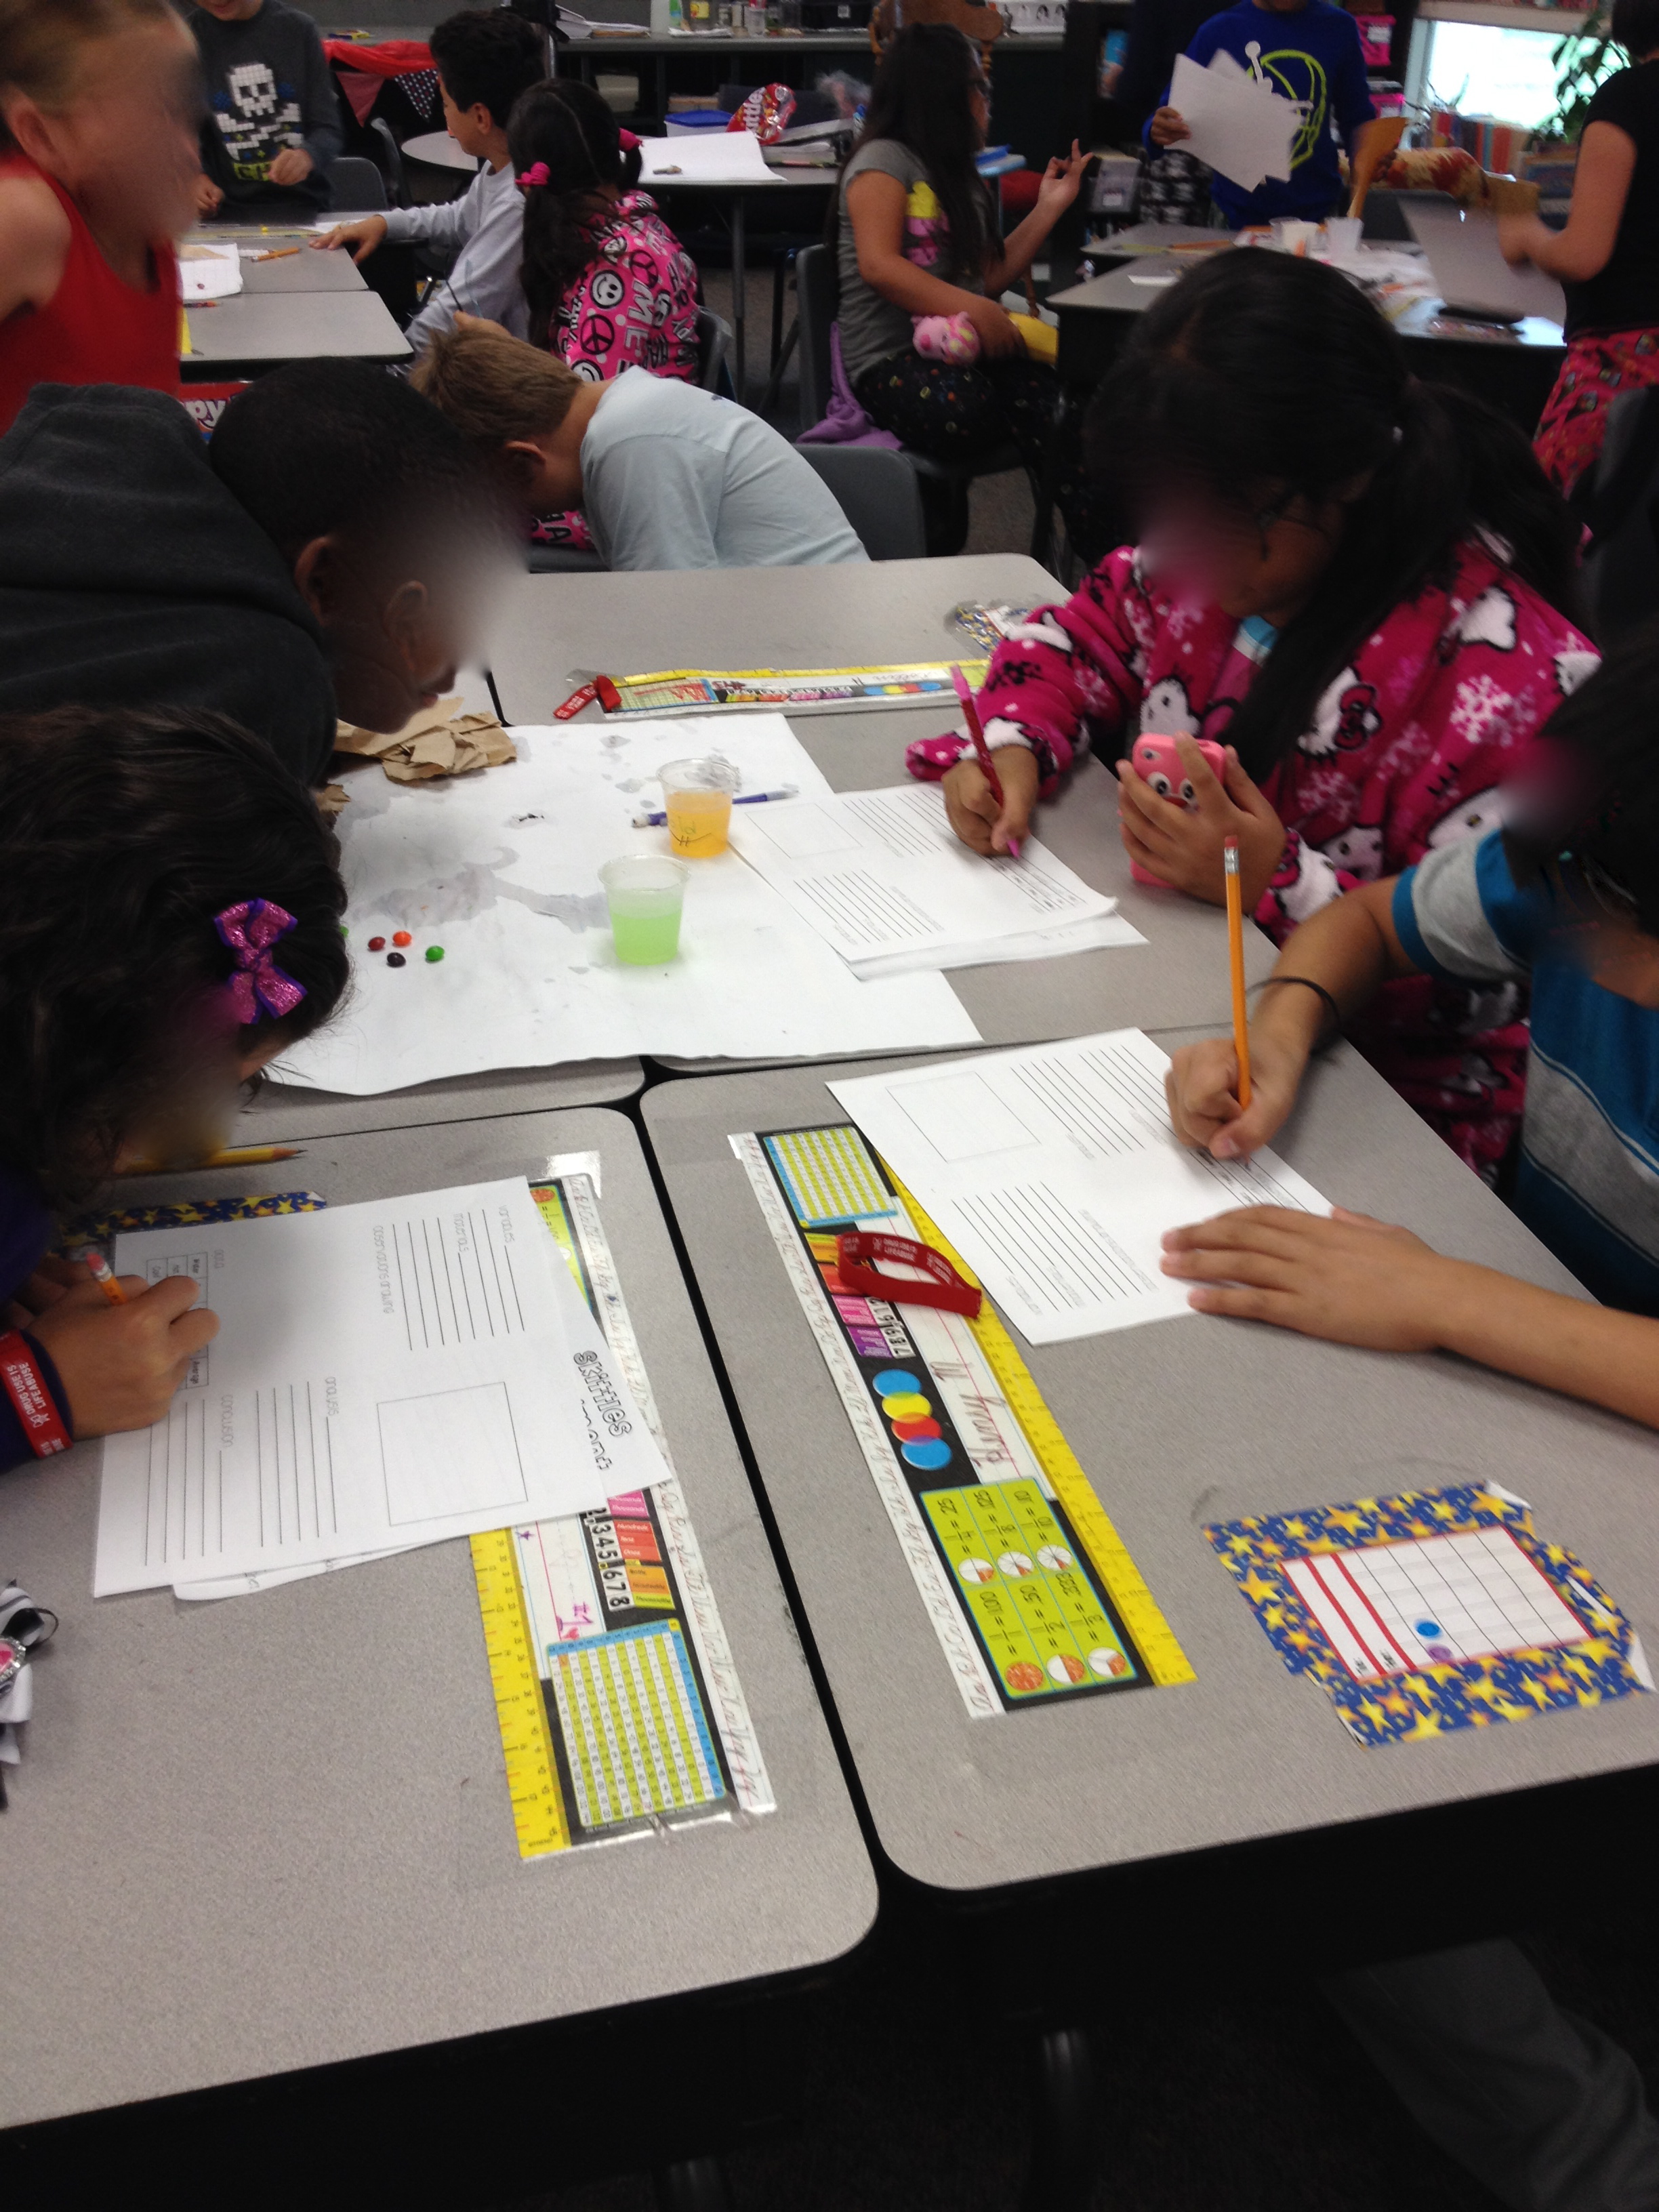
I’m happy to report on our second experiment–Skittles Science! I was reading one of my favorite blogs, Runde’s Room, and she mentioned this experiment. I immediately went to teacherspayteachers.com to purchase this product. (That’s right. She’s that good. Every recommendation from her has been quality.)
Great product! Has all materials for experiment and more.
This particular product has more than just the science experiment in it, but I just used the PPT to explain the key points I wanted students to focus on i.e. how to record observations.
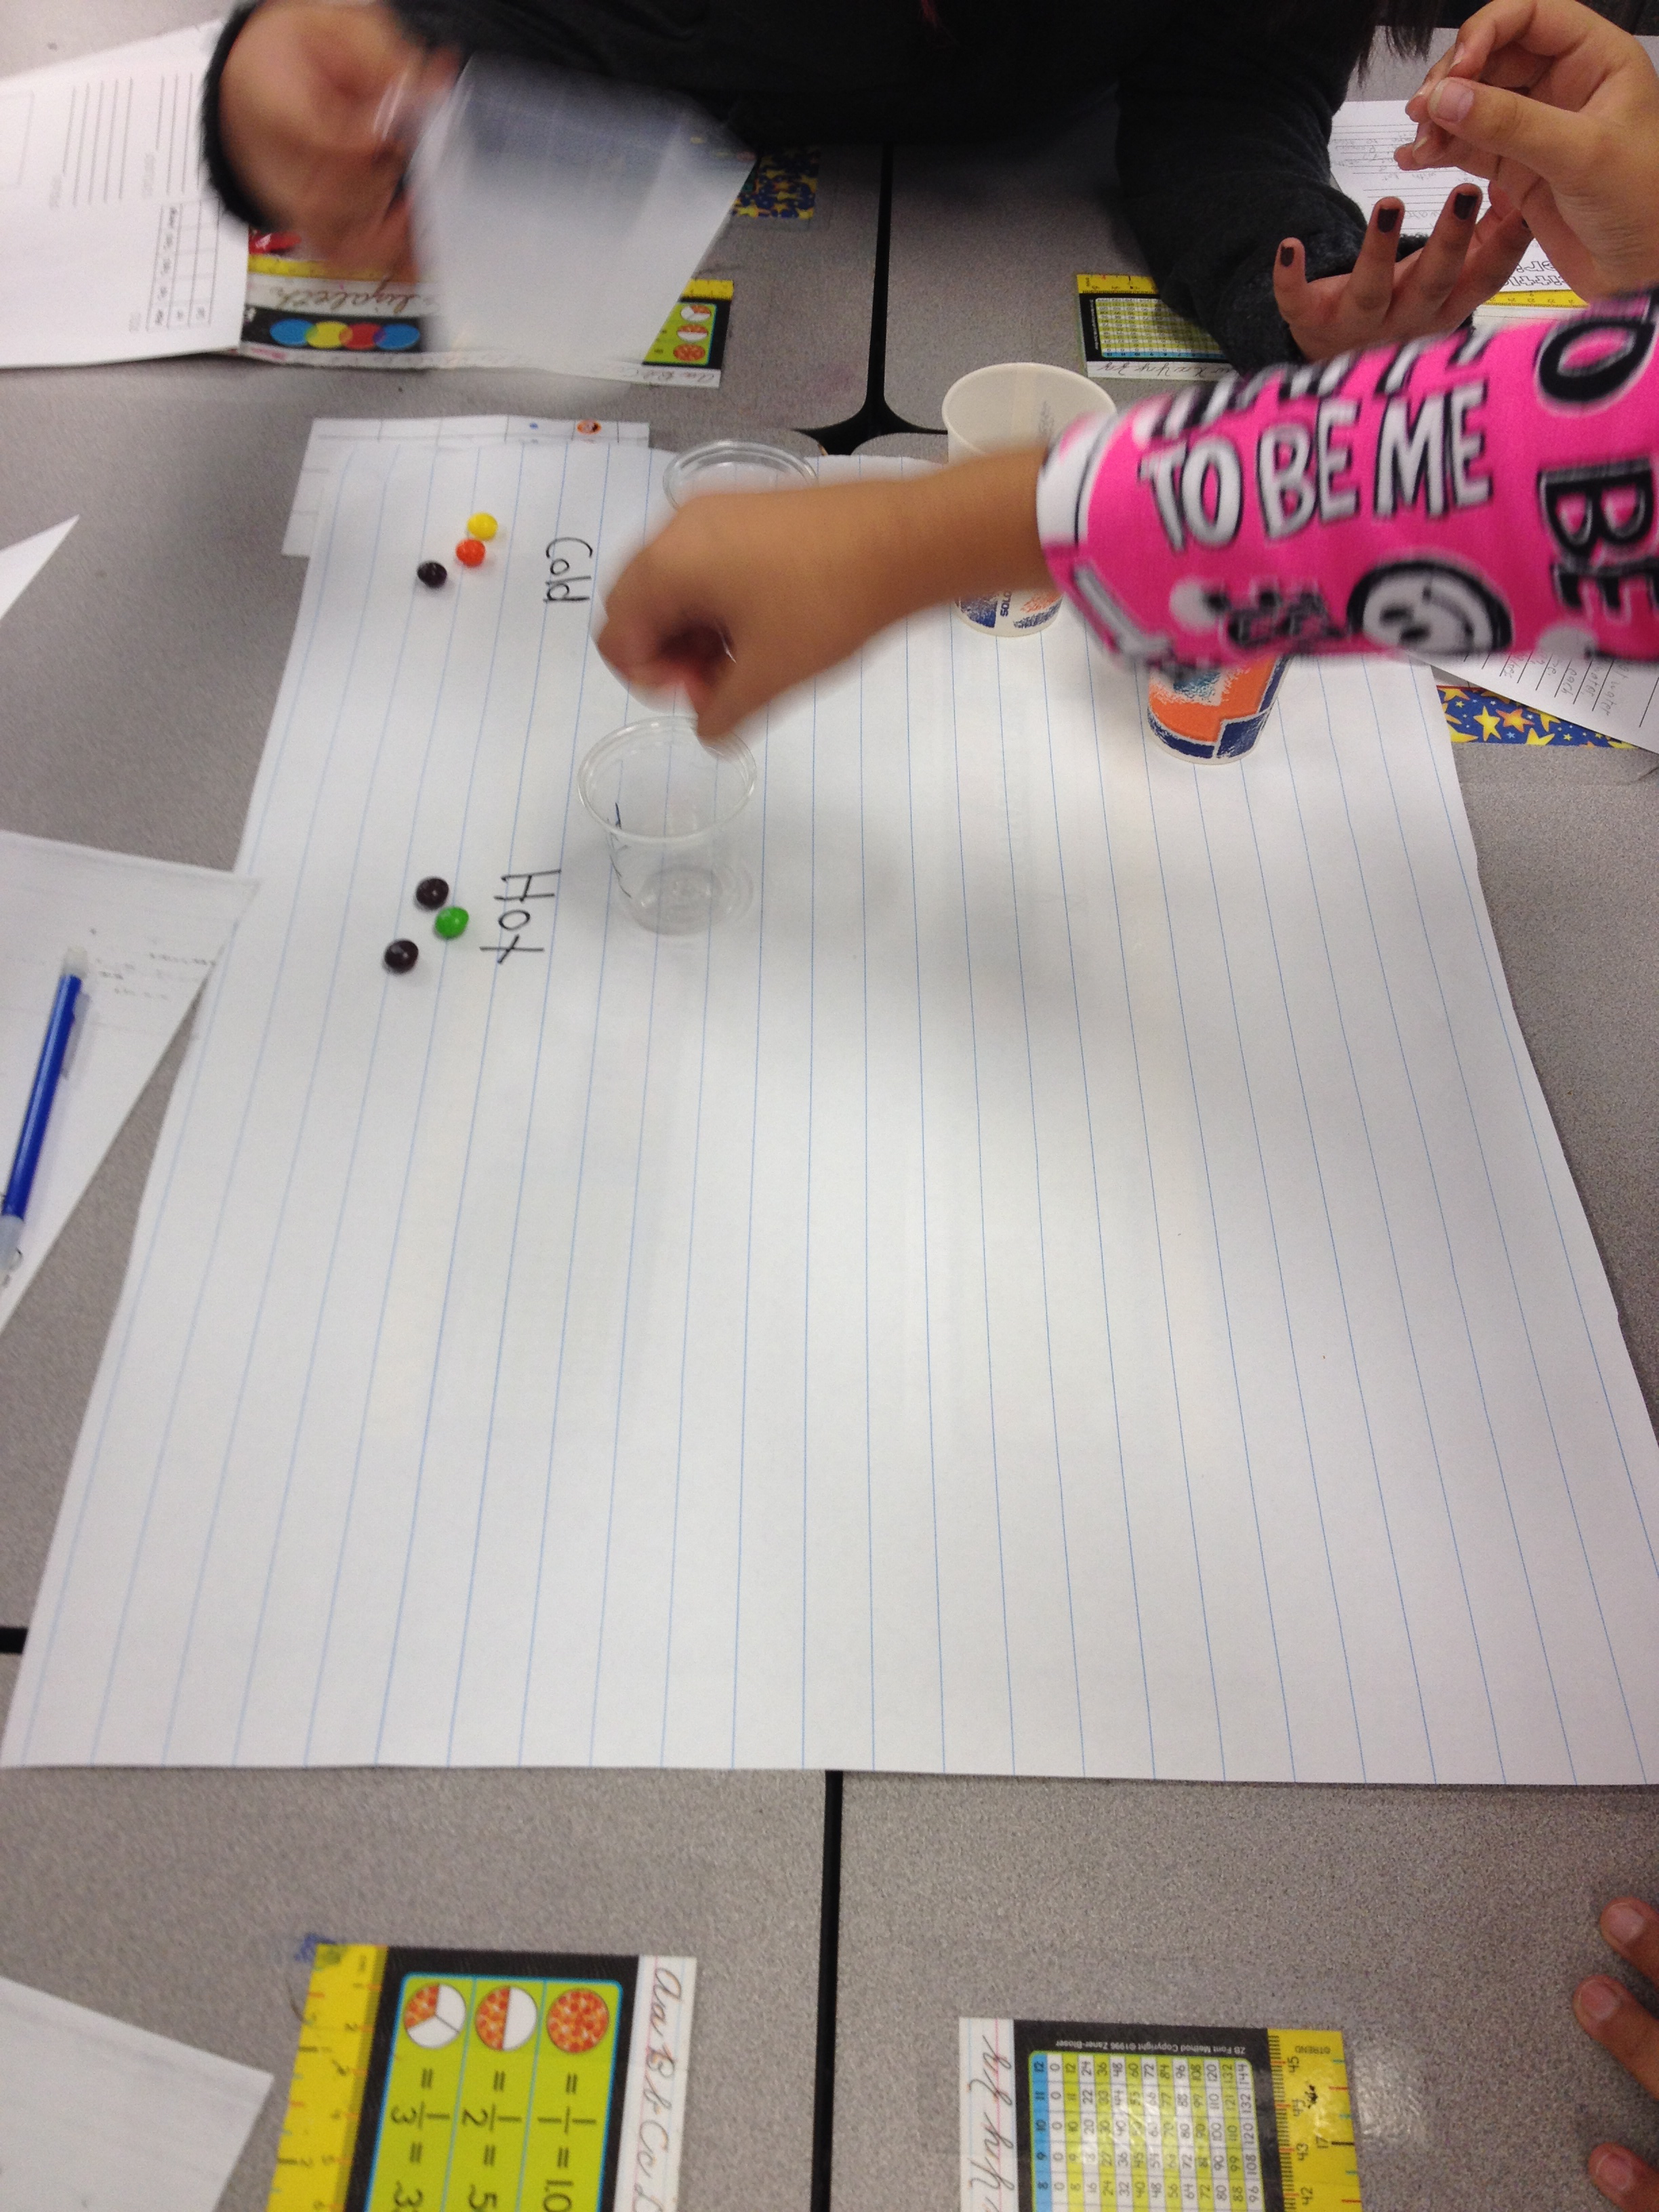
The question to be investigated was: Do Skittles dissolve faster in hot water or cold water?
Once the question was posed we went to work through the scientific process. Each student had to form their own hypothesis based on their prior knowledge of the effects of different temperatures of water on certain items. It was very interesting to hear the students’ reasoning to support their hypothesis. Most of the students predicted that the hot water would dissolve the skittle faster due to the fact that items are dissolved in hot water more often than cold. (For example, hot tea, coffee, cleaning dishes.)
The following are pictures of the students conducting their experiments. I chose to leave the procedure part open to each group to decide the steps they needed to take. I simply told them the materials and tools that would be available to them (pretty much like the diaper experiment). And might I add, the procedural steps were SO MUCH BETTER than the first experiment. Yay, they are learning from their mistakes! Just look at how engaged these kids are. I love it!
Love seeing the students all leaning in like this! Totally engaged.Look at this engagement!! Love it!Students working together, each with a different responsibility for this science experiment.Science is fun!Skittles Science Experiment!Teaching the students how to label and to be precise and accurate with tools.
As far as some teacher tips….here goes:
1. I heated water from home and brought it to school in a large thermos. I also have a Keurig in the classroom and was prepared to use that if we needed more water.
2. Each group needs to have a stopwatch or timer of some sort to record timed data. (Cell phones worked well for this.)
3. Set aside at least an hour of time for this lesson. On average, skittles were dissolving in 8-10 minutes and the experiment calls for 3 trials. Personally, I thought this was a good lesson on patience and persistence. They are used to conducting school experiments in which the “reaction”, whatever that may be, happens pretty quickly. The students struggled tremendously with having to wait and watch the changes in the skittle because it occurs slowly. I used this as a teaching moment to explain how meticulous and patient real scientists need to be in order to obtain reliable data. Scientists do not dismiss experiments simply because “something” doesn’t happen after a minute. Reliable data is usually gathered over long periods of time.
Overall, the students had a great time being scientists. Once we finish recording all the data on their lab sheets, I’ll post some pictures of the final product.
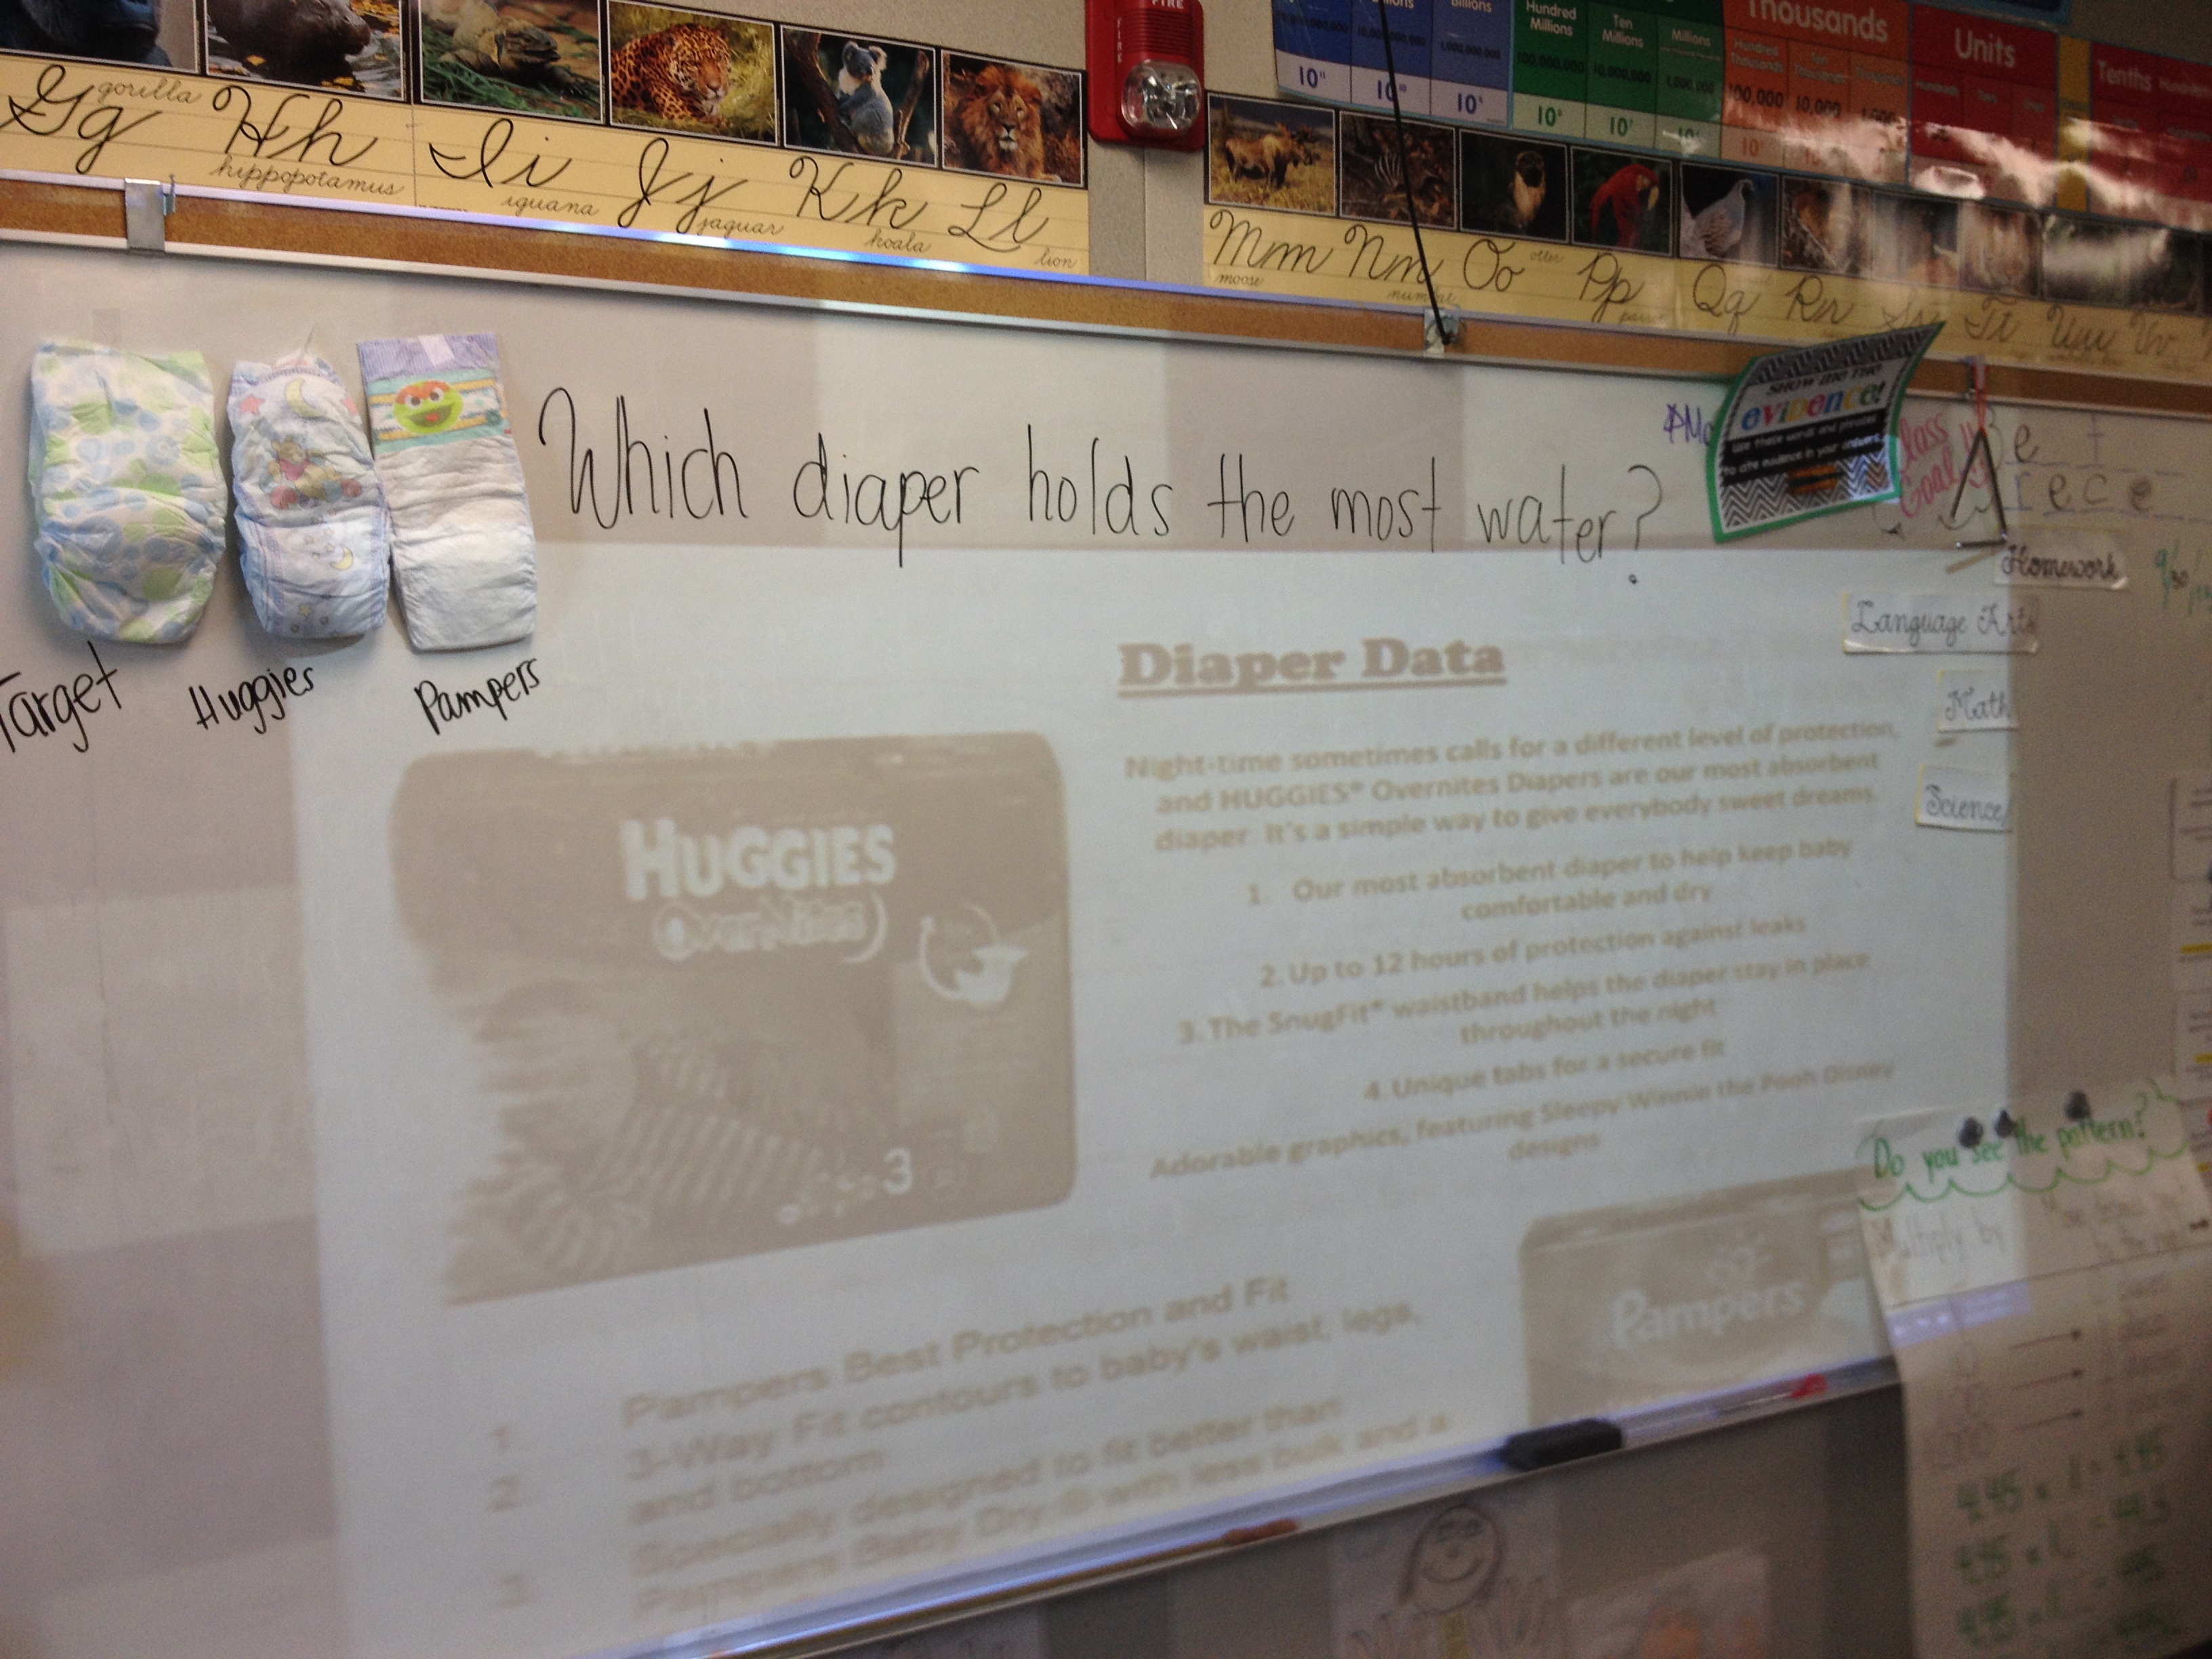
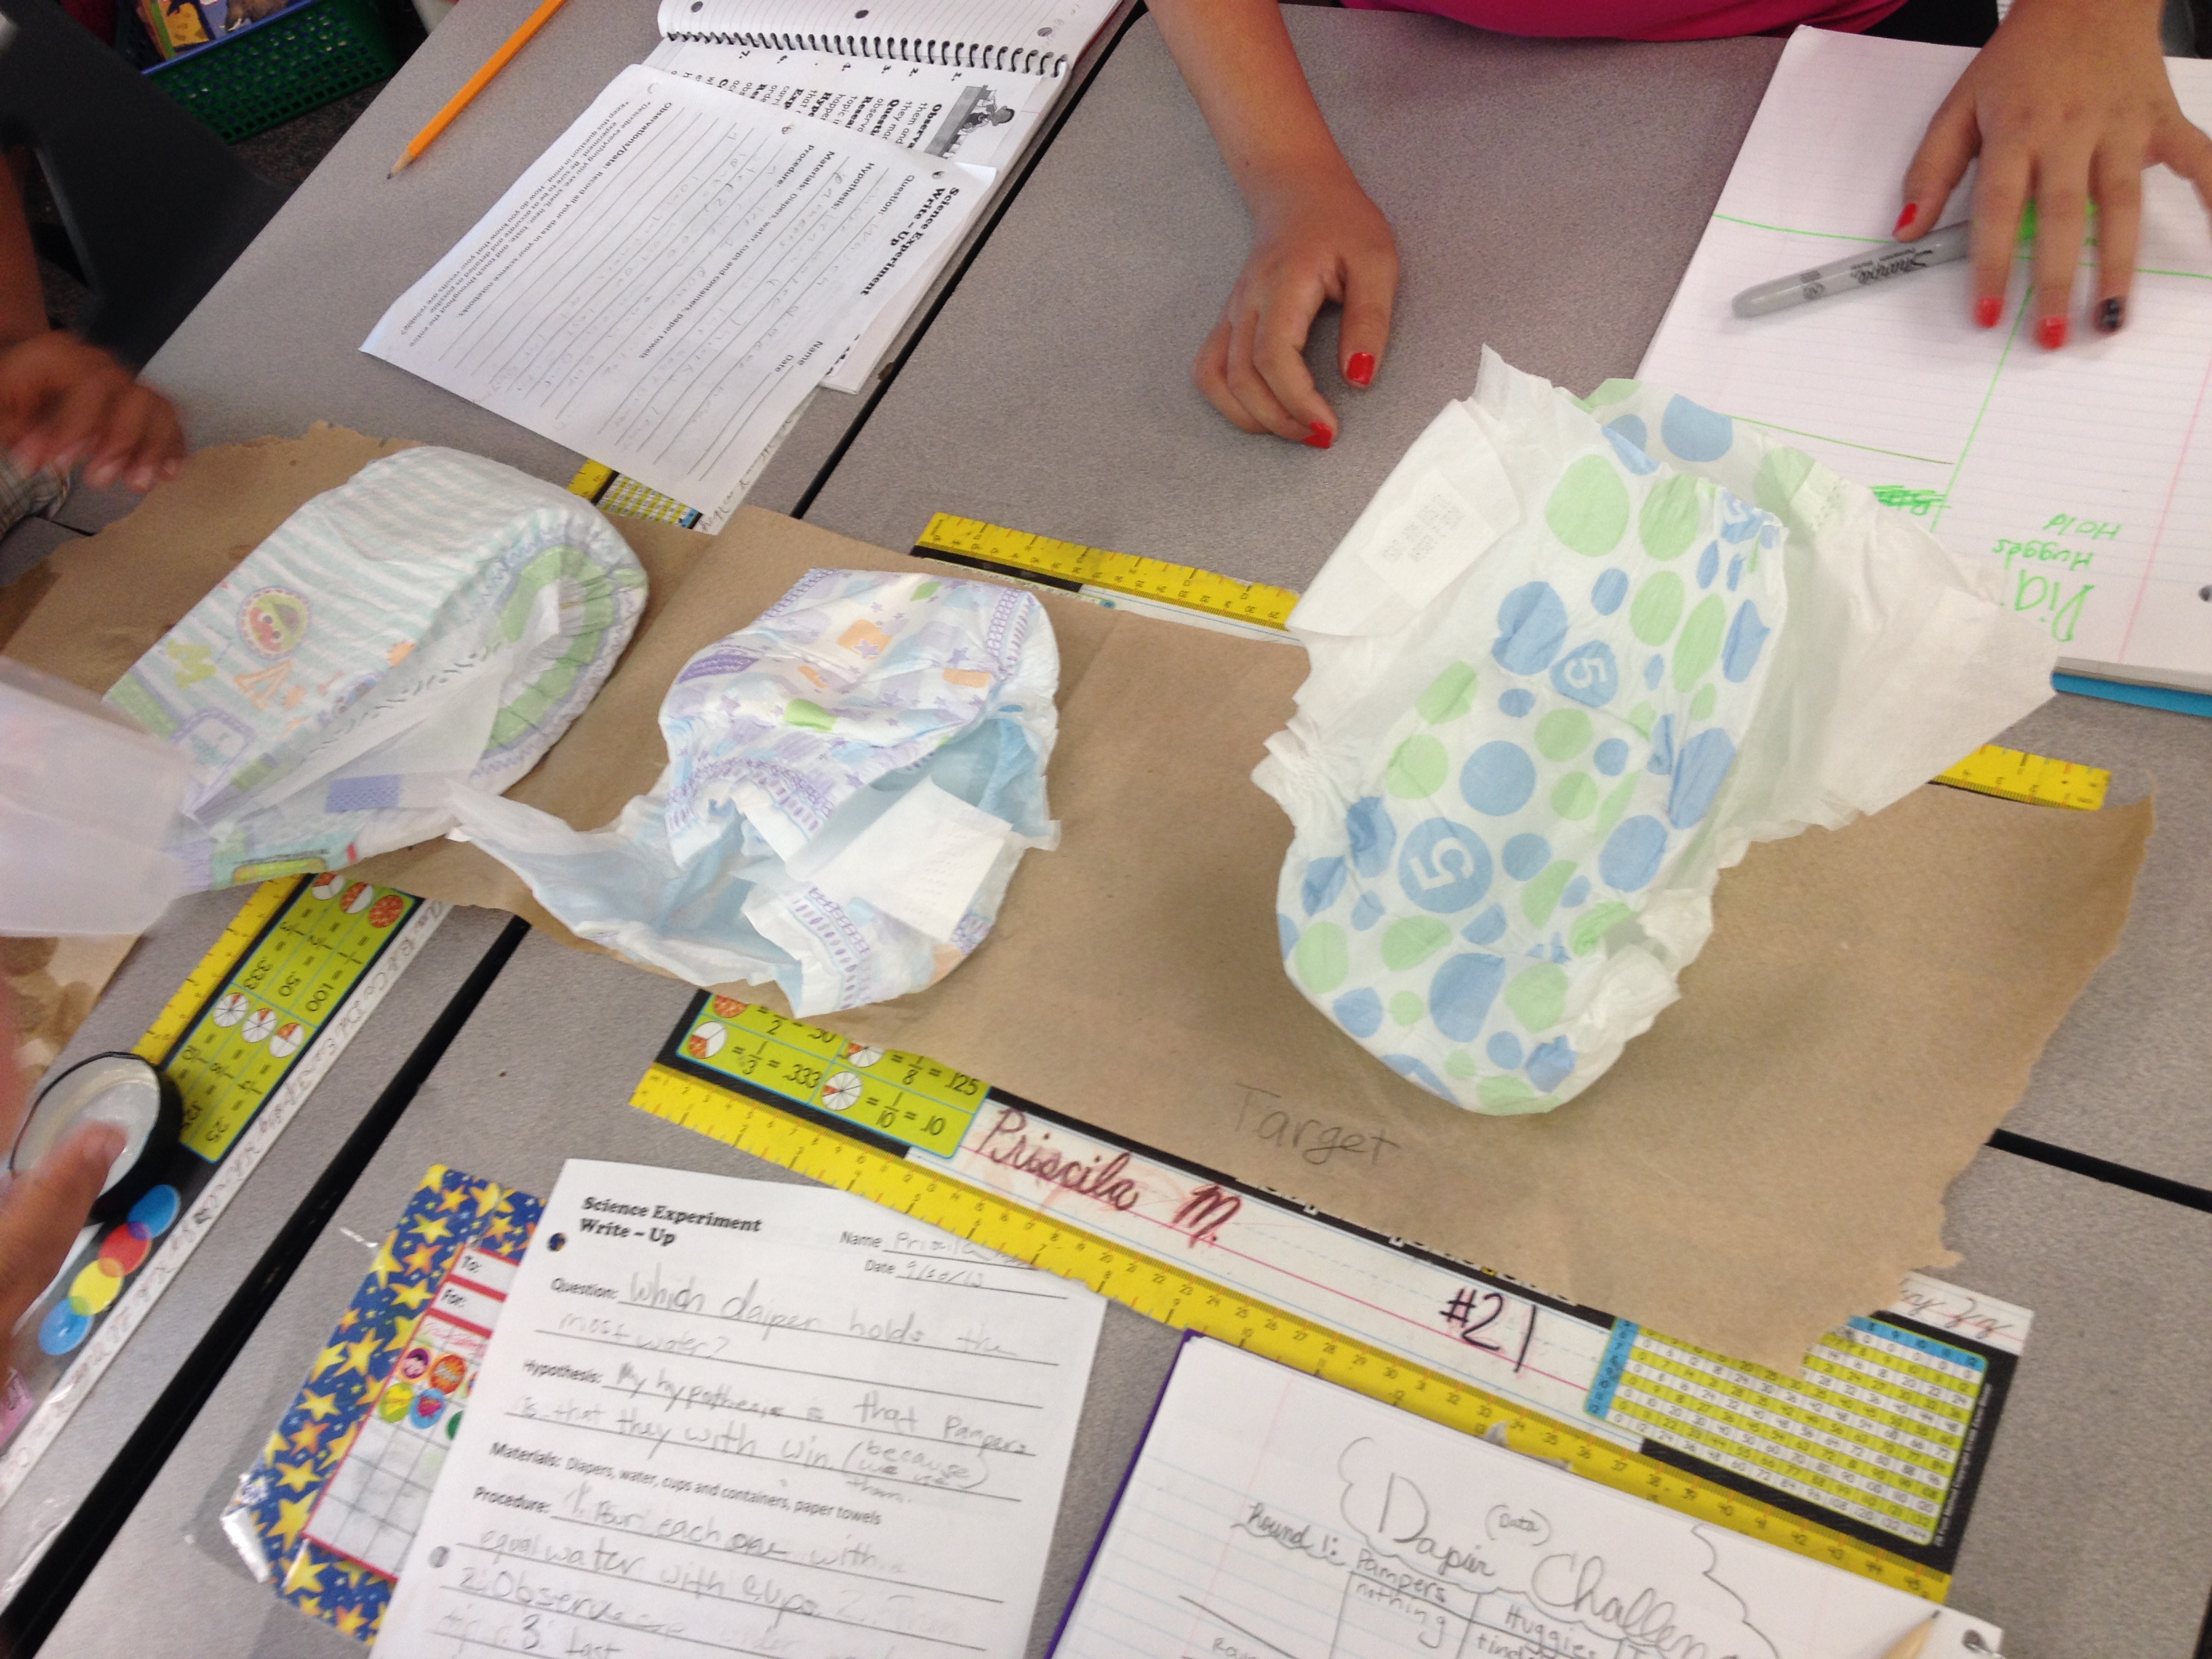
Which diaper absorbs the most liquid? My way of introducing the scientific method..
Which diaper absorbs the most liquid?
Like many first time moms, after having my son, I kept trying different diapers to see which one worked the best. At the same time, I was searching for a fun way to introduce the scientific method with my students. Suddenly, I read something that sparked this lesson idea: “Keep experiments simple for students. Answer a real life question you have.”
Too often, we teachers, try to bring science experiments into the classroom (with not help from schools or our curriculum) that are frankly just too difficult. Whether we don’t have the materials necessary or even the knowledge of why this chemical reacted a certain way, etc. These obstacles have always made bringing true experimentation into the classroom pretty much non-existent. I hate this. So, then my diaper problem seemed like something my kids could handle.
I was honest with my students and told them that we were going to create an experiment so that it could benefit me and my son. The students were totally into it! I’m sure working with diapers had a little something to do with it as well. *Tip: You might want to give the rules on inappropriate toilet humor before you begin.*
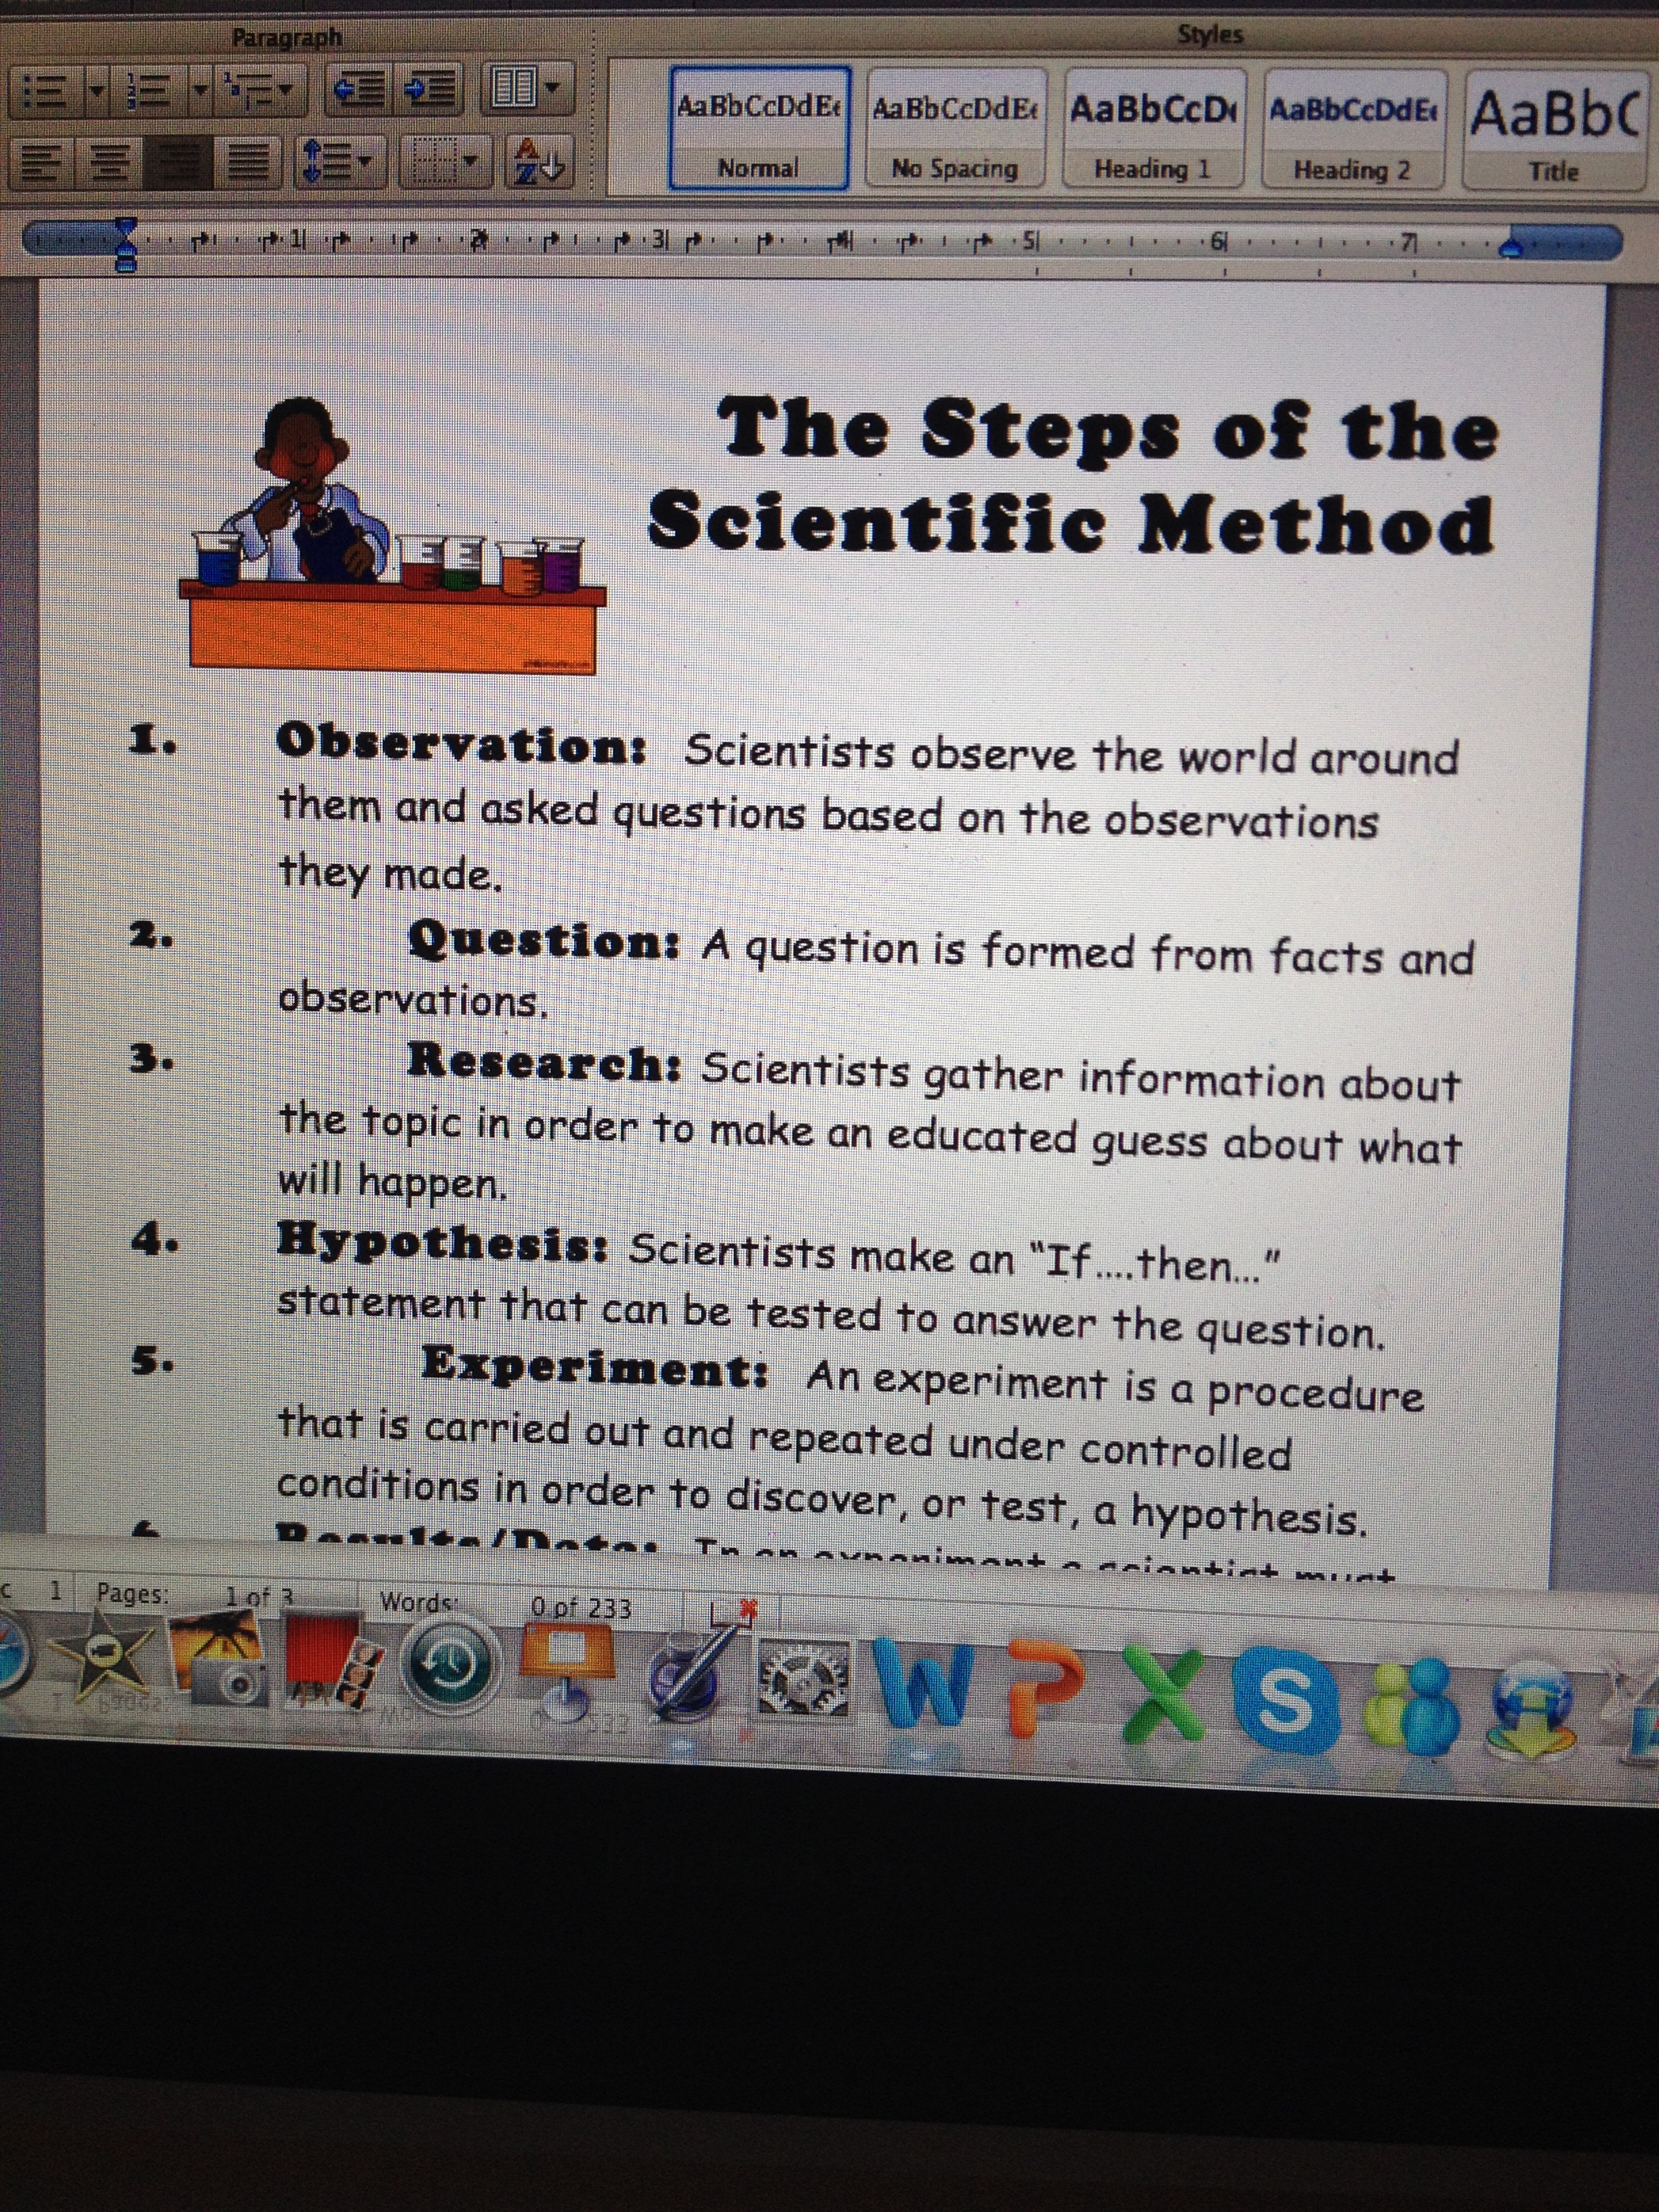
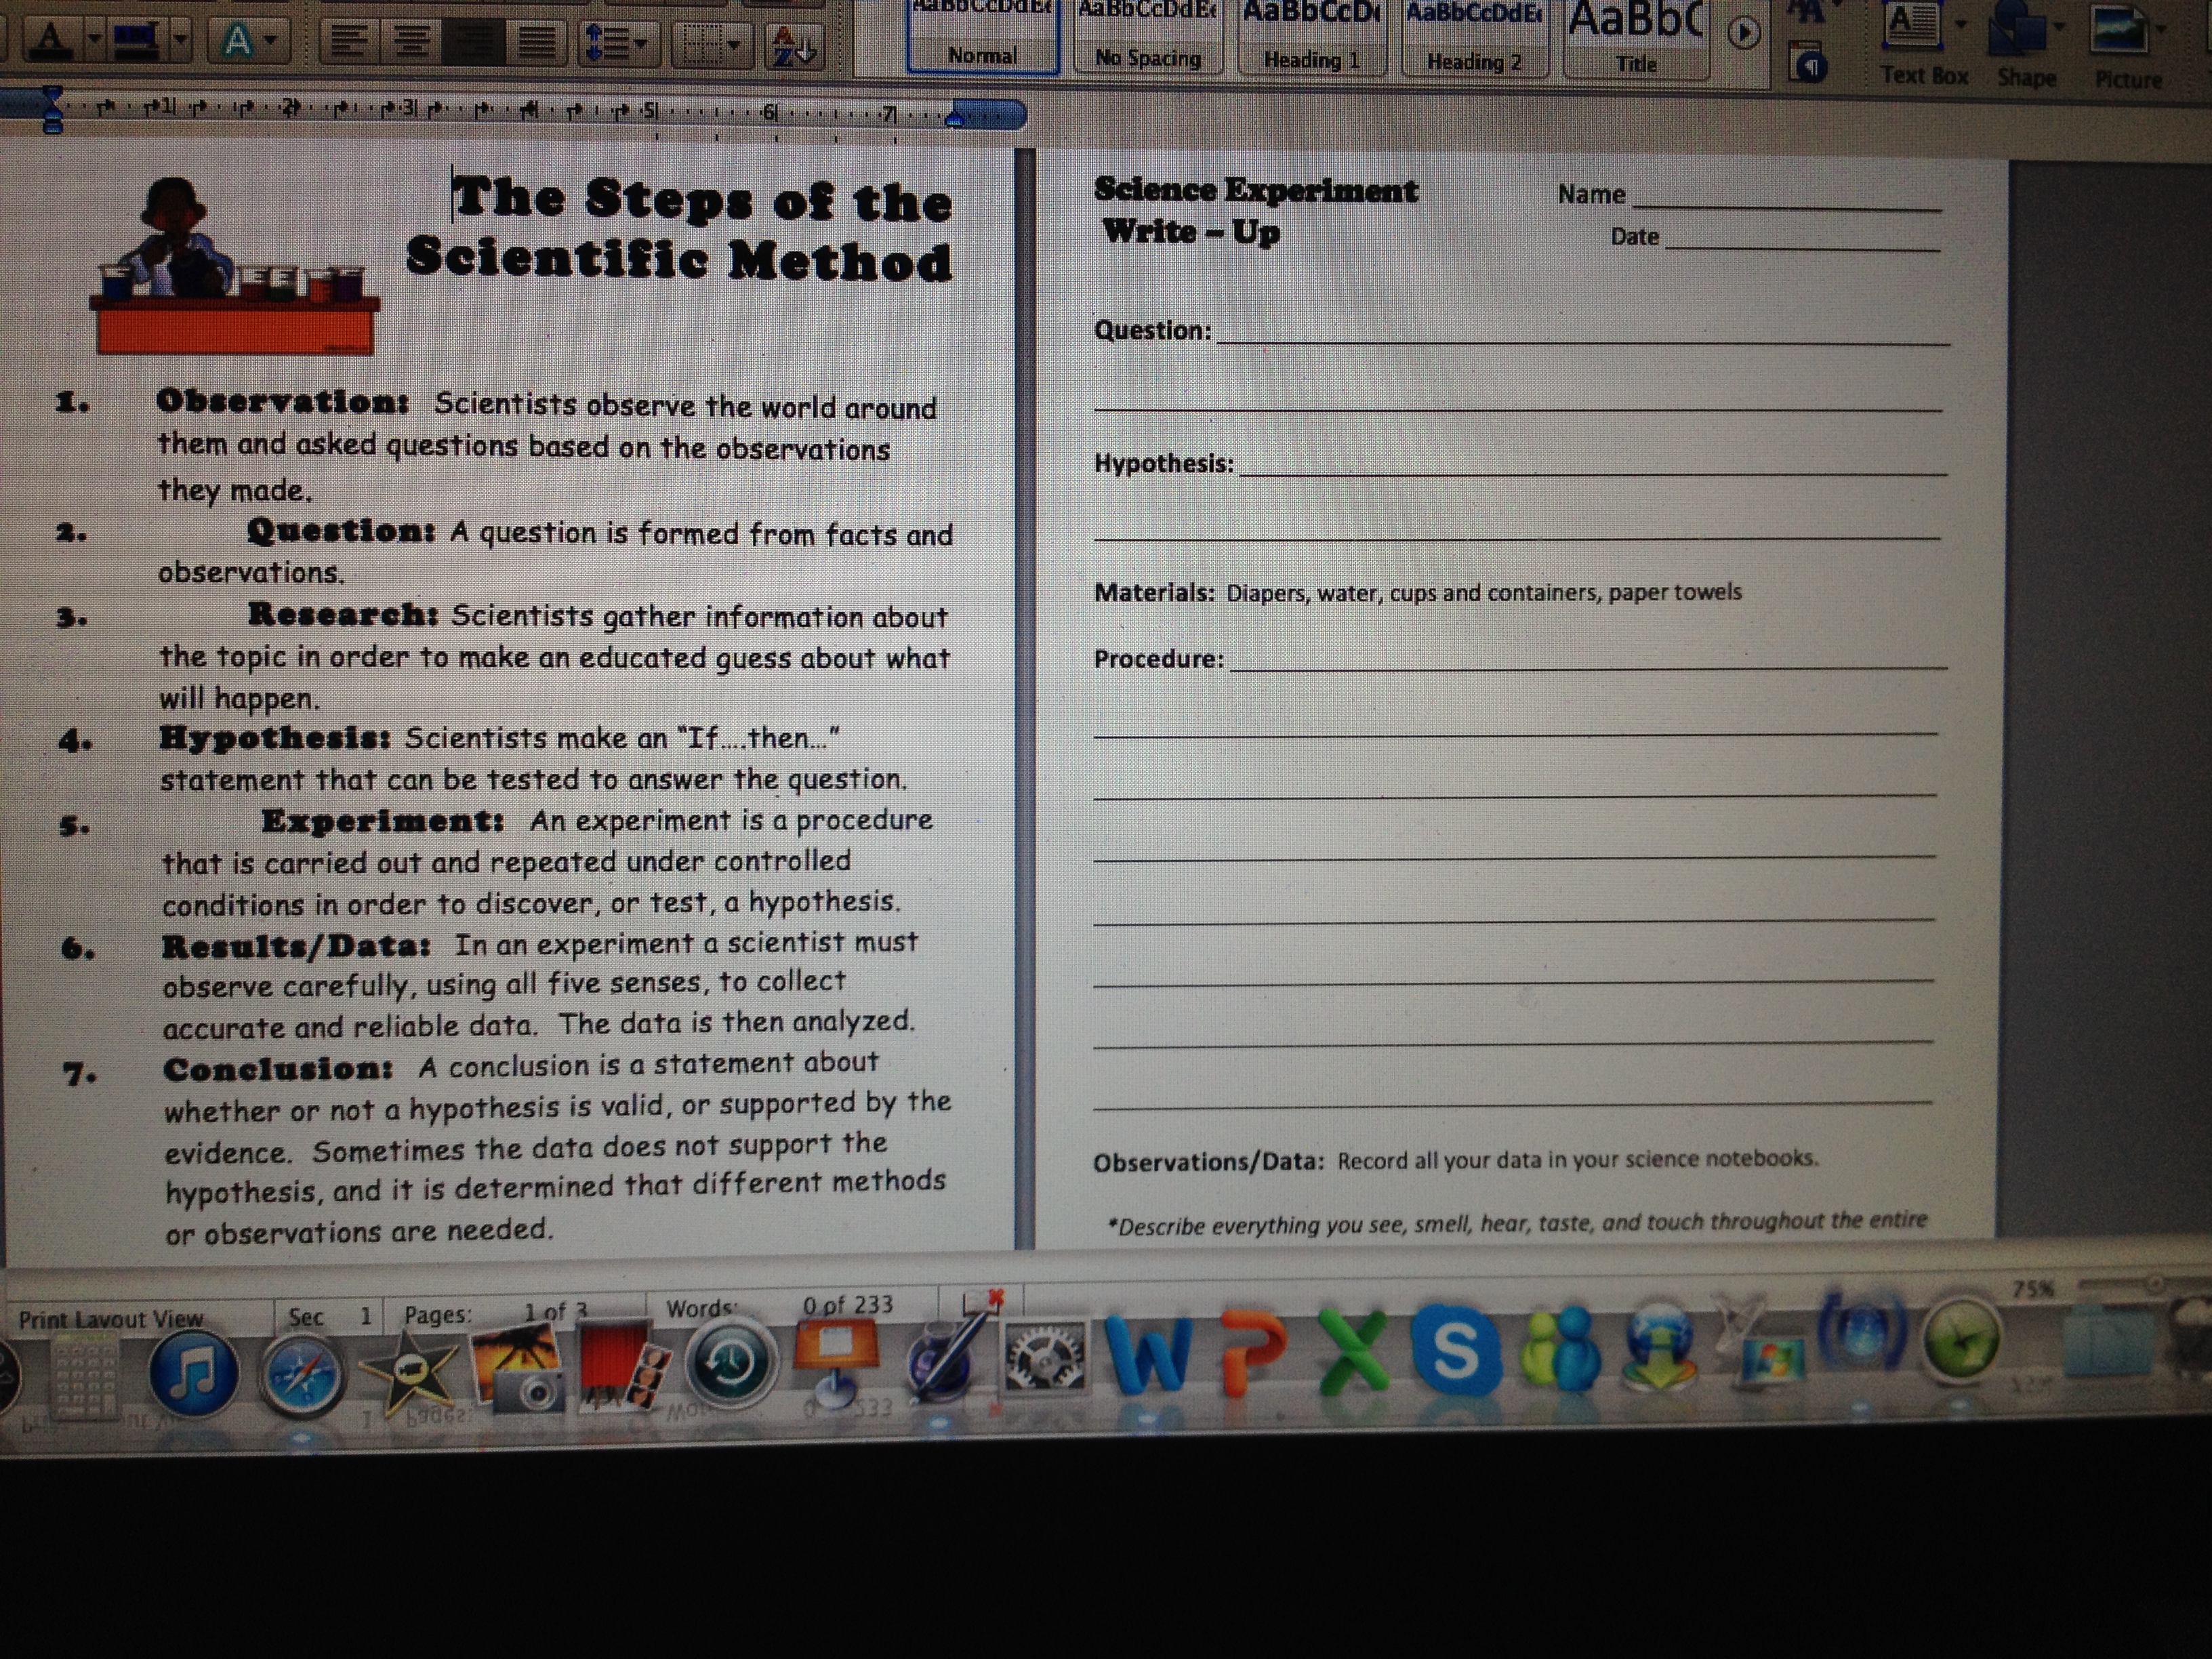
The first thing I did was show the kids a video (found on youtube.com) about the scientific method. It’s pretty cheesy, but it did it’s job of getting the kids excited and in a great mood. I then passed out the scientific-method.docx (as seen below): steps of the scientific method to be glued in their notebooks, a lab write-up sheet for the experiment, and diaper data. The last one is a sheet listing the three diapers to be tested with some basic information which was taken straight from each brand’s website.
Steps of Scientific MethodForms for diaper experimentDiaper Data- information on the three brands of diapers to be tested
After students looked over all the data and discussed at their table groups any prior knowledge they might have, each group had to agree on a “team” hypothesis.
**Please note: I purposely threw a wrench in this experiment so as to teach the importance of variables later on. One of the diapers to be tested was Huggies Overnights. Last year, one student questioned the validity of the experiment, but this year…NOT A ONE. I do this to see if they notice that all the diapers are not the same and that they should be. The overnights even state they are specifically made for 12 hours of absorption.*
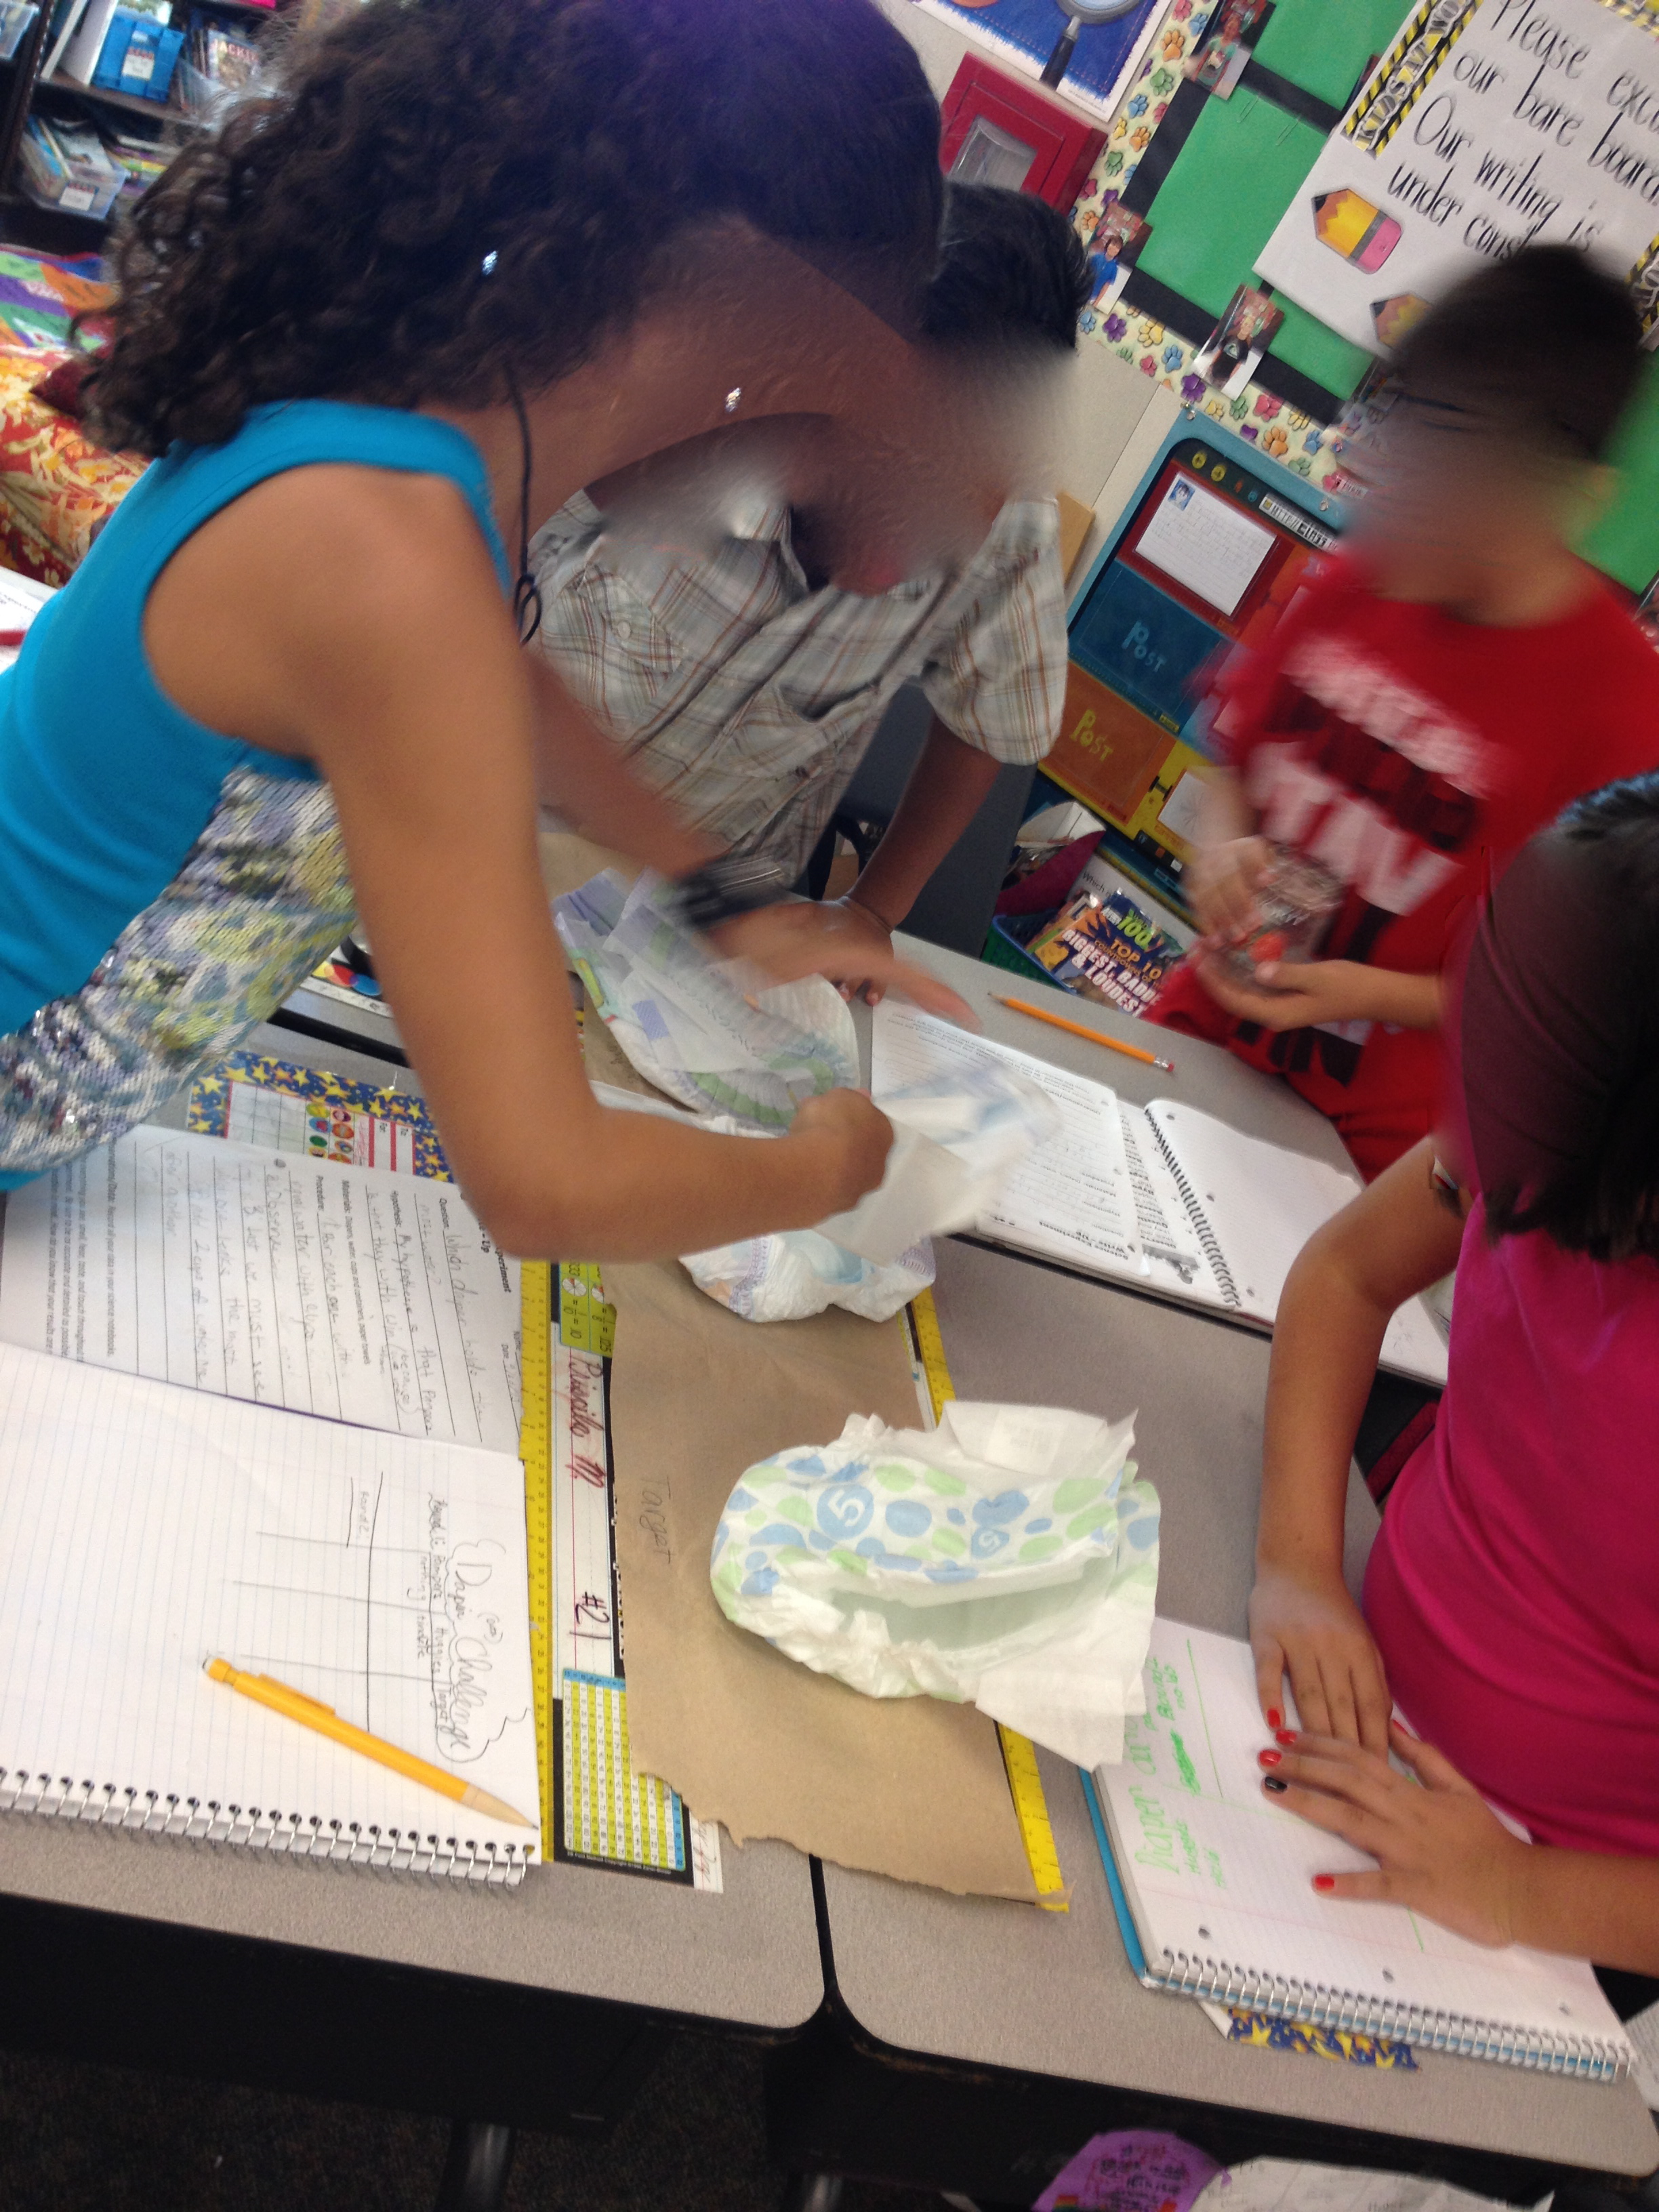
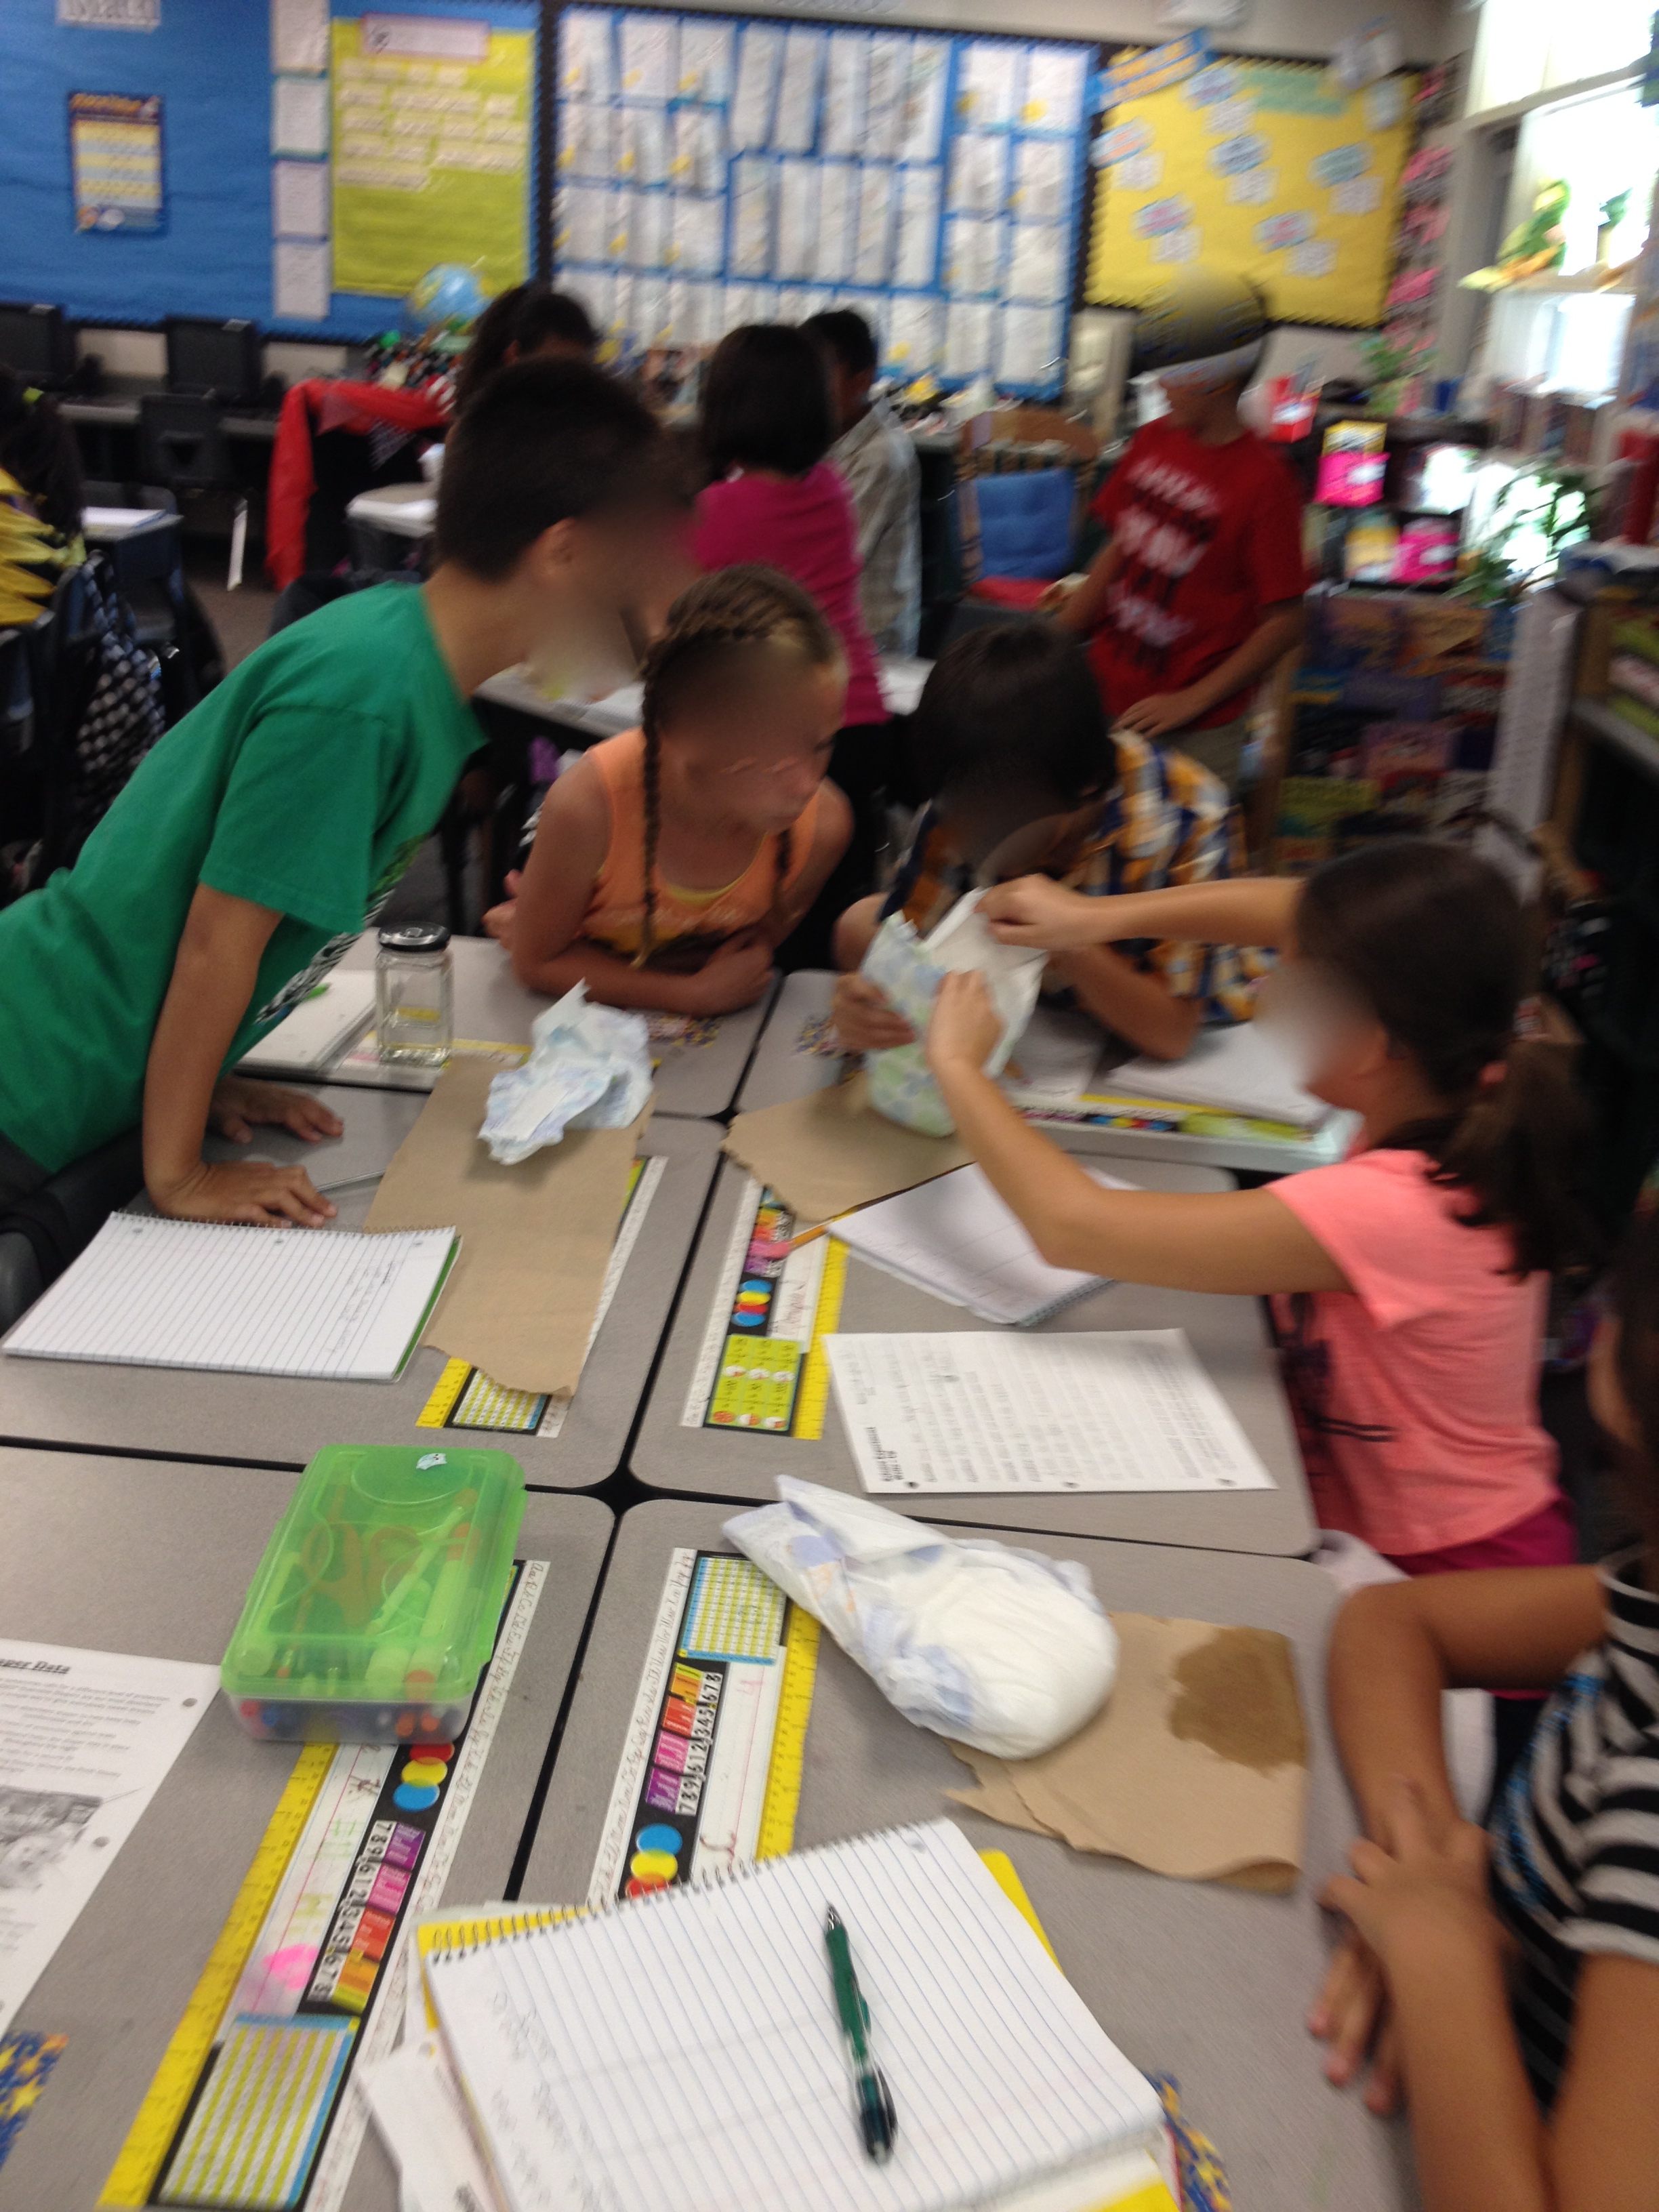
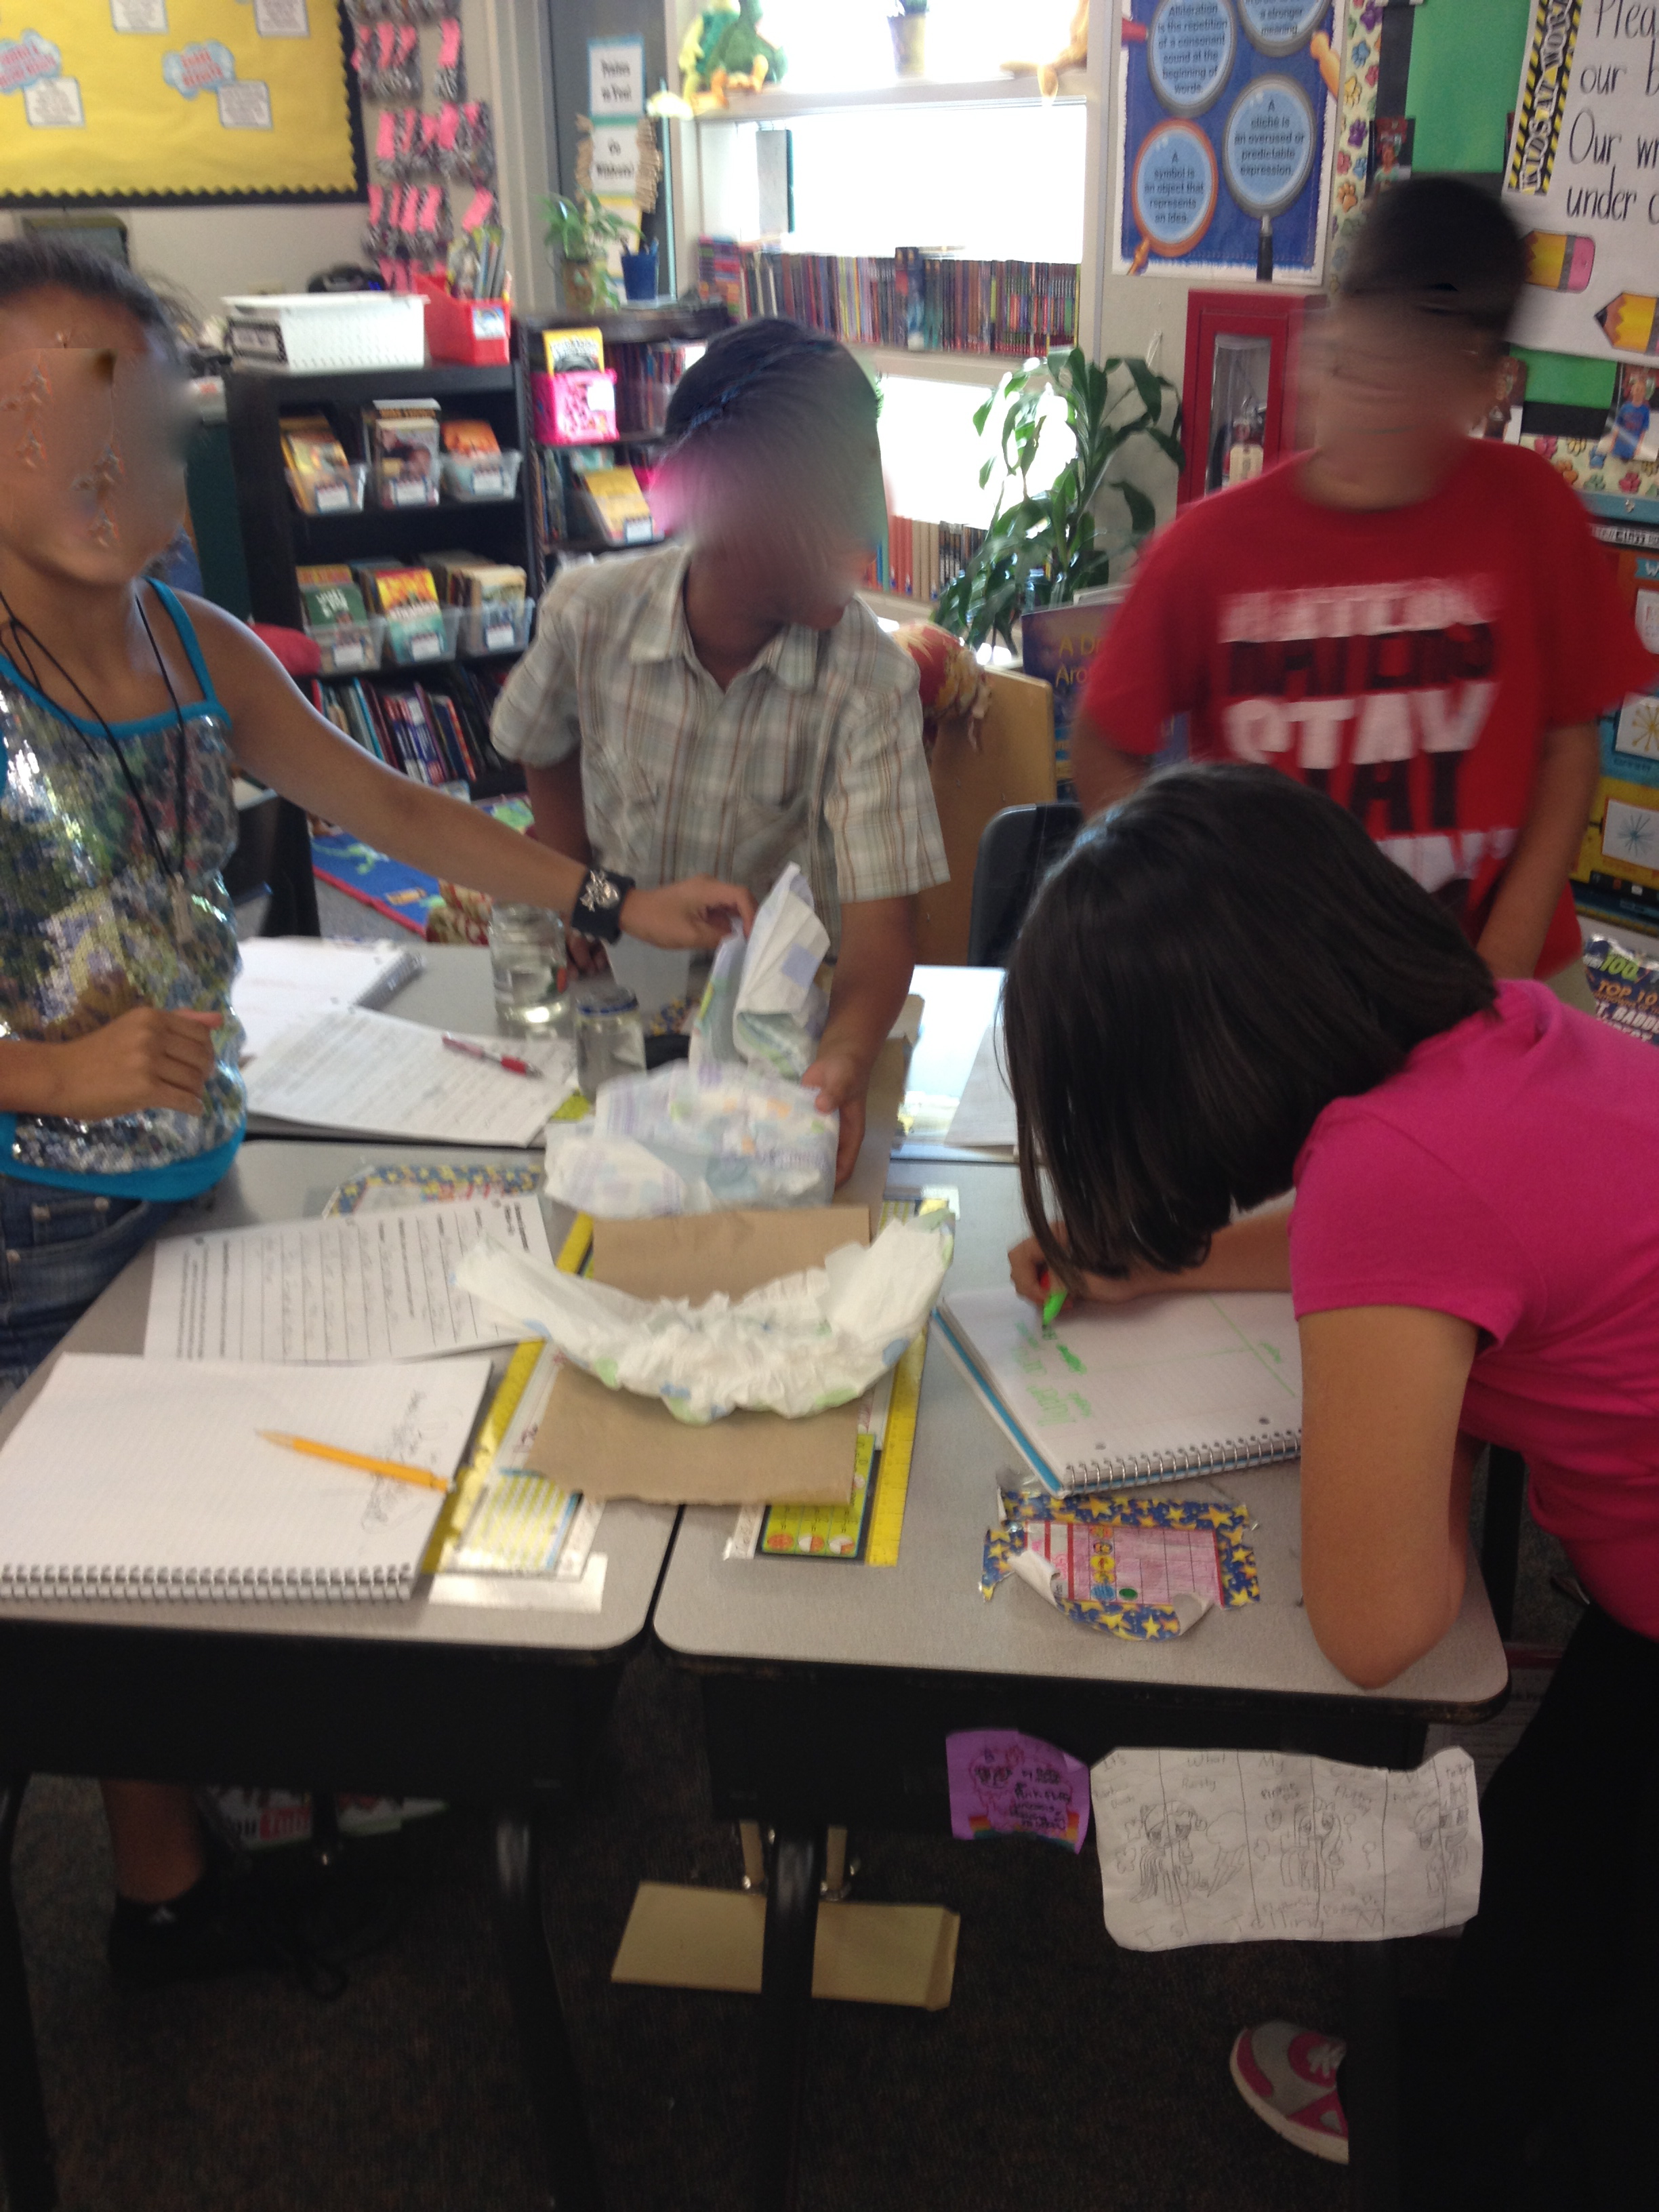
After each team has a hypothesis, THEY design their experiment and record all the necessary steps on the form. I simply tell them the materials they will have at their disposal and they plan the rest. Of course, I walk the room and monitor their discussion, but I do feel the best results occur if they are left alone on this first attempt. They learn SO much from their mistakes. For example, only 4 out of my 6 teams felt it was necessary to EQUALLY MEASURE the amount of water to be added to each diaper.
The next day the students conduct their experiments and record their observations in their notebooks. It’s pretty awesome how into it they all are. The experiment probably took about 30 minutes to complete and results were then discussed as a class.
One team was actually pretty organized with their diapers! They even labeled each diaper brand on the paper towels.Testing our diapers!Teams were so into this diaper experiment.
Every group, except one, found Huggies Overnights to hold the most water (of course!). We then began evaluating each team’s process and determining whether our results were valid. Finally, I exposed my secret about the overnight diaper. I immediately showed them a Bill Nye video on the importance variables and precise measurements in a science experiment.
We also ended up cutting the diapers open to reveal how in the world the diapers held so much water. This is another reason why I love this experiment. It fosters so many more questions the students have that lead to more investigation. Inside the diapers is a crazy gel like substance that starts off looking like cotton, but when it comes into contact with liquid has a chemical reaction which changes the entire look and feel of their material.
I finish up this lesson with a student journal reflection about what we would do differently if I let them do this again. Also, a homework assignment to research and find out what the material is inside of a diaper.
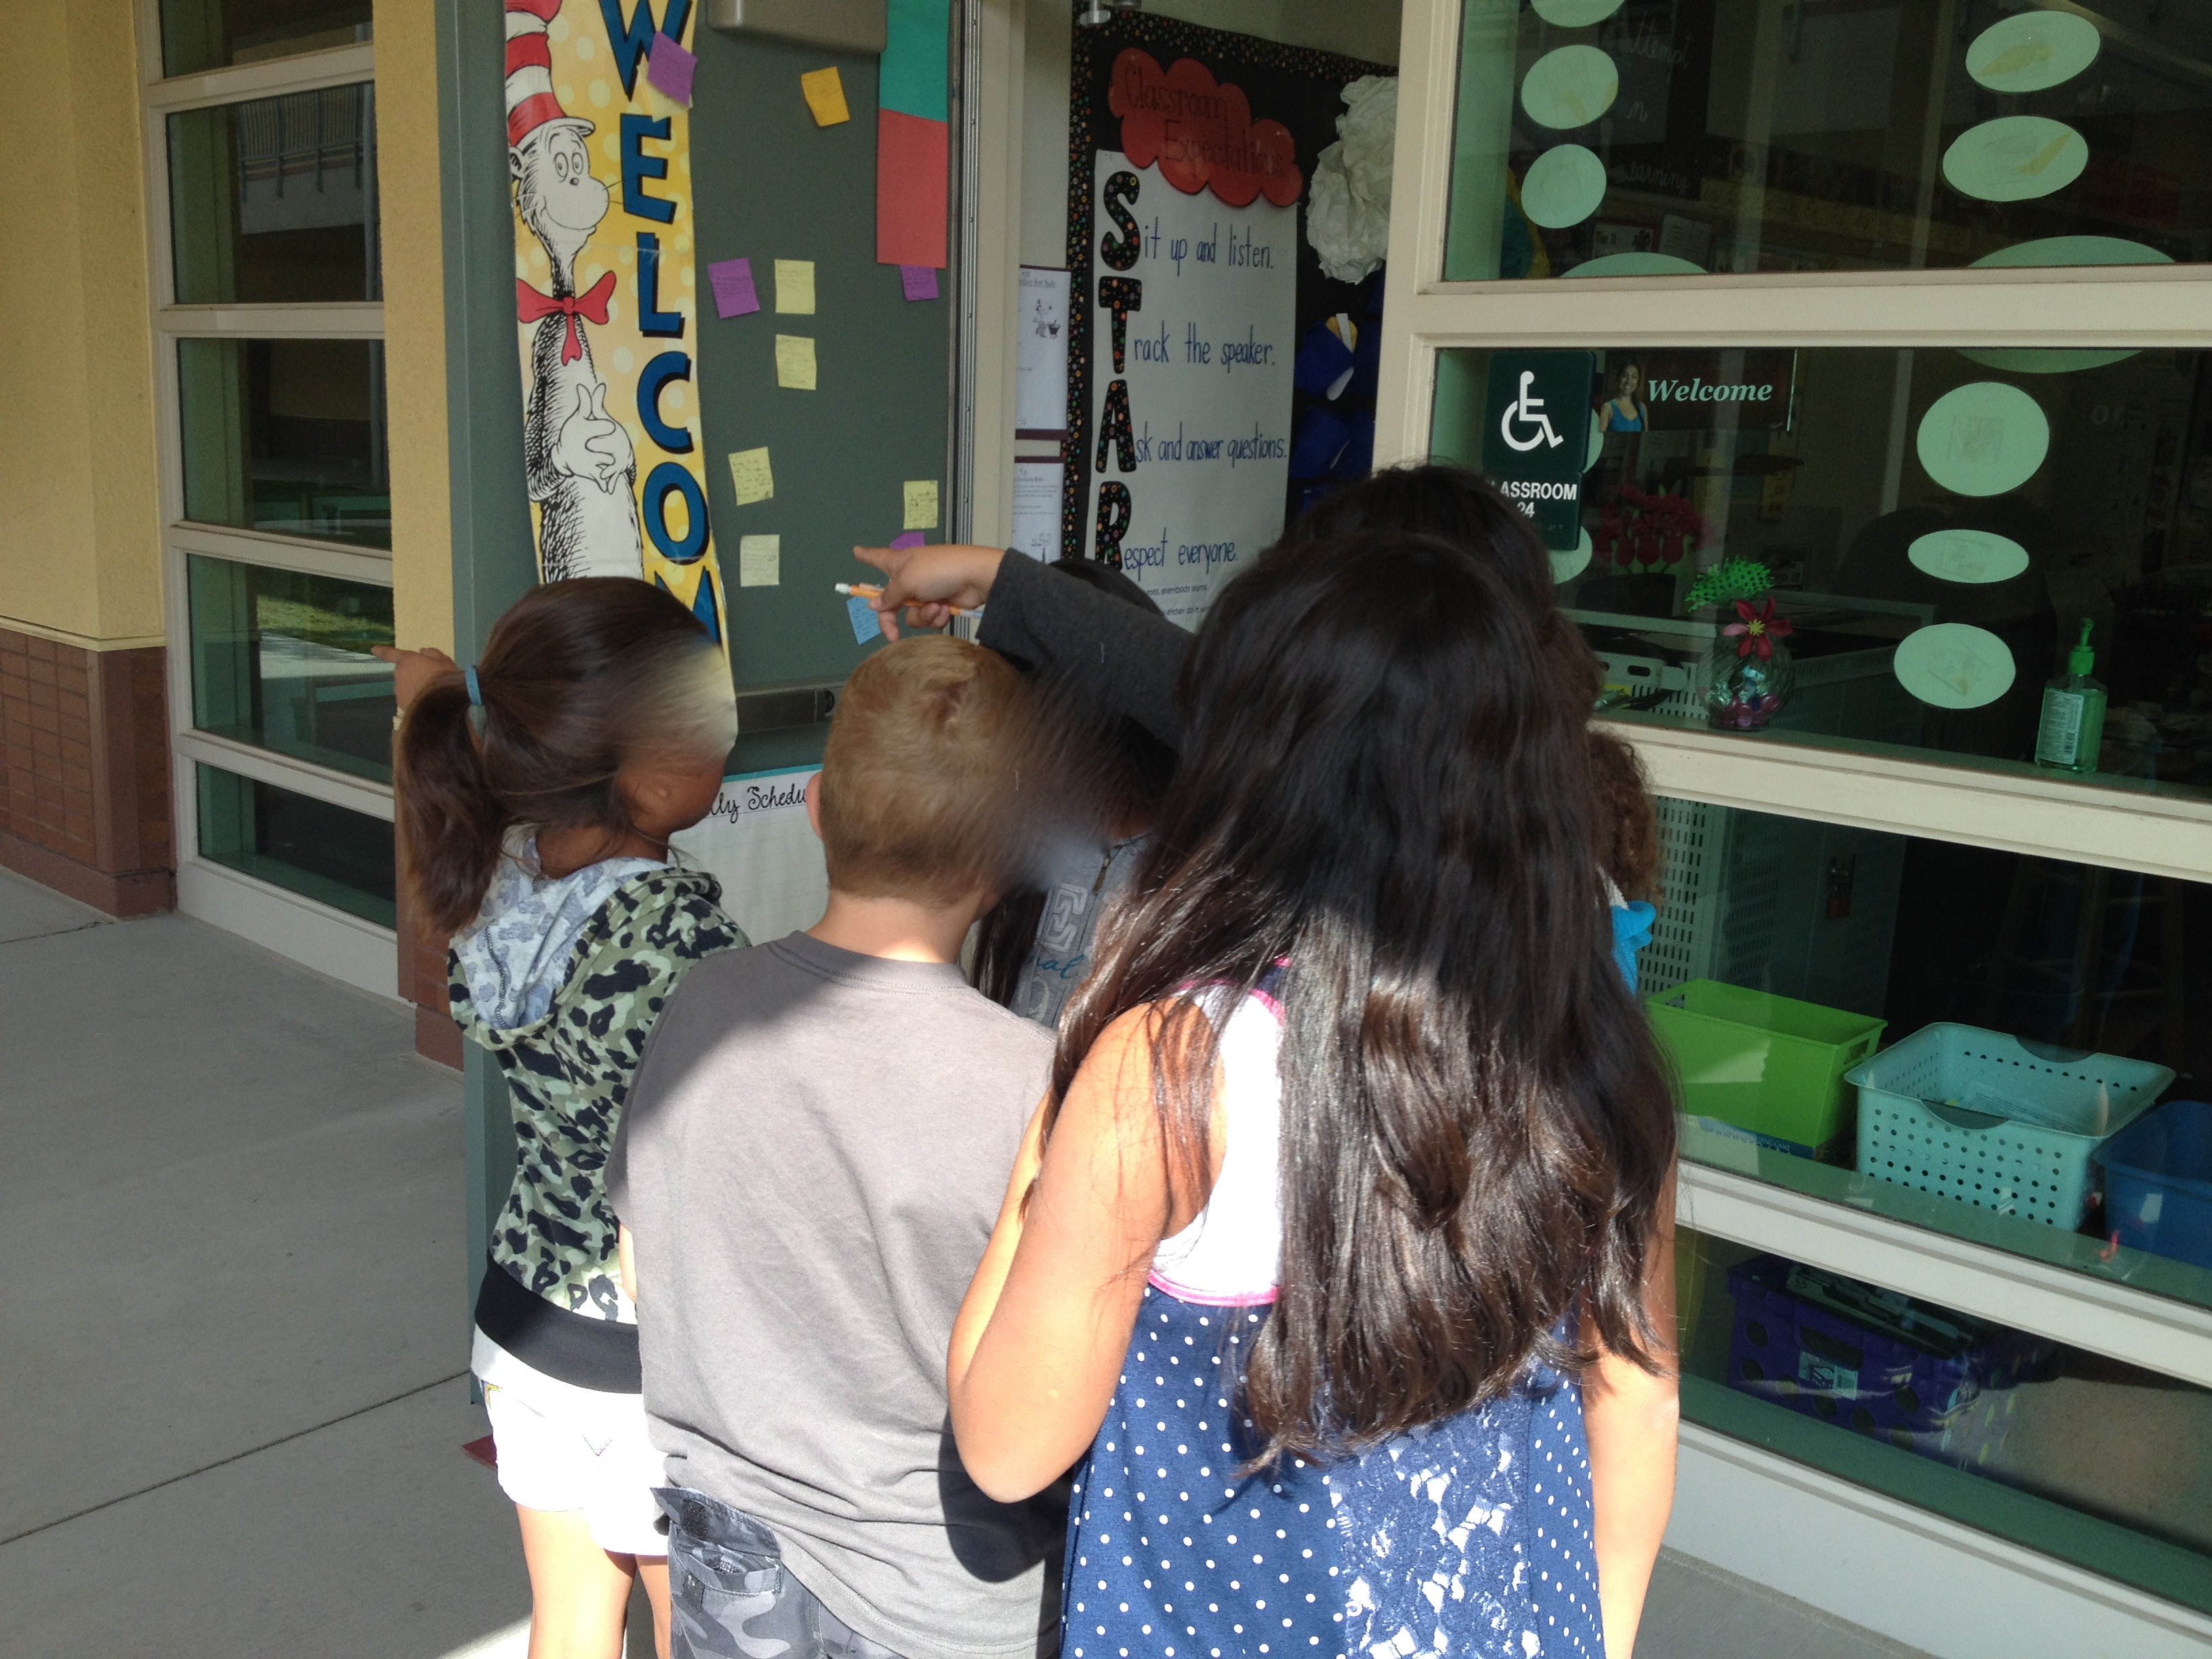
This is one of my favorite units….time to study early explorers! I tried this activity last year and the kids loved it, and I definitely loved watching the results.
To kick of this unit of early explorers, I have the students take on the Mapmaker Challenge. (Click to download document.)
Mapmaker Challenge activity to kick off our study of early explorers! Students truly realize how difficult it is to make a map.
The students are put into groups and assigned a different destination. Each group is to start at our room and end up in a different place. The first day of this activity I go over the instructions carefully. (At this point, we have already had lessons on using map skills and map features.) Students are then given about 15-20 minutes to “explore” the campus—meaning they take their notebooks with them and record EVERYTHING around them, especially landmarks, how many footsteps they have traveled, and in what direction. (I use the compass on my smartphone to tell them which way is north.)
Students then head back to the classroom to begin sketching their map on graph paper. My partner teacher had each group create ONE map, but I have each student draw their map individually even though their data should be the same. They can also help each other in this “planning stage”. The students then complete their maps for homework.
Collection of some of the different maps my students created.One student’s map: Voted most accurate of the campus
My objective for the lesson is to give the students a taste of what it must have been like to explore uncharted waters and territories and then record it accurately so others may follow your route. The students have such trouble creating an accurate map at a school they’ve been attending for years! It’s crazy!
The next day I collect the maps and select some, both good and bad, to try out during the day. Each team is given one map at a time. They are instructed to follow the map exactly and determine whether it’s accurate or not. This is where the fun starts! The kids are so excited to be let out of the classroom to follow the route. Tip: Be sure not to give students any map they made themselves. If you do, the student that made the map starts verbally explaining what their map says. This defeats the purpose. The students should be able to follow the route using the landmarks, legend, footstep count, etc.
I allowed each team to try more than one map because I wanted them to experience both good and bad. The conversations they were having were so interesting! They were very vocal with which maps were accurate and those that had some issues.
Mapmaker Challenge: Studying the map to figure out where to begin.Getting ready for the map challenge! Did the map work?Mapmaker Challenge: Did this map work?Mapmaker Challenge: This way guys!
Upon returning to the classroom, the students were bursting to share their thoughts. I told them they were NOT allowed to speak for 5 minutes and instead had to open up their journals and write about what just happened. After they wrote in their journals, we had a very lively discussion.
I just love this lesson because I can keep referring back to their “mapping” troubles while we learn about obstacles the explorers faced.
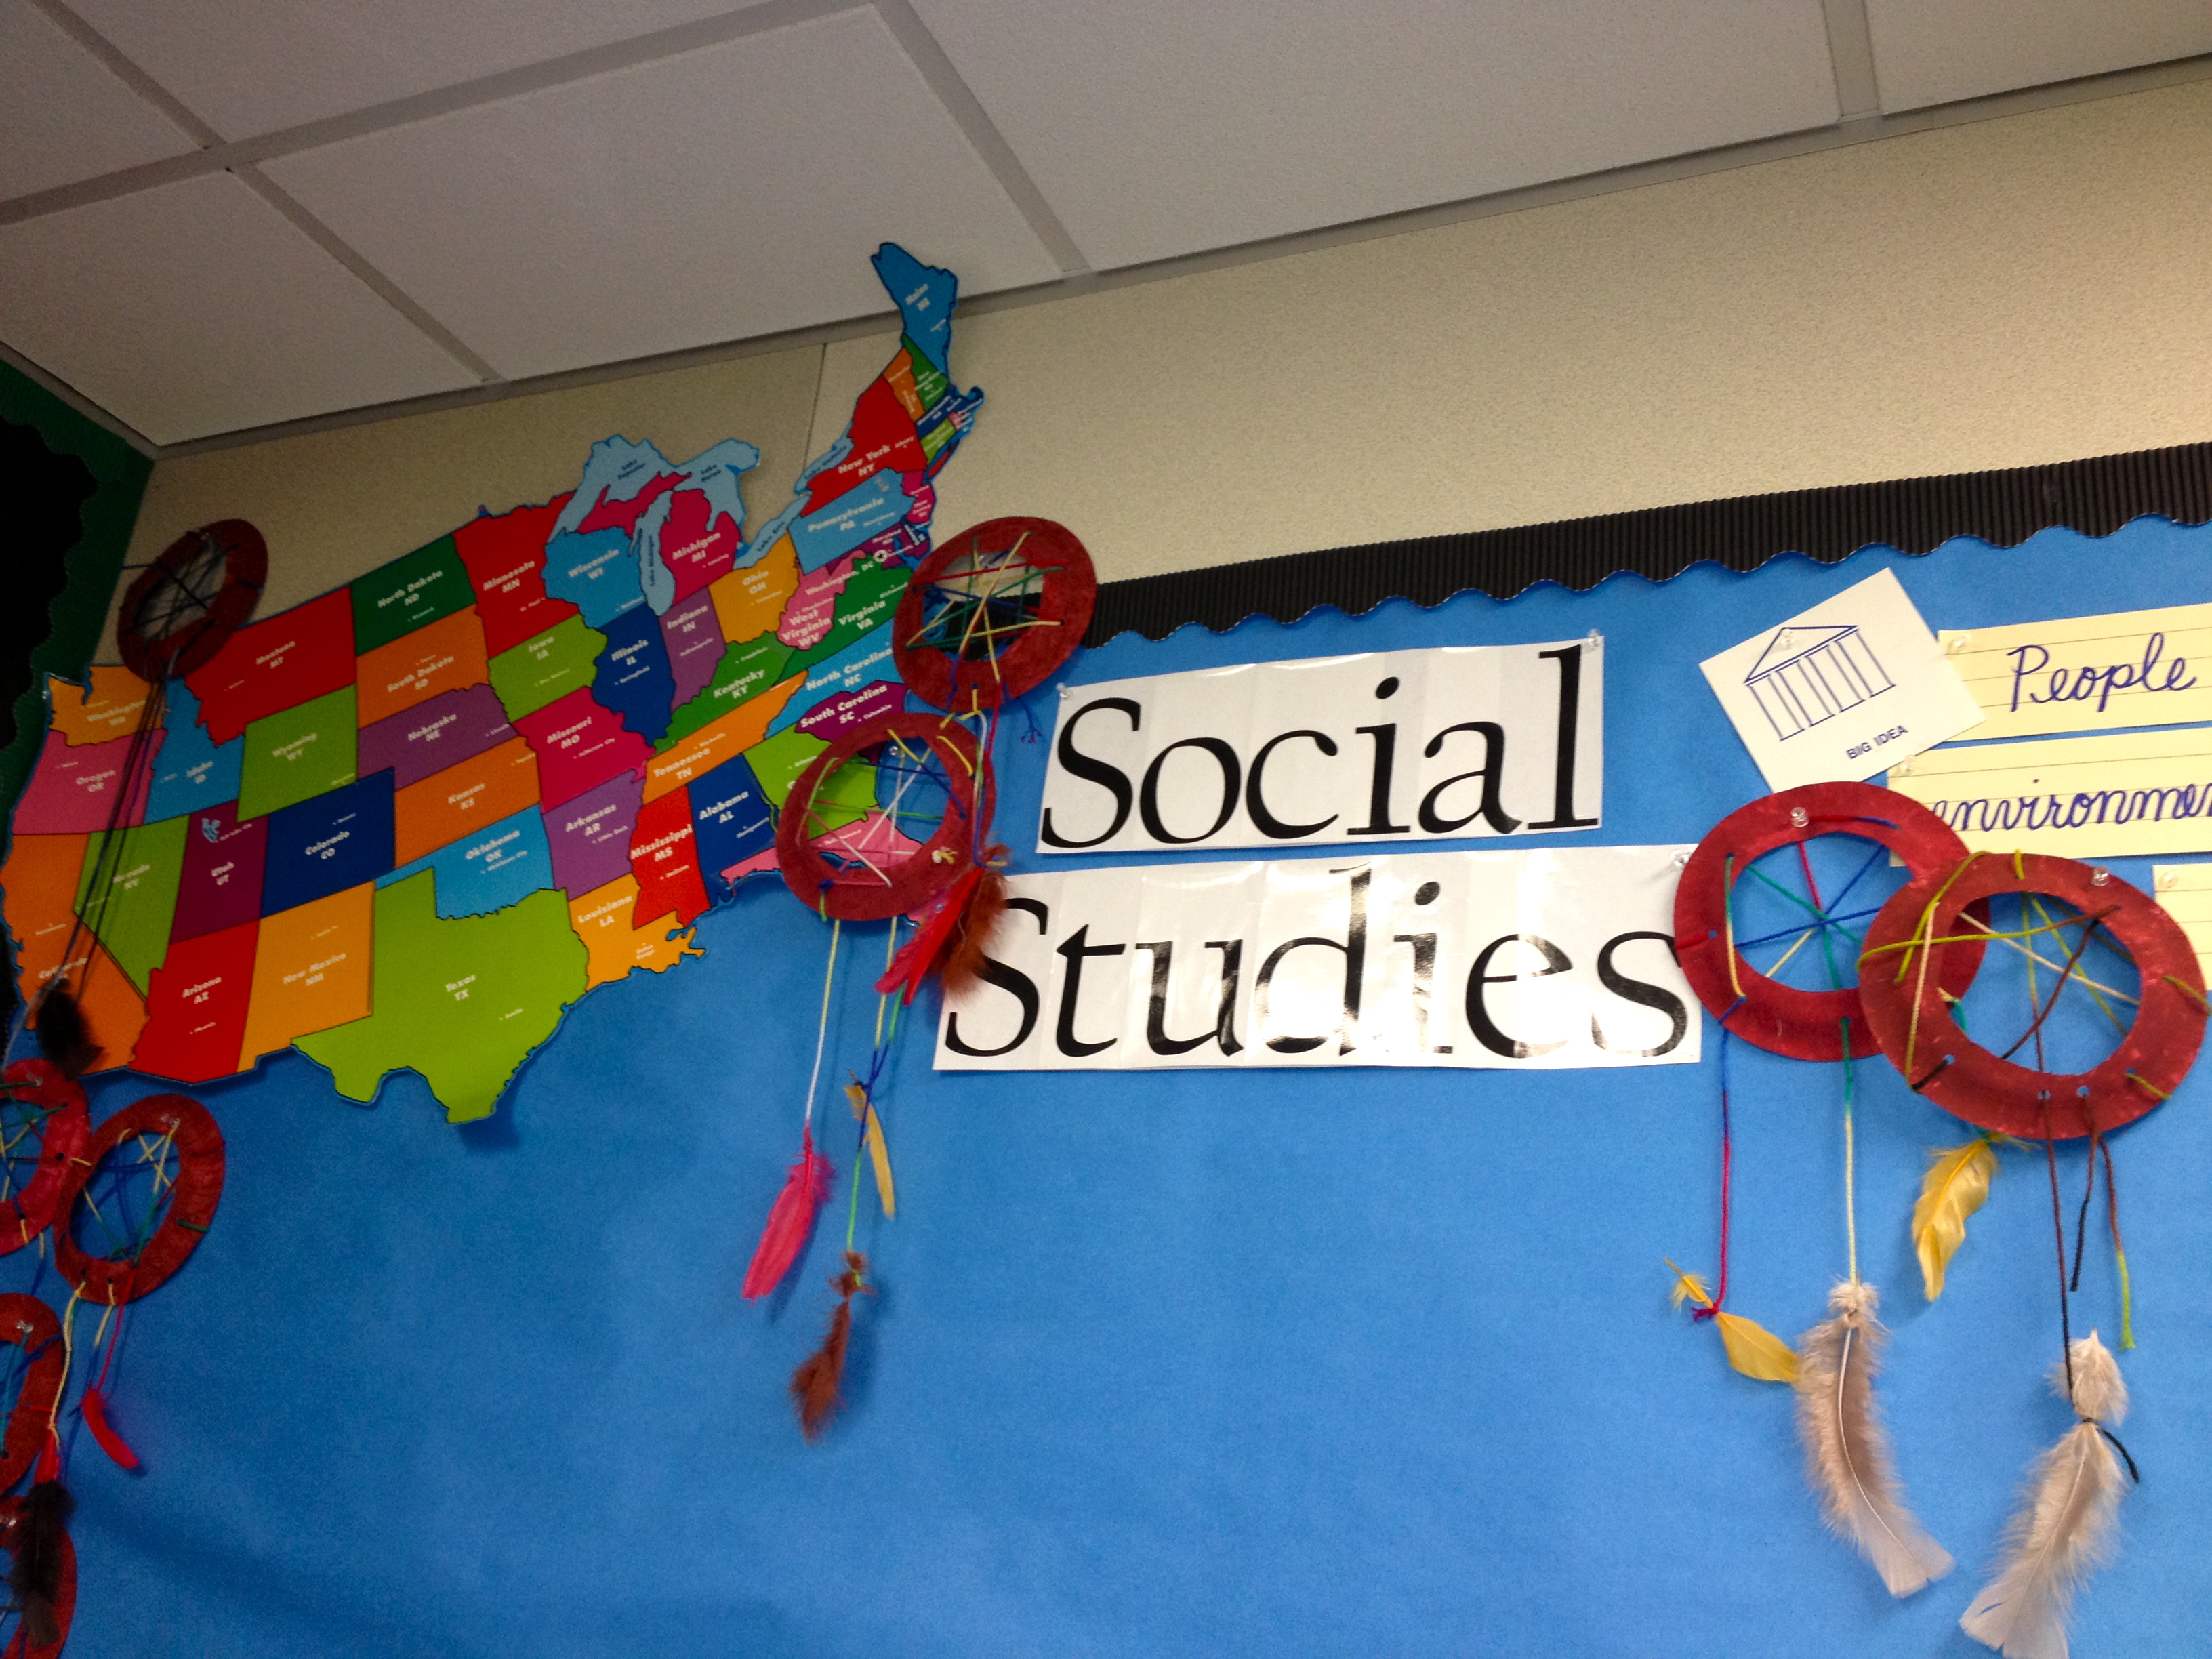
It’s finished– Our Native American Region tab books complete with dreamcatchers!Created this book to attack skills of drawing conclusions, main idea and details for each lesson of Chapter 2.
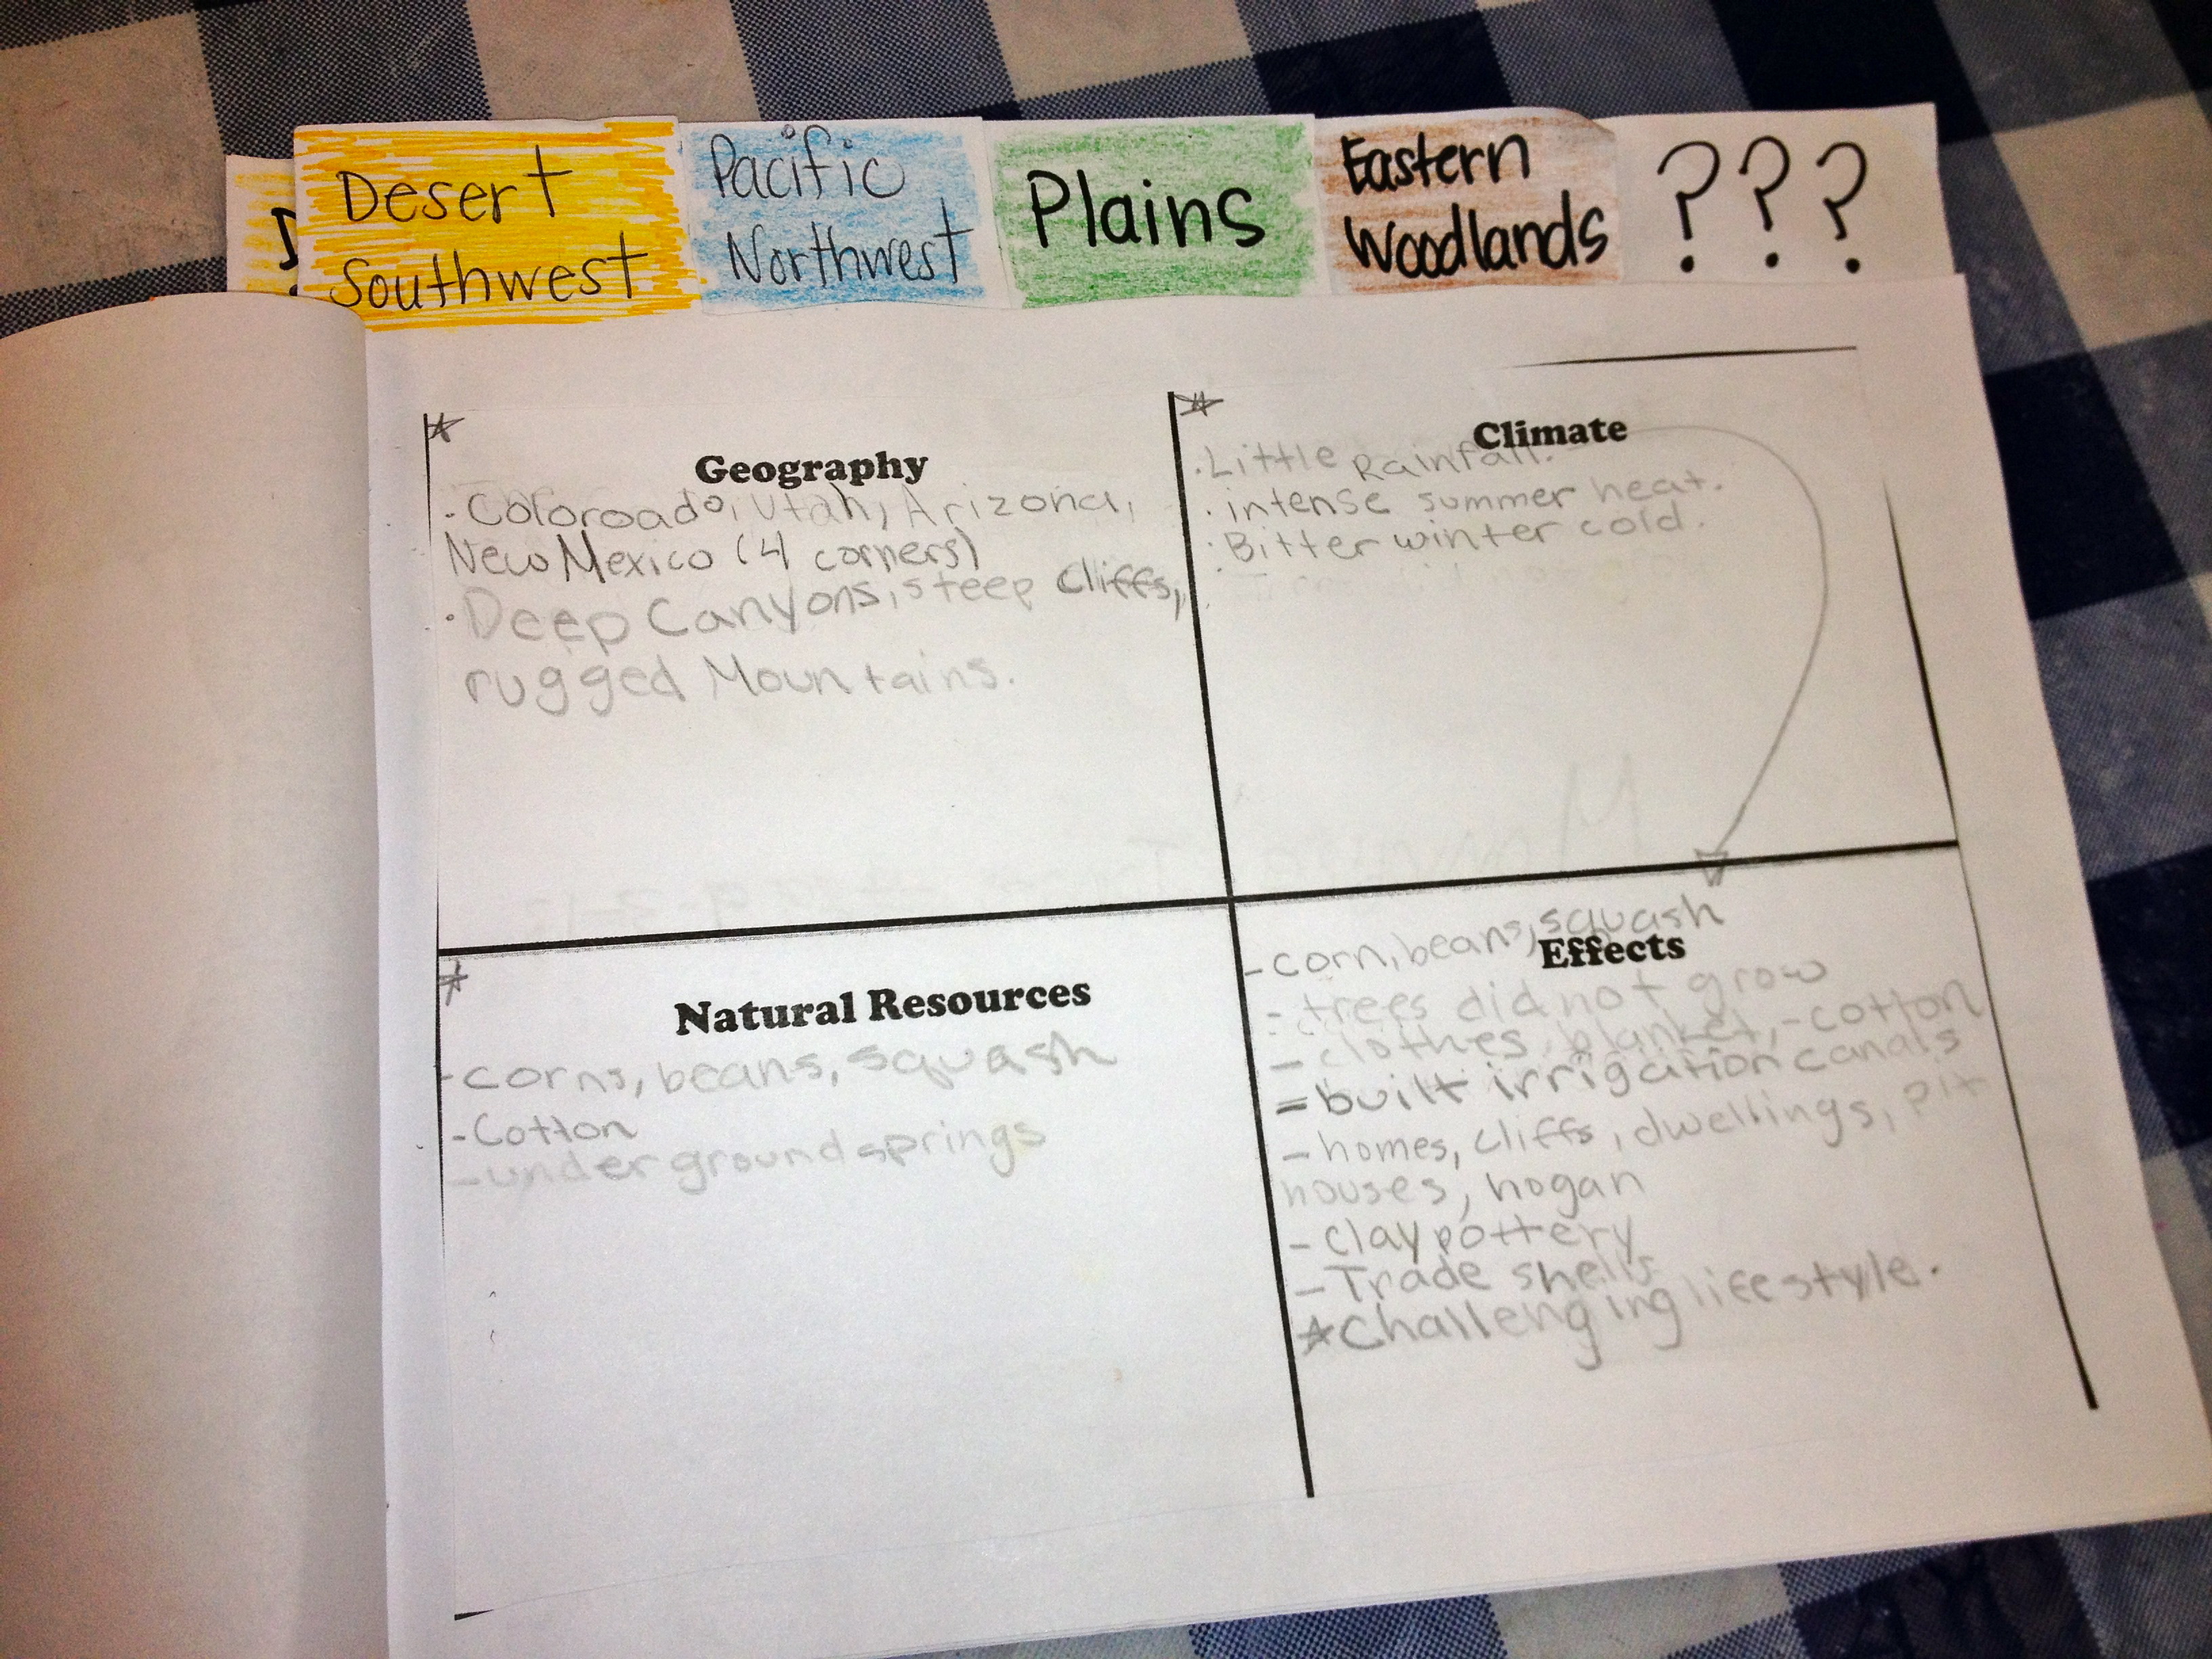
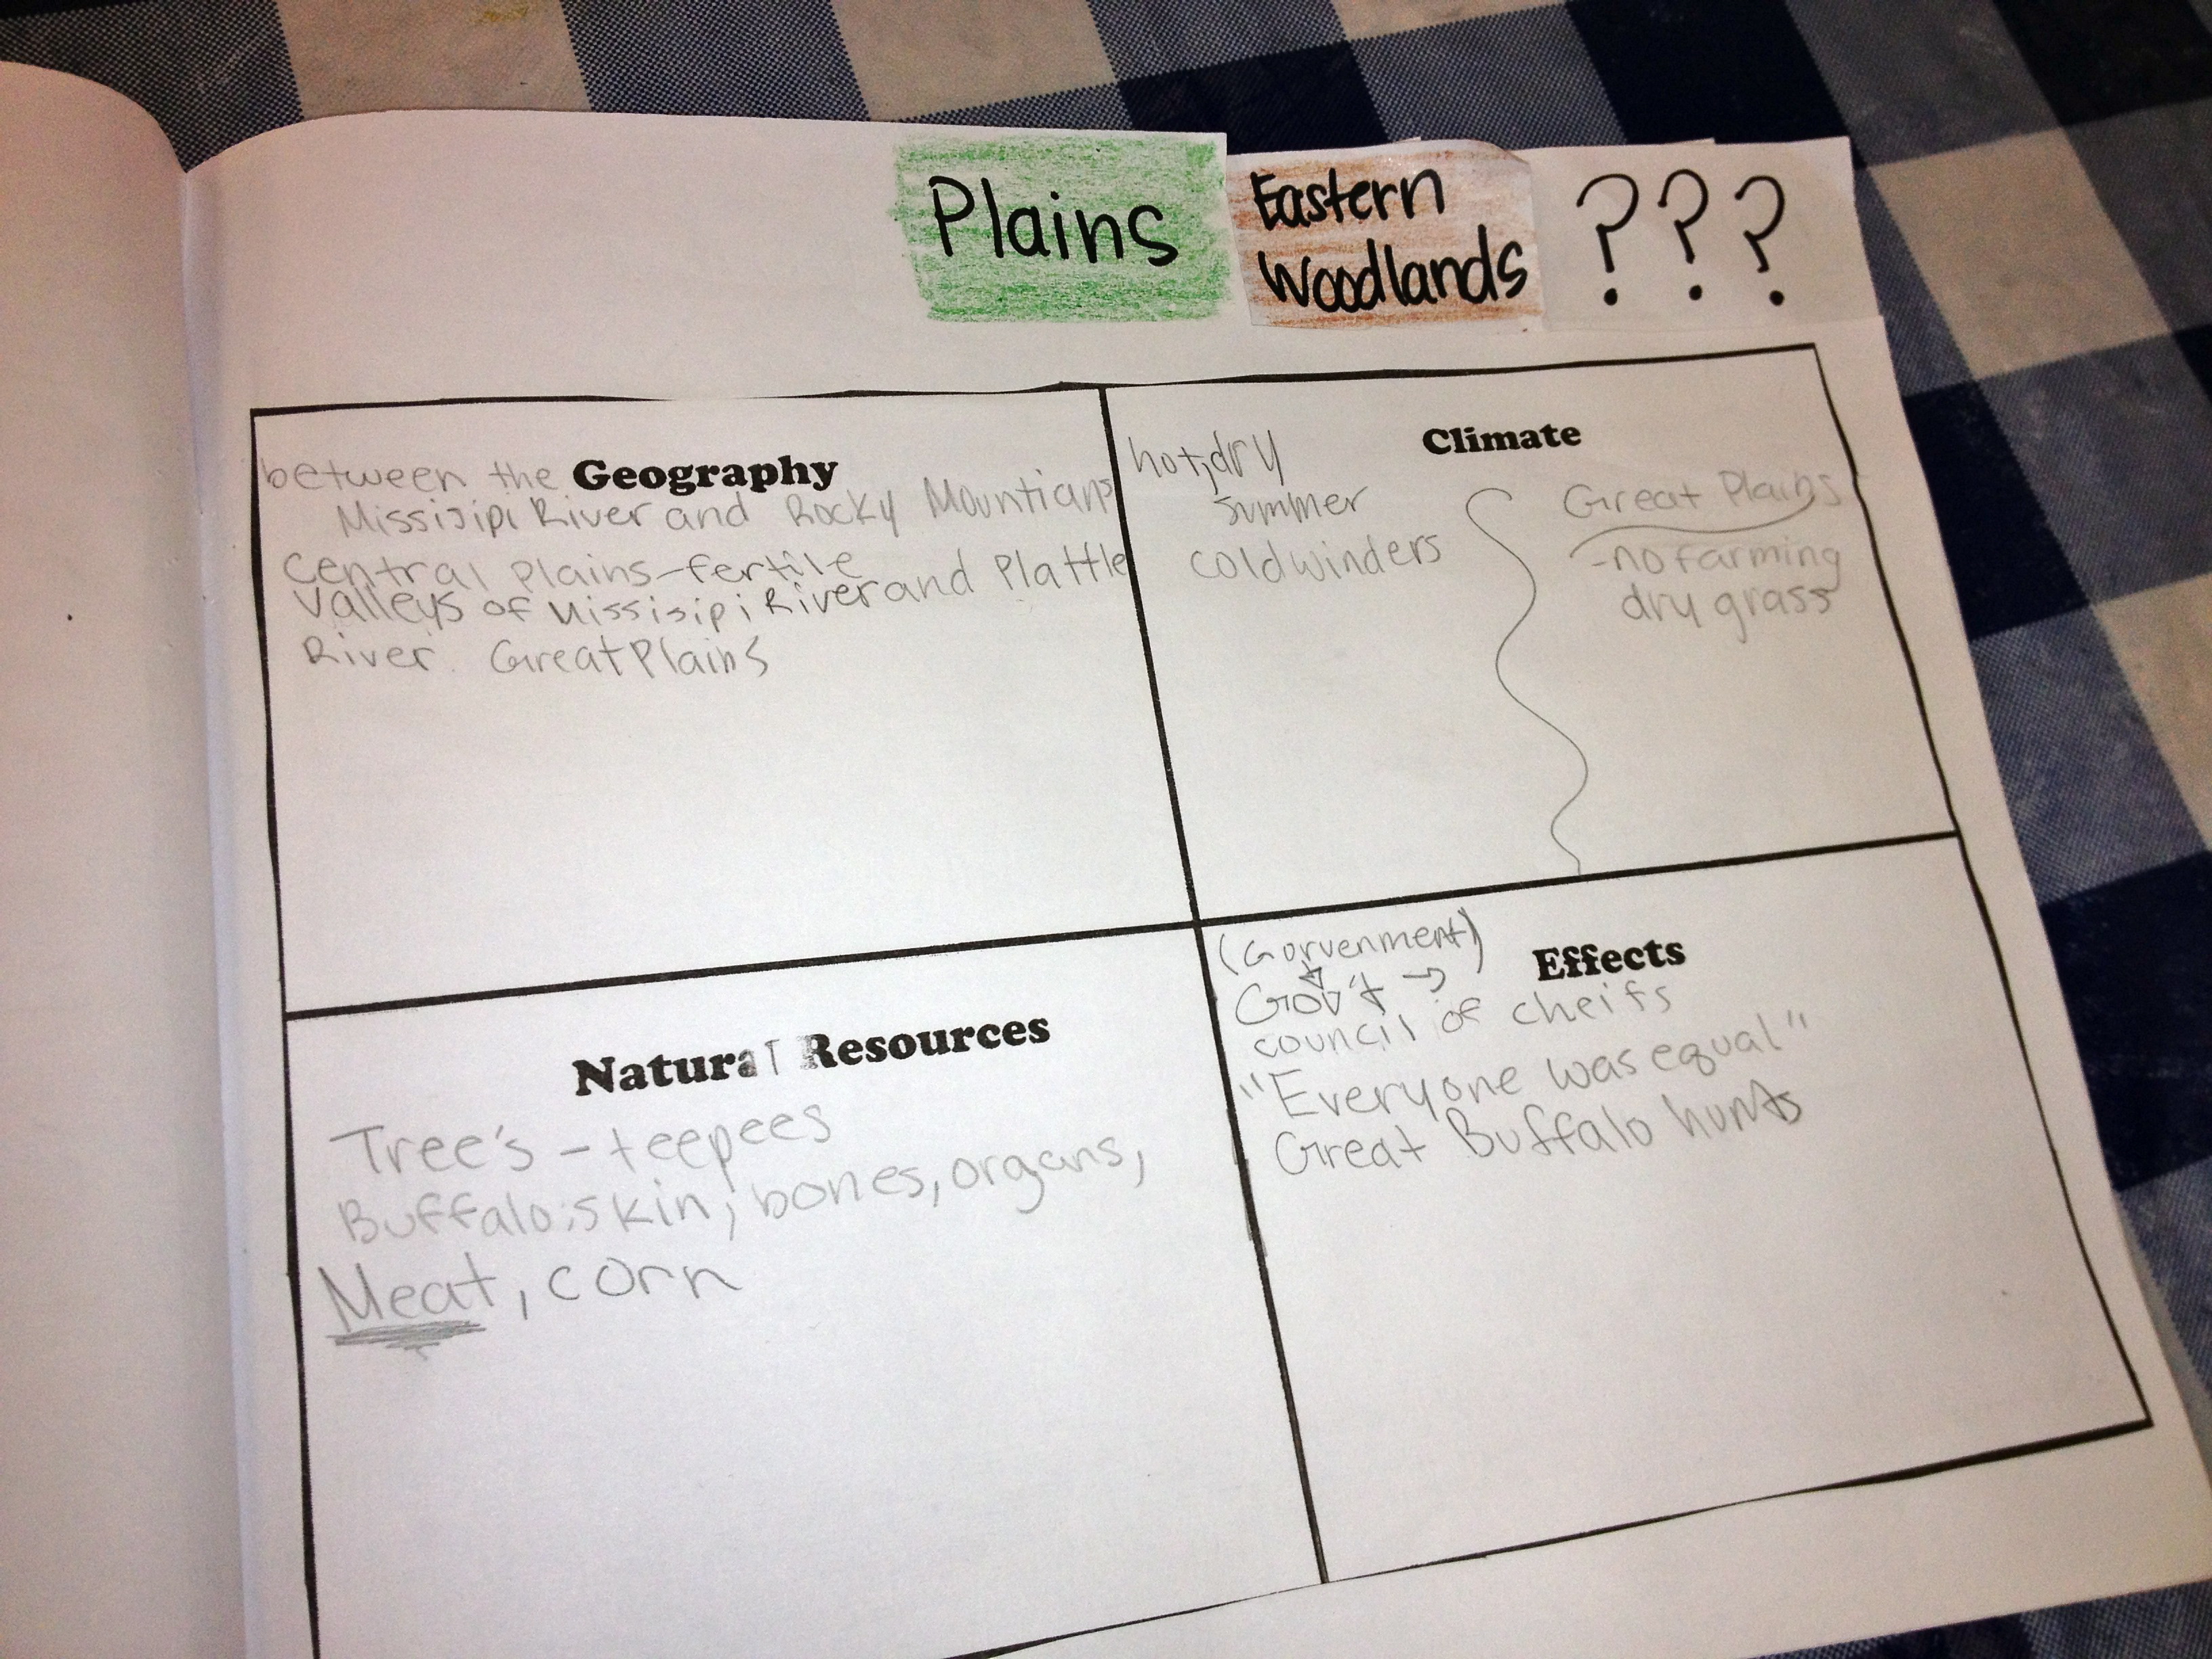
This year my partner teacher and I are really striving to pull the essential questions and desired comprehension skills we want students to achieve BEFORE we plan the unit or chapter. Chapter 2 of our social studies book is Native Americans and the different regions in the U.S. The big idea is that people need to use their environment to survive and that affects their lifestyle. Our HM comprehension skill for the week was also “drawing conclusions”. This is what we came up with. (It turned out well. Next year, I would make only a few minor adjustments.)
We had the students make a tab book for Lessons 1-4. Next year, I would include one for Lesson 5 “The Arctic”, but to be honest I ran out of time. I used the last page as their quiz/assessment. It’s designated with question marks. Each page has the same 4 quadrant grid with geography, climate, natural resources, and effects. (I actually already changed the “effects” to daily lifestyle because I believe it fits better and makes more sense to the students. They need to gather all information before they can make any sort of reasonable conclusion.) This helps in the reading instruction because I can focus on pulling only the main idea and important facts/details for each section of the grid.
I used the book as a resource along with books from our school library and videos from discovery education (about 15 min. long per region.) The first two lessons we completed as a class. The next one was completed with partners and the final grid was completed individually to determine if the students could search their text for all the necessary information. We color coded each tab to match the region of the map on the front cover.
Used the same 4 quadrant grid for each lesson–geography, climate, natural resources, and effects.Changed the last quadrant to daily life after reflecting upon the lesson. Think it fits better. The last page dealt with drawing conclusions from what we learned.
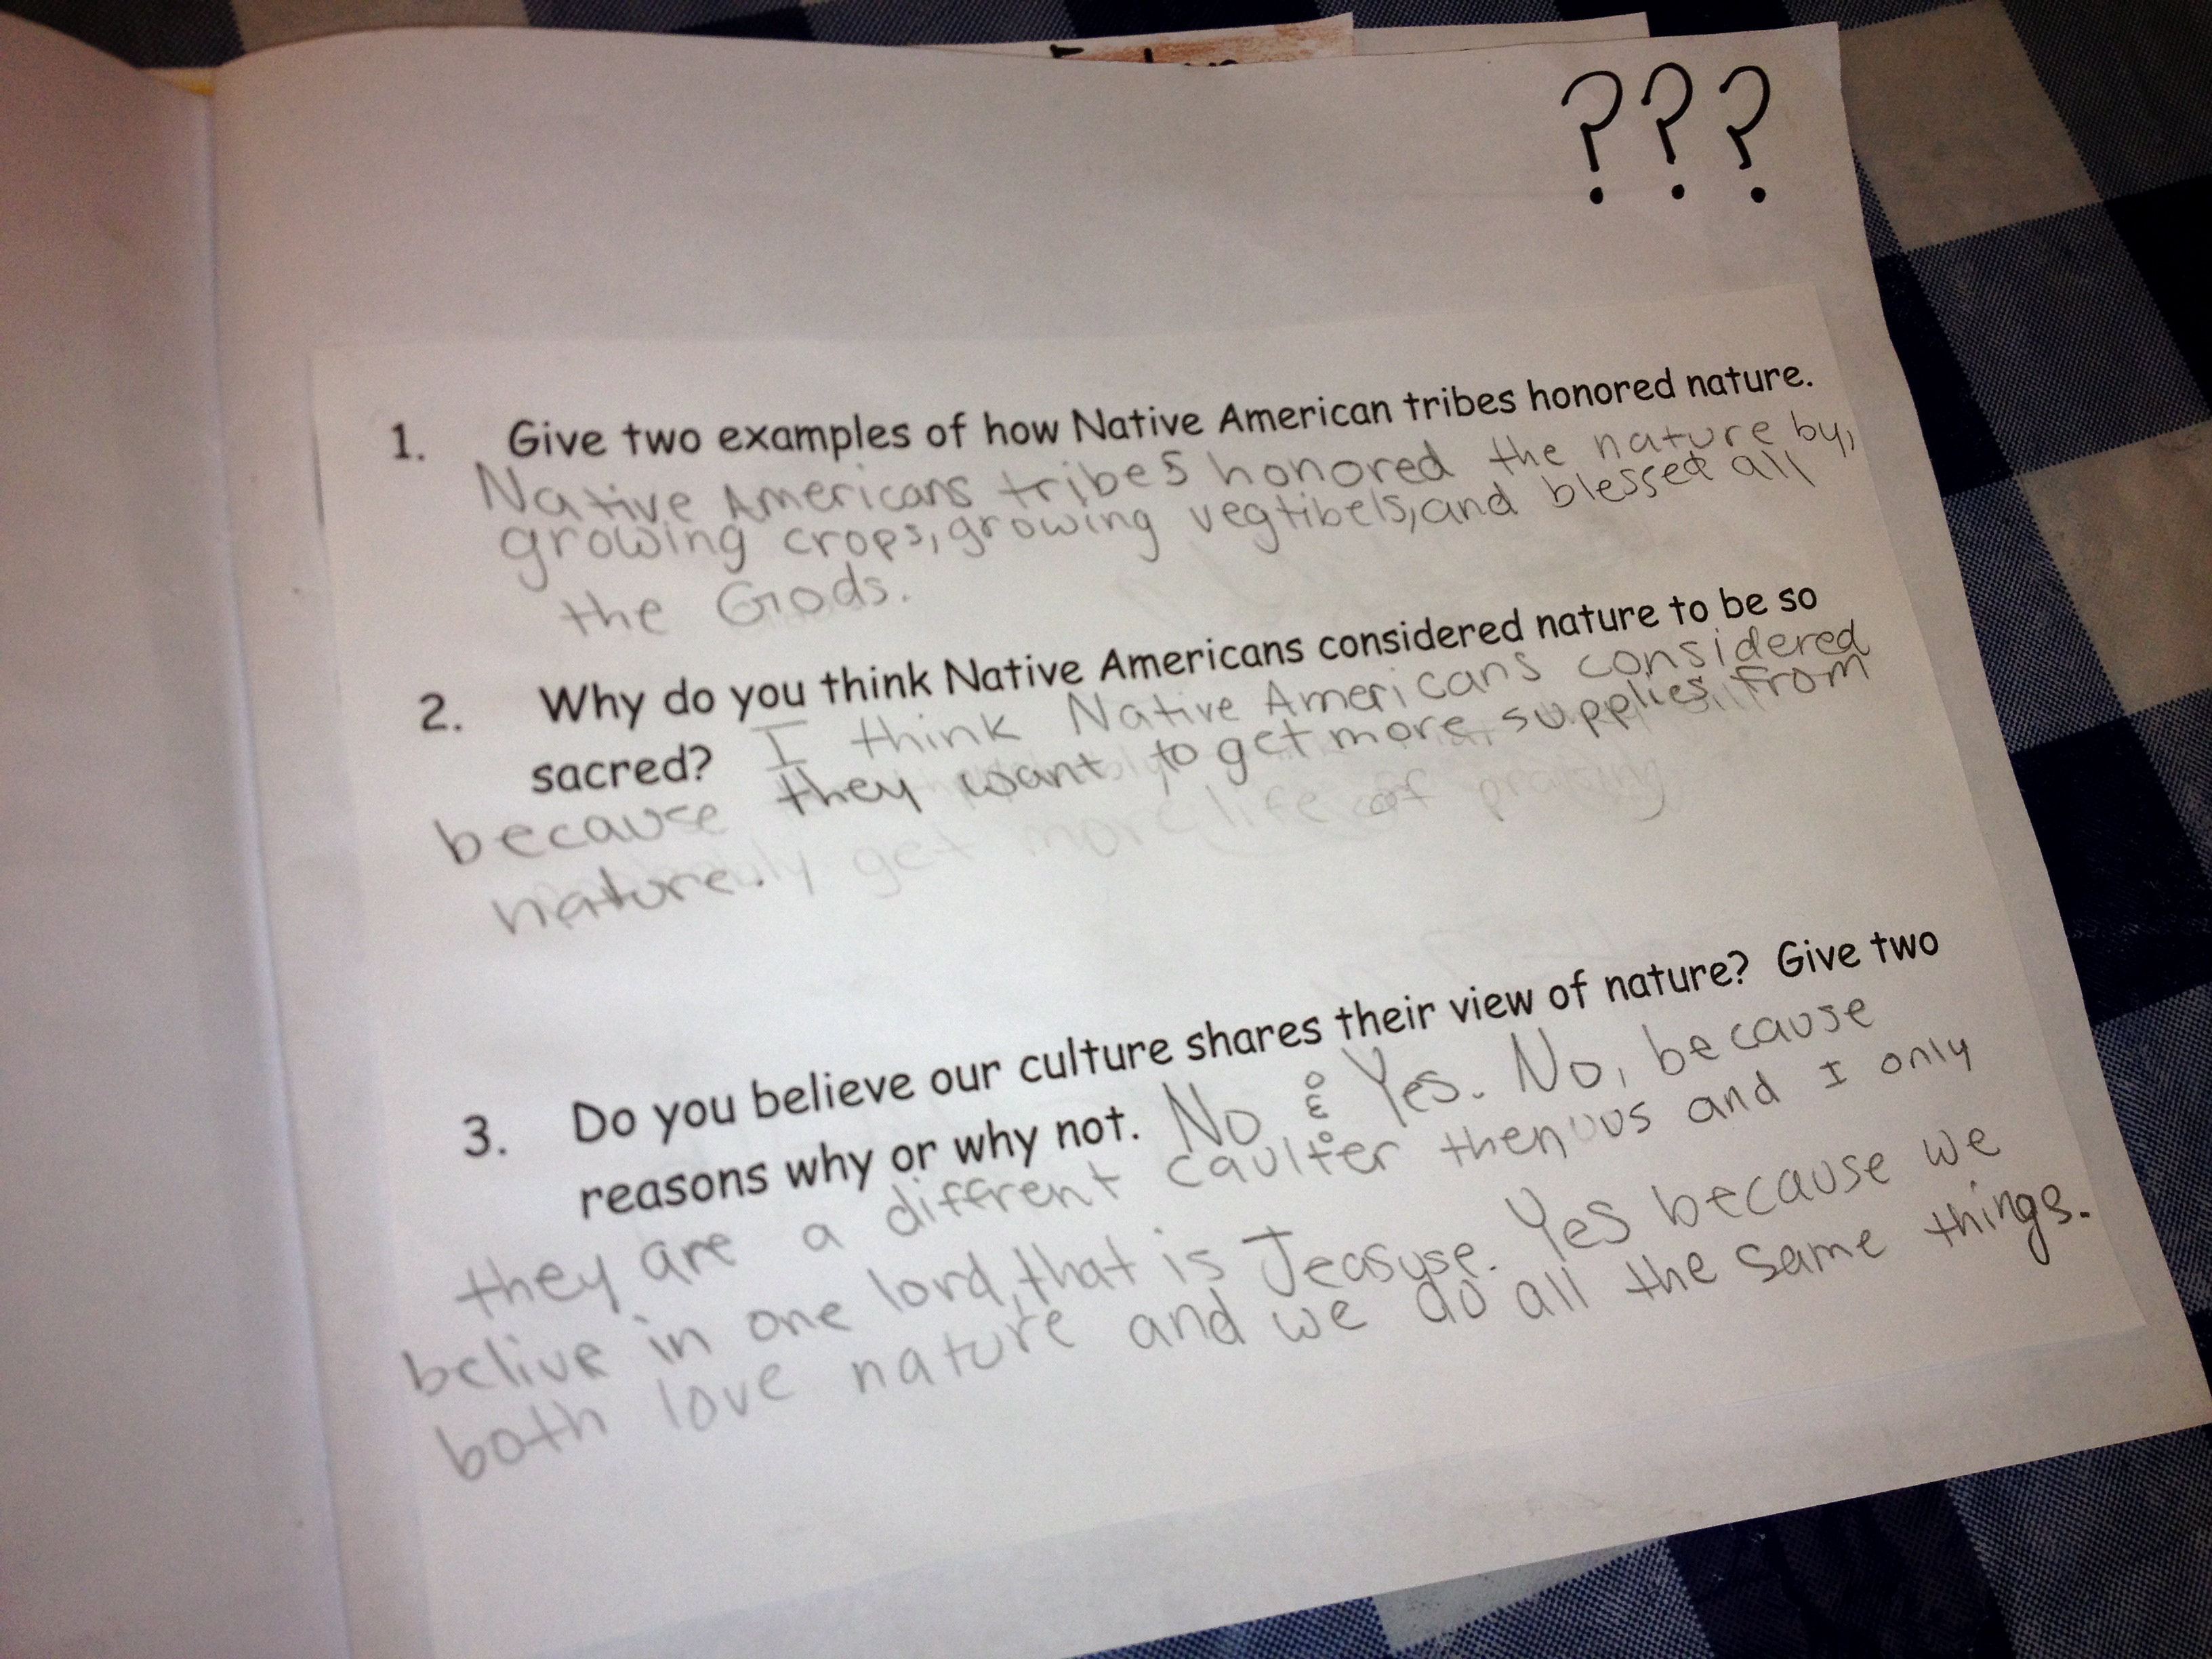
The last page has 3 questions that students will not be able to find the answers directly in the text. They must use evidence from the text to support their conclusions, but have to come up with their own answers from everything we had learned and discussed in the past weeks. From the assessments, I have a very good idea of where my instruction needs to go next…which is a good thing.
This was the assessment used to determine if the students could draw reasonable conclusions from reading the text and use those details and facts to support conclusions made. It was very interesting.
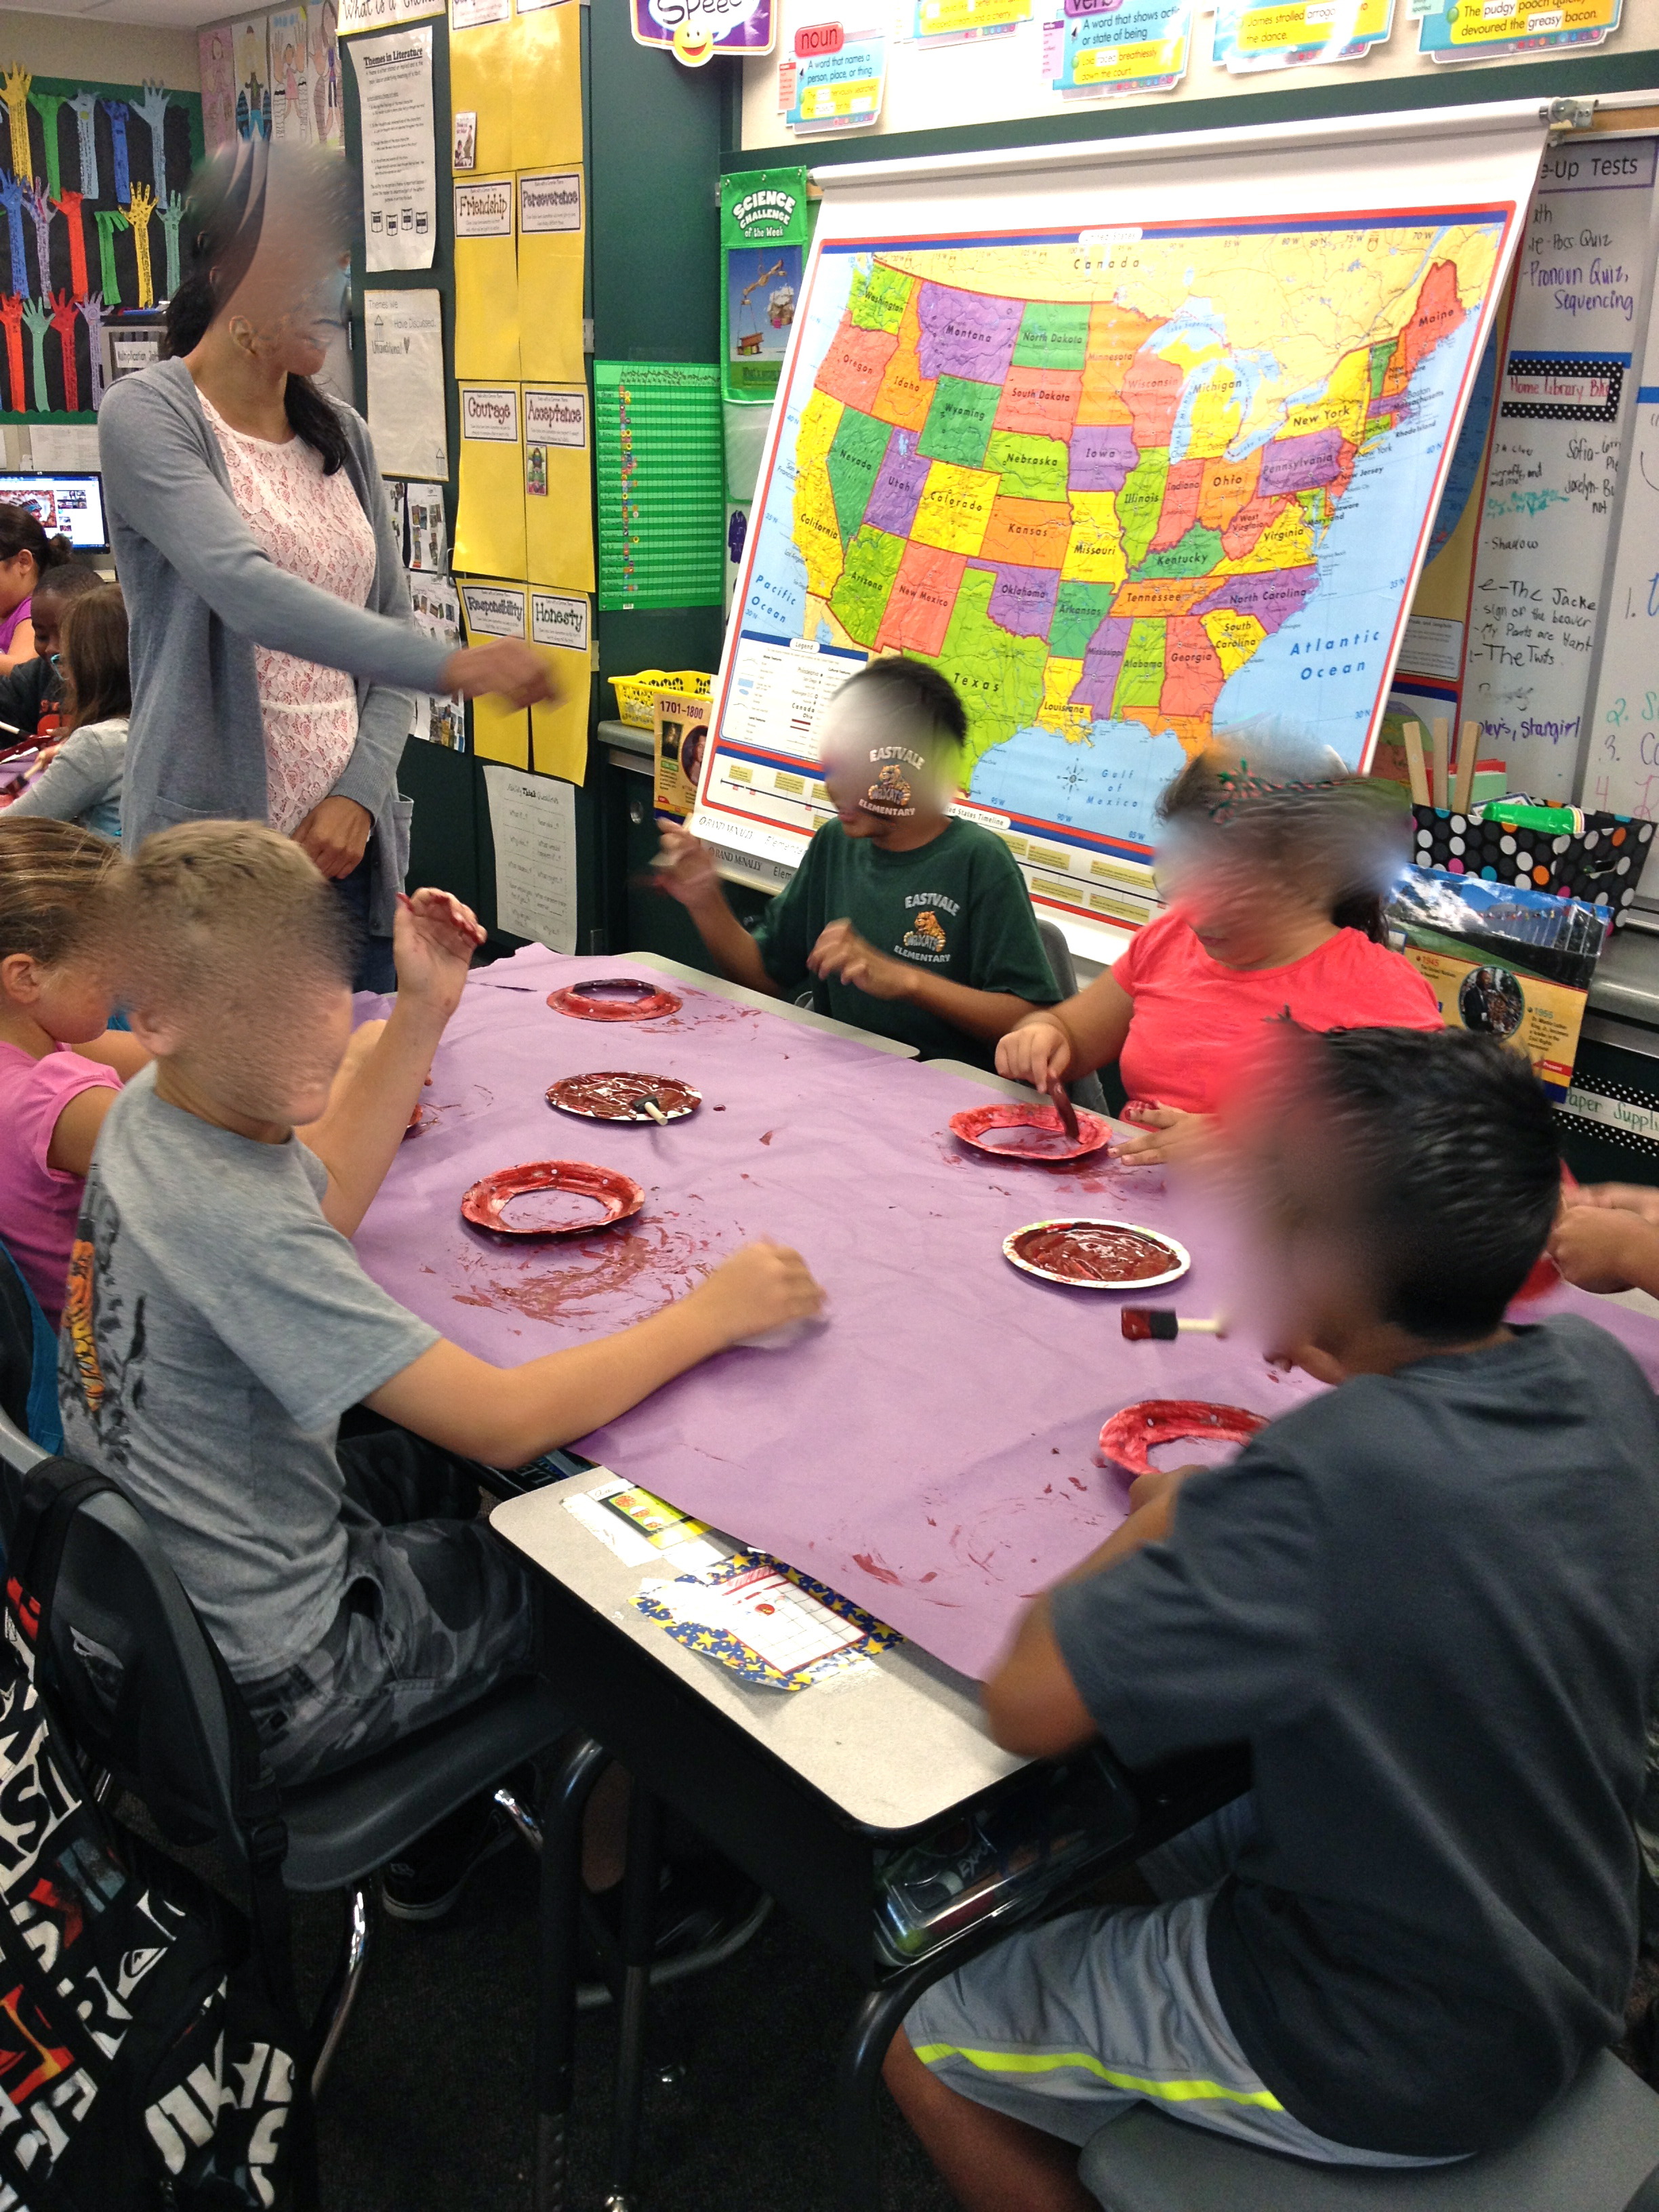
And finally, after all this gathering of information, we felt the students were missing some of the beautiful, cultural aspects of these people so we had the students read myths and legends during our language arts instruction in reading groups AND make their own dreamcatchers. I found simple instructions online and materials needed were: paint, paper plates, yarn, and feathers. The students loved it! I had them paint the plates Friday morning so by the afternoon, we could decorate. We read a short passage on dreamcatchers before we began and played some tribal flute music during the rest of the lesson.
I’ll add pictures of my finished board later…forgot to snap it before I left. Click here for the entire document-Native American Tab Book
Not nearly finished board, but looking good nonetheless.Dreamcatchers going up on display! Love them!
I’ve gone back and forth on this and I have come to a final decision. So many teachers are out there trying to figure out the best ways to guide students to a love of reading and a desire for learning. In past posts, I have mentioned books I have read such as The Book Whisperer (again, highly recommended), Beth Newingham (google her), and other research as done by Fountas and Pinnell of reader’s notebooks. Recently went to a training and was recommended Mosaic of Thought, which I have just purchased (will write my thoughts on that at a later time), and met an amazing woman– Carol Jago. She has inspired me to be open and share thing with my fellow educators in hopes that we all can work together and improve our instruction for students. (Just recently purchased her book Rigor for All, as well.) Yikes! I’ve got a lot of reading to do…..
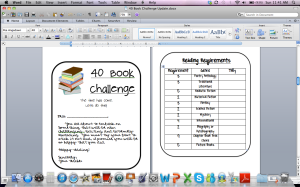
Anyway, this year I began a “40 Book Challenge” in Reader’s Notebooks for my students. Instructions and all are included in this download so I won’t explain any of that. I’d simply like to take time to reflect on my results thus far, and changes I have already made and what I will plan on making for next year.
So far, I am extremely happy with the results. The first month of response letters and weekly schedules were a little rough. I’ve had to stick a couple of reminder lessons of my expectations in my lesson plans. You know how it is teaching kids a new system…and, let’s face it, even myself. I’ve had to refine my instructions. For example, each week I expect ONE FULL PAGE response. Some of my kids are now typing their responses as their handwriting is just too…..how shall I put it….sloppy? That’s it.
I would like to see their responses move from simple retells to basic plot summaries and more opinion and critique-type styles, but we’re working on that. I also had a book talk (included in the download) oral presentation. I wanted a little more substance so I revised another one which will take place in a couple of weeks. I’m excited to compare the results!
Overall, getting rid of AR (which I did last year) and starting this has allowed me to treat my students like real readers!! Which they are!! It’s amazing how much more I’m learning about them through these letters. Yes, it is a major time commitment and at times I question my own program…. Do I need to respond to every kid, every week??? But the answer in my heart is yes, even if it’s just a couple of sentences. The students feel very special receiving that note. They know I care.
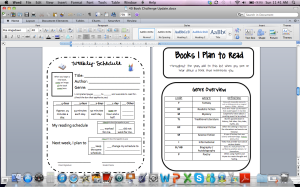
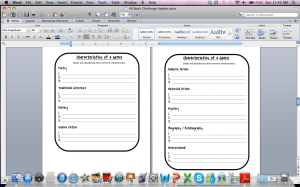
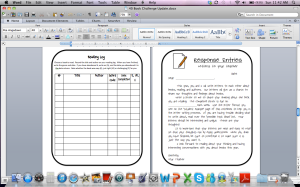
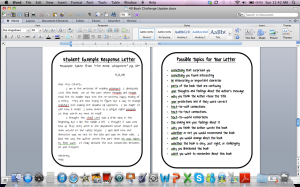
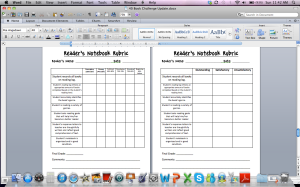
Weekly Schedule signed by both student and parent is to be glued into Reader’s Notebook each week along with their weekly response letter. Books I Plan to Read is a heading for one page to be used throughout the year for students to add titles to it. Genre codes used for reading log.Completed as a class at the beginning of the year then attached (glued) in notebooks for student reference. Taken from “The Book Whisperer” and adapted to fit my composition books.Also, instructions in the form of a letter of what is expected each week in their accountability letter.Student Example to be kept in notebooks for reference and list of possible topics to address in weekly letters.I have a couple of different rubrics in this file. Adapted from Beth Newingham’s rubrics and adapted for my liking and grading system. Similar to my writing rubrics and oral presentation criteria charts.
If you don’t already have an edmodo account that you are using with your students, please do yourself a favor and get started.
Just a quick share to all who don’t know about it: This has become the single best way I have found to communicate with my students. (It’s been super helpful with parents as well, but Google Voice texting capability surpasses edmodo’s “alert” to parents.)
Edmodo operates and looks similar to a facebook page. The benefit of this is that is so user friendly and students are immediately hooked. I use edmodo in lieu of a classroom website. I found my website extremely difficult to keep updated and, as a result, people stopped checking it. Edmodo is a constant stream. The homework is posted daily by my “Edmodo Administrator”. The students are allowed to help each other and discuss issues related only to academics. They can’t even private message each other! They can only send me a private message and then I’ll be alerted via text. I am able to quickly respond to a question on the edmodo app. It’s awesome!
There are so many cool things you can do with it. Here’s a list of just a few:
1. Put all important tests and events on the monthly calendar. Parents and students can view at all times.
2. Send out “alerts” (think twitter) to all who entered a phone number at sign-up
3. Homework is posted daily for parents and students to see
4. Badges can be awarded to students (I created a bunch of my own.)
5. Embed movies and article links to keep kids interested and checking in
6. Save files to your library to stay organized
The list could continue, but I cannot. It’s past my bedtime. Edmodo takes literally 10 seconds to sign-up so check it out and take the time to view the intro. tutorial.
Today was one of the first and many trainings I will receive this year. (We are in year 4 of a technology/writing grant and have ongoing trainings to help us to use the myaccess.com writing program to better service our kids’ writing needs.) And while I truly appreciate the technology we were given (a laptop cart per grade level), it is a little overwhelming.
I don’t know about you, but when I’m in a training, my mind starts racing with all these ideas about how I can and should implement everything I’m learning into my lesson plans ASAP. Granted, many of the ideas are good ideas, but then I come home, sit on my floor (as I am now), and try to plan. It just seems impossible to fit in everything I need to fit in–in the appropriate amount of time.
We have so much technology and in-services thrown our way, but I wish I could sit down with some teachers to discuss simple logistics. I need to see a teacher and a functioning schedule that implements the following in an effective way:
1. Reader’s Notebook with daily student conferences and timely teacher response to student response letters
2. Successful and Meaningful Reading Group Rotations
3. Science Experiments
4. Social Studies Projects and Research
5. Discovery Education videos streamed into lessons consistently
6. Digicore lessons
7. myaccess.com– Student Writing Block
8. Spelling and Phonics Instruction
9. Quick Parent Communication (I just started using Google Voice this year. I’m liking it so far, just working out the kinks. Love the texting capability though, especially that I can type texts to parents on the computer during the school day.)
10. Meaningful HW assignments using technology
11. Edmodo updates and exciting articles/video to keep students engaged
12. Math exploratory lessons (Looking into Marcie Cook Tile Math–any other suggestions??)
13. Instruction in how to create a wonderful lesson using Doceri and my new iPad
14. Finally, can I get a common core training sometime before I’m supposed to assess the students with it?!
Hmmmm… am I missing anything? Oh yes, my own personal life–husband, family, friends, church, exercise, etc. I mean, I do have a
1 1/2 year old kid somewhere…..where is that kid…. Gotta go.
Someone let me know when they have this all figured out. I would like to observe your classroom-soon!
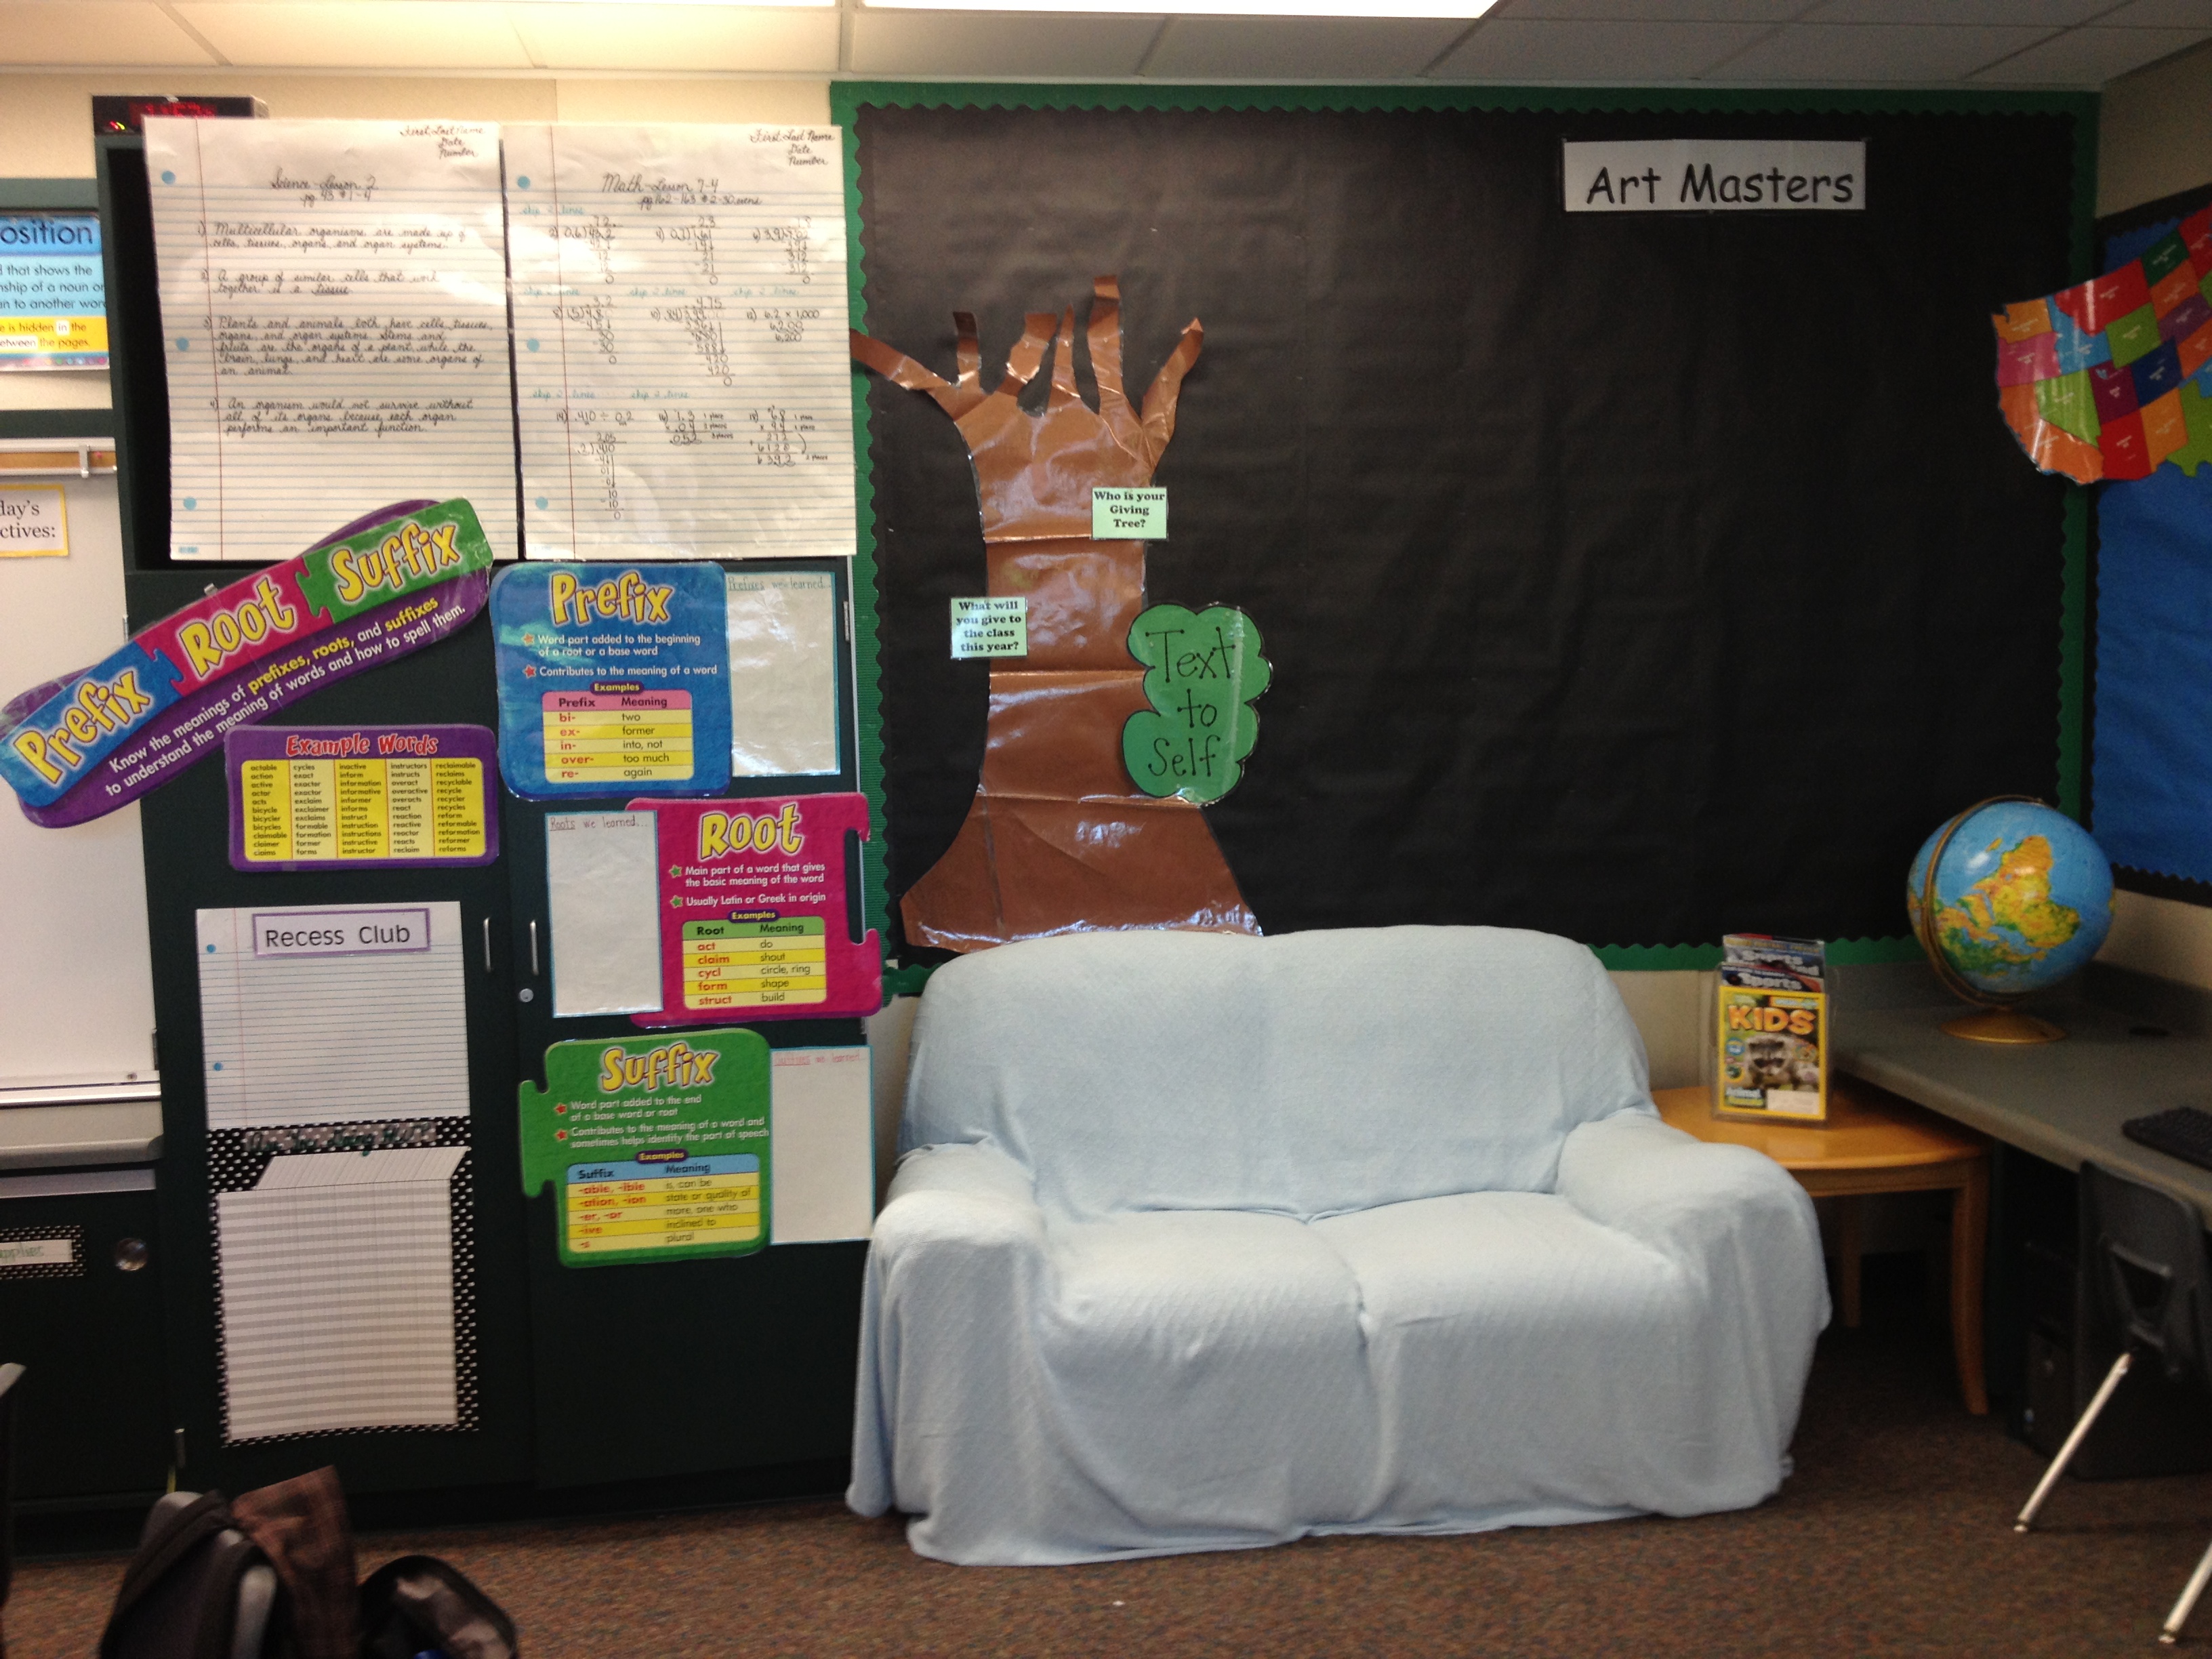
Really quickly—- just going to post some pictures of my new classroom. Once my student work starts going up, I’ll spend more time explaining each part of the classroom. I LOVE CLASSROOM ENVIRONMENT!
Students love when they can read at places other than their desks.
Reading Cave under the counter 🙂The couch is always a hit.
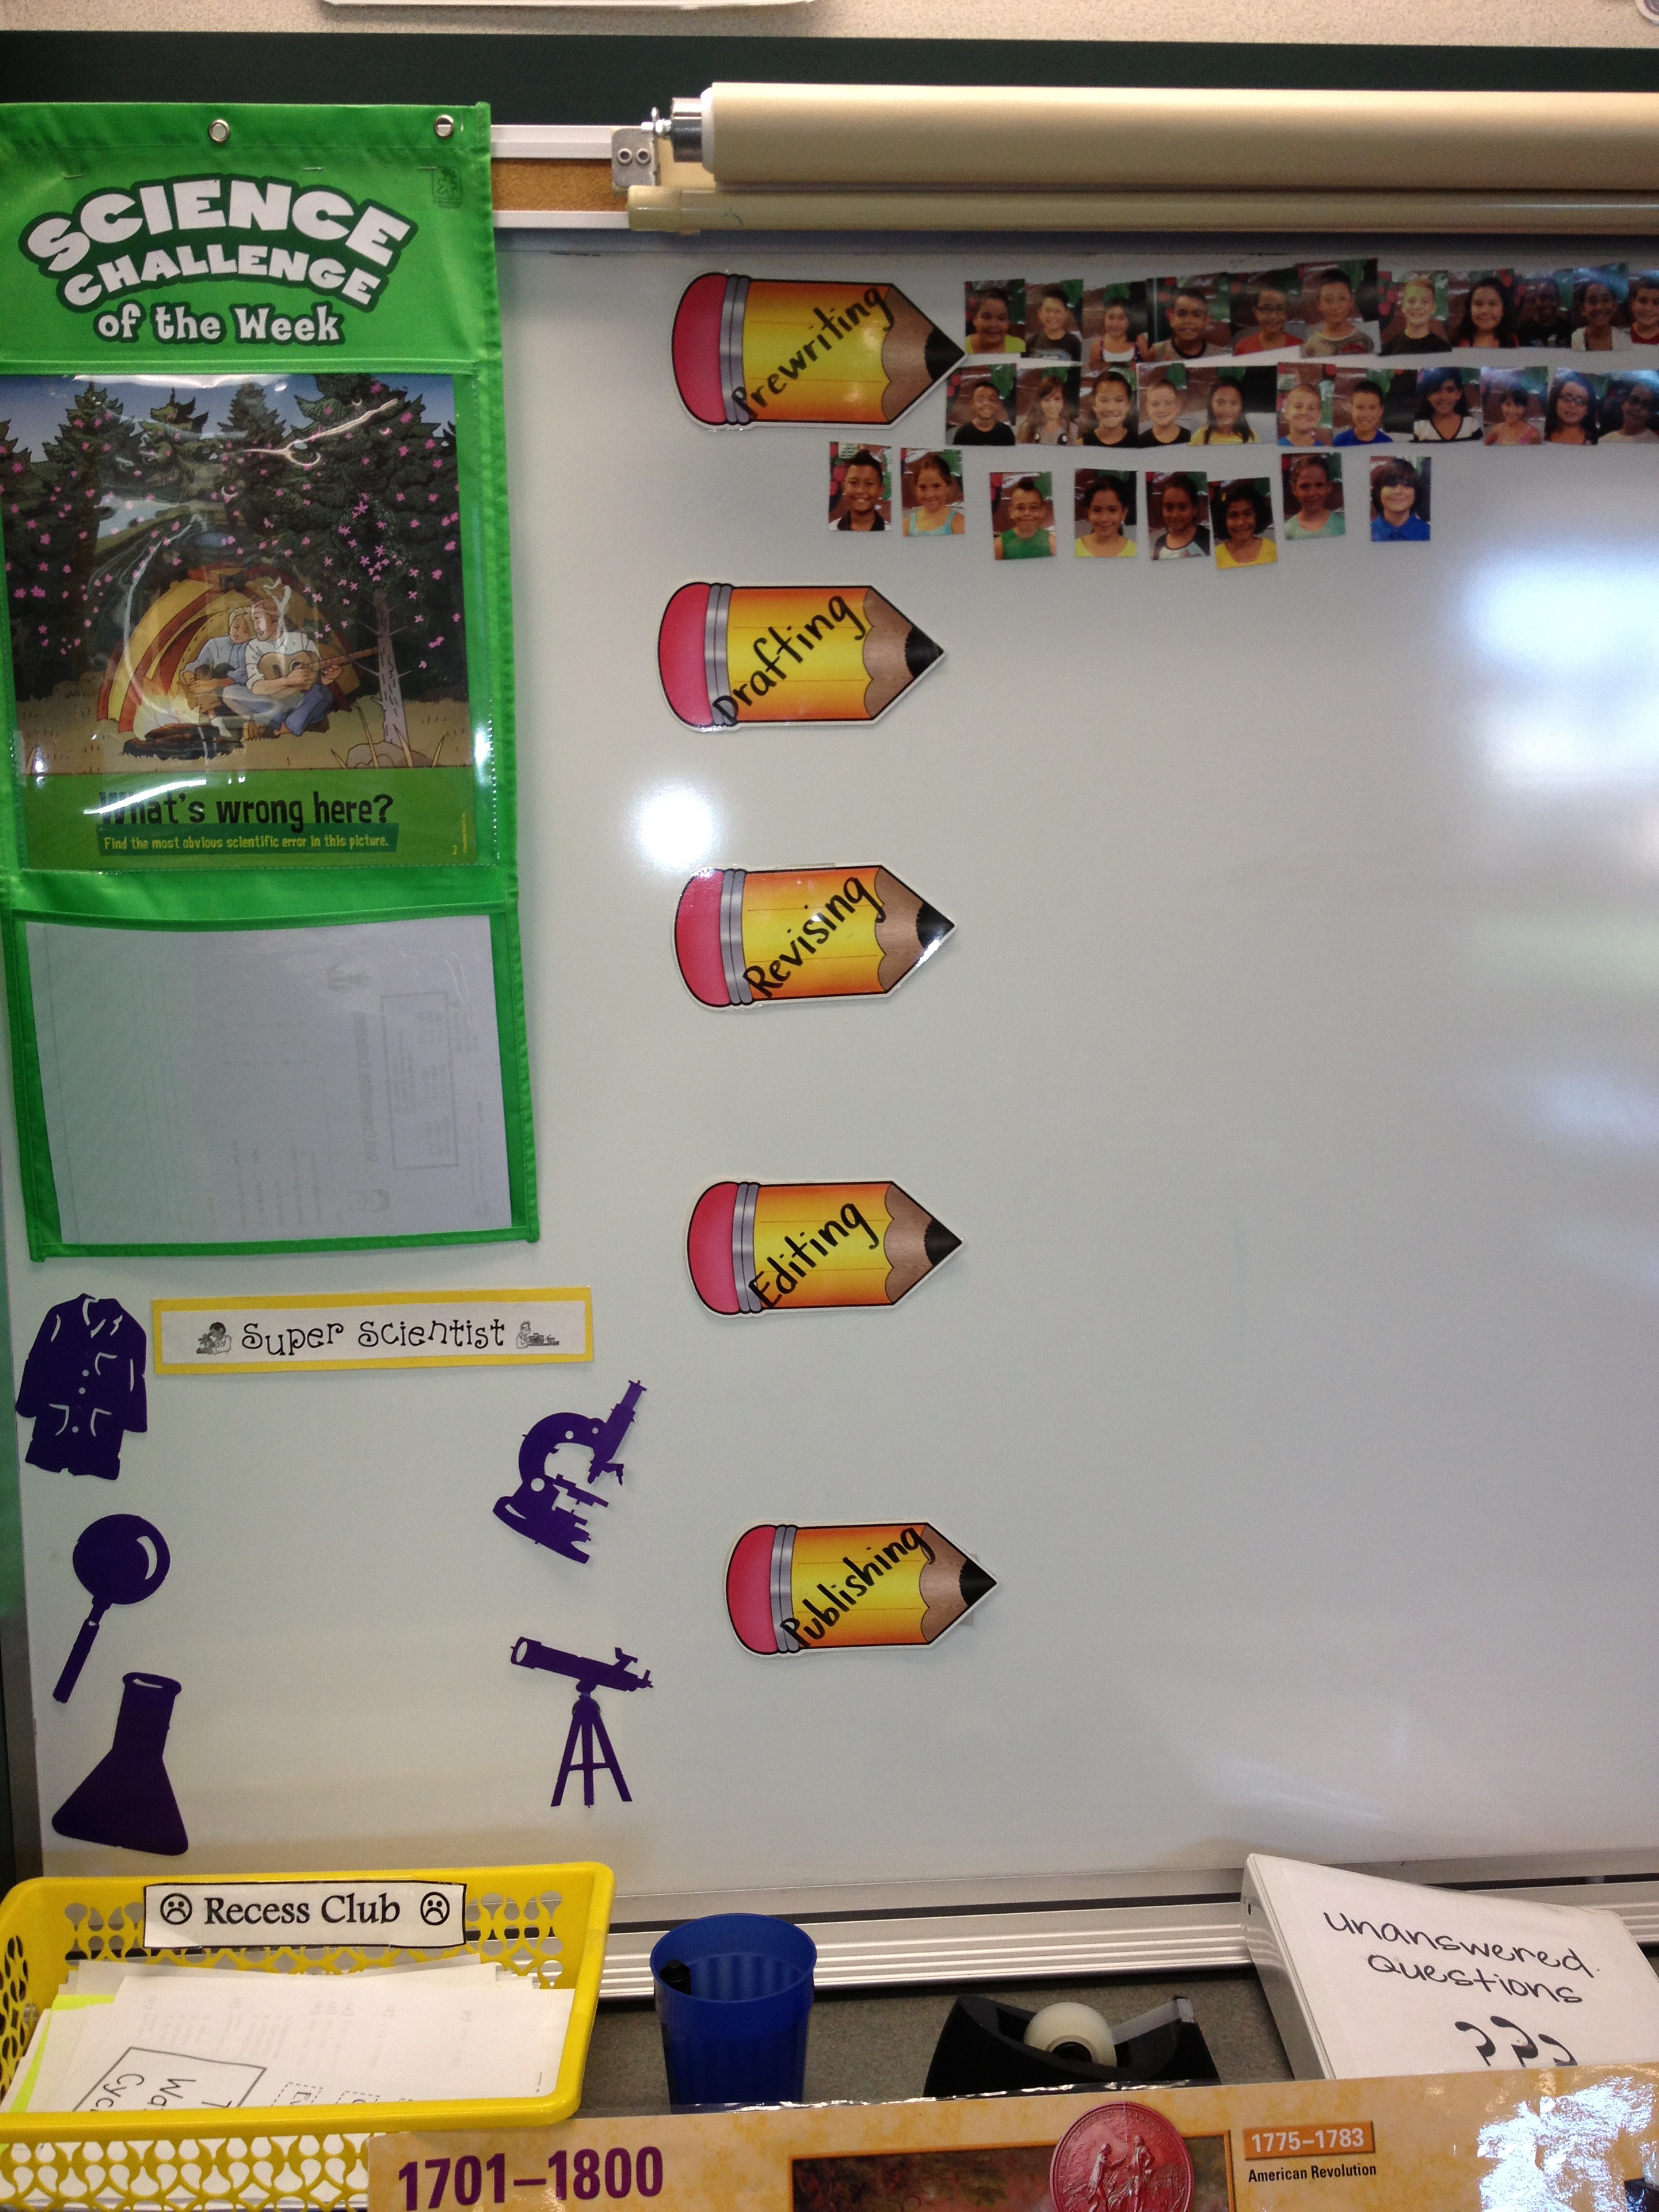
The Writing Wall — now complete with pictures of each student to accompany their work this year.
Writing wall with steps for each type of writing: summaryWriting Wall with “Please excuse the bare wall. Our writing is under construction sign.” Thanks Pinterest.
The blue bags get filled with compliments. Once each student has at least one compliment, the students are able to collect all the compliments on their way home. The compliment coordinator keeps track of this. New this year: Book Recommendation Wall–we’ll see how this works out.
This is how I keep track of where my students are in writing. As the students progress at different rates, they move their heads to the step they are on in the writing process. Because we are just beginning summaries on Monday, all faces are in the prewriting stage. (I used to keep track on paper, but this visual is soooo helpful!) Also pictured is the science challenge of the week. I believe I bought it at Lakeshore and it’s a purchase I have never regretted. My science monitor manages this for me.
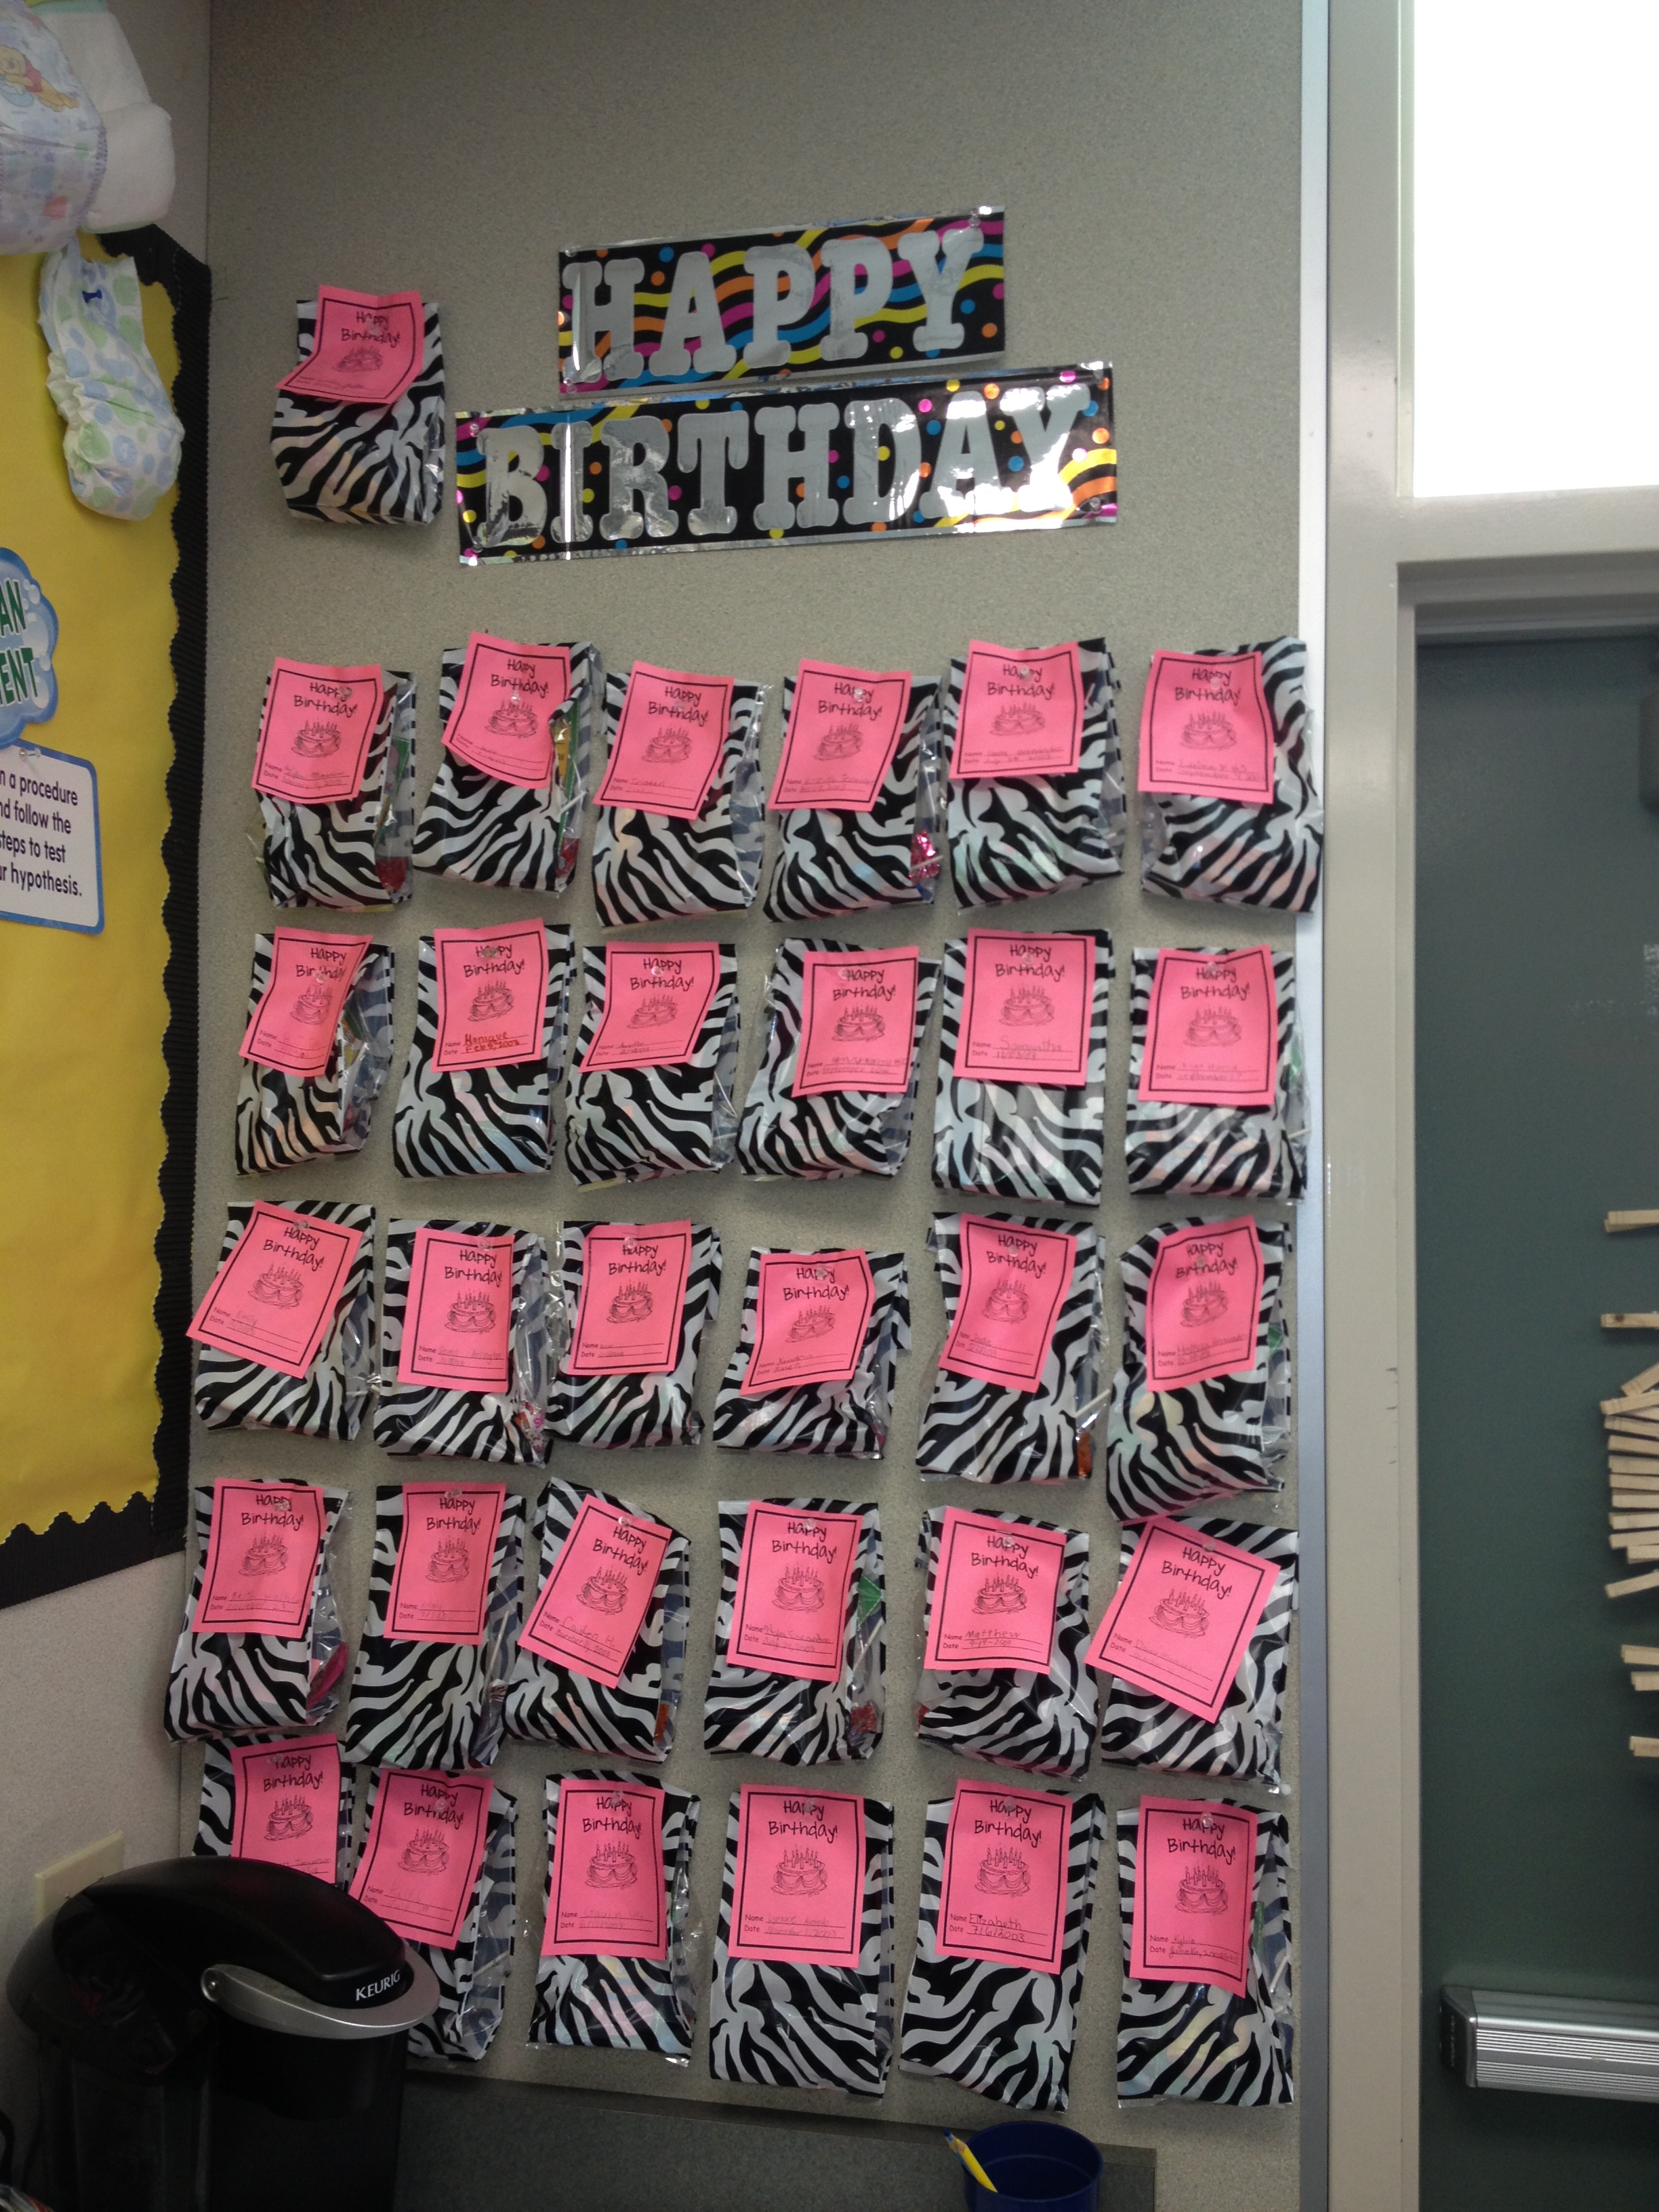
Science challenge of the week and how I monitor student writing progress throughout the week.Thanks Beth Newingham for theme posters. Such good lessons for my read alouds all year.Multiplication Jail, Strain you Brain (weekly math challenge), and Unanswered QuestionsBirthday Bags up!
Multiplication Jail, Strain your Brain, and Unanswered Questions will be further discussed in a later post.
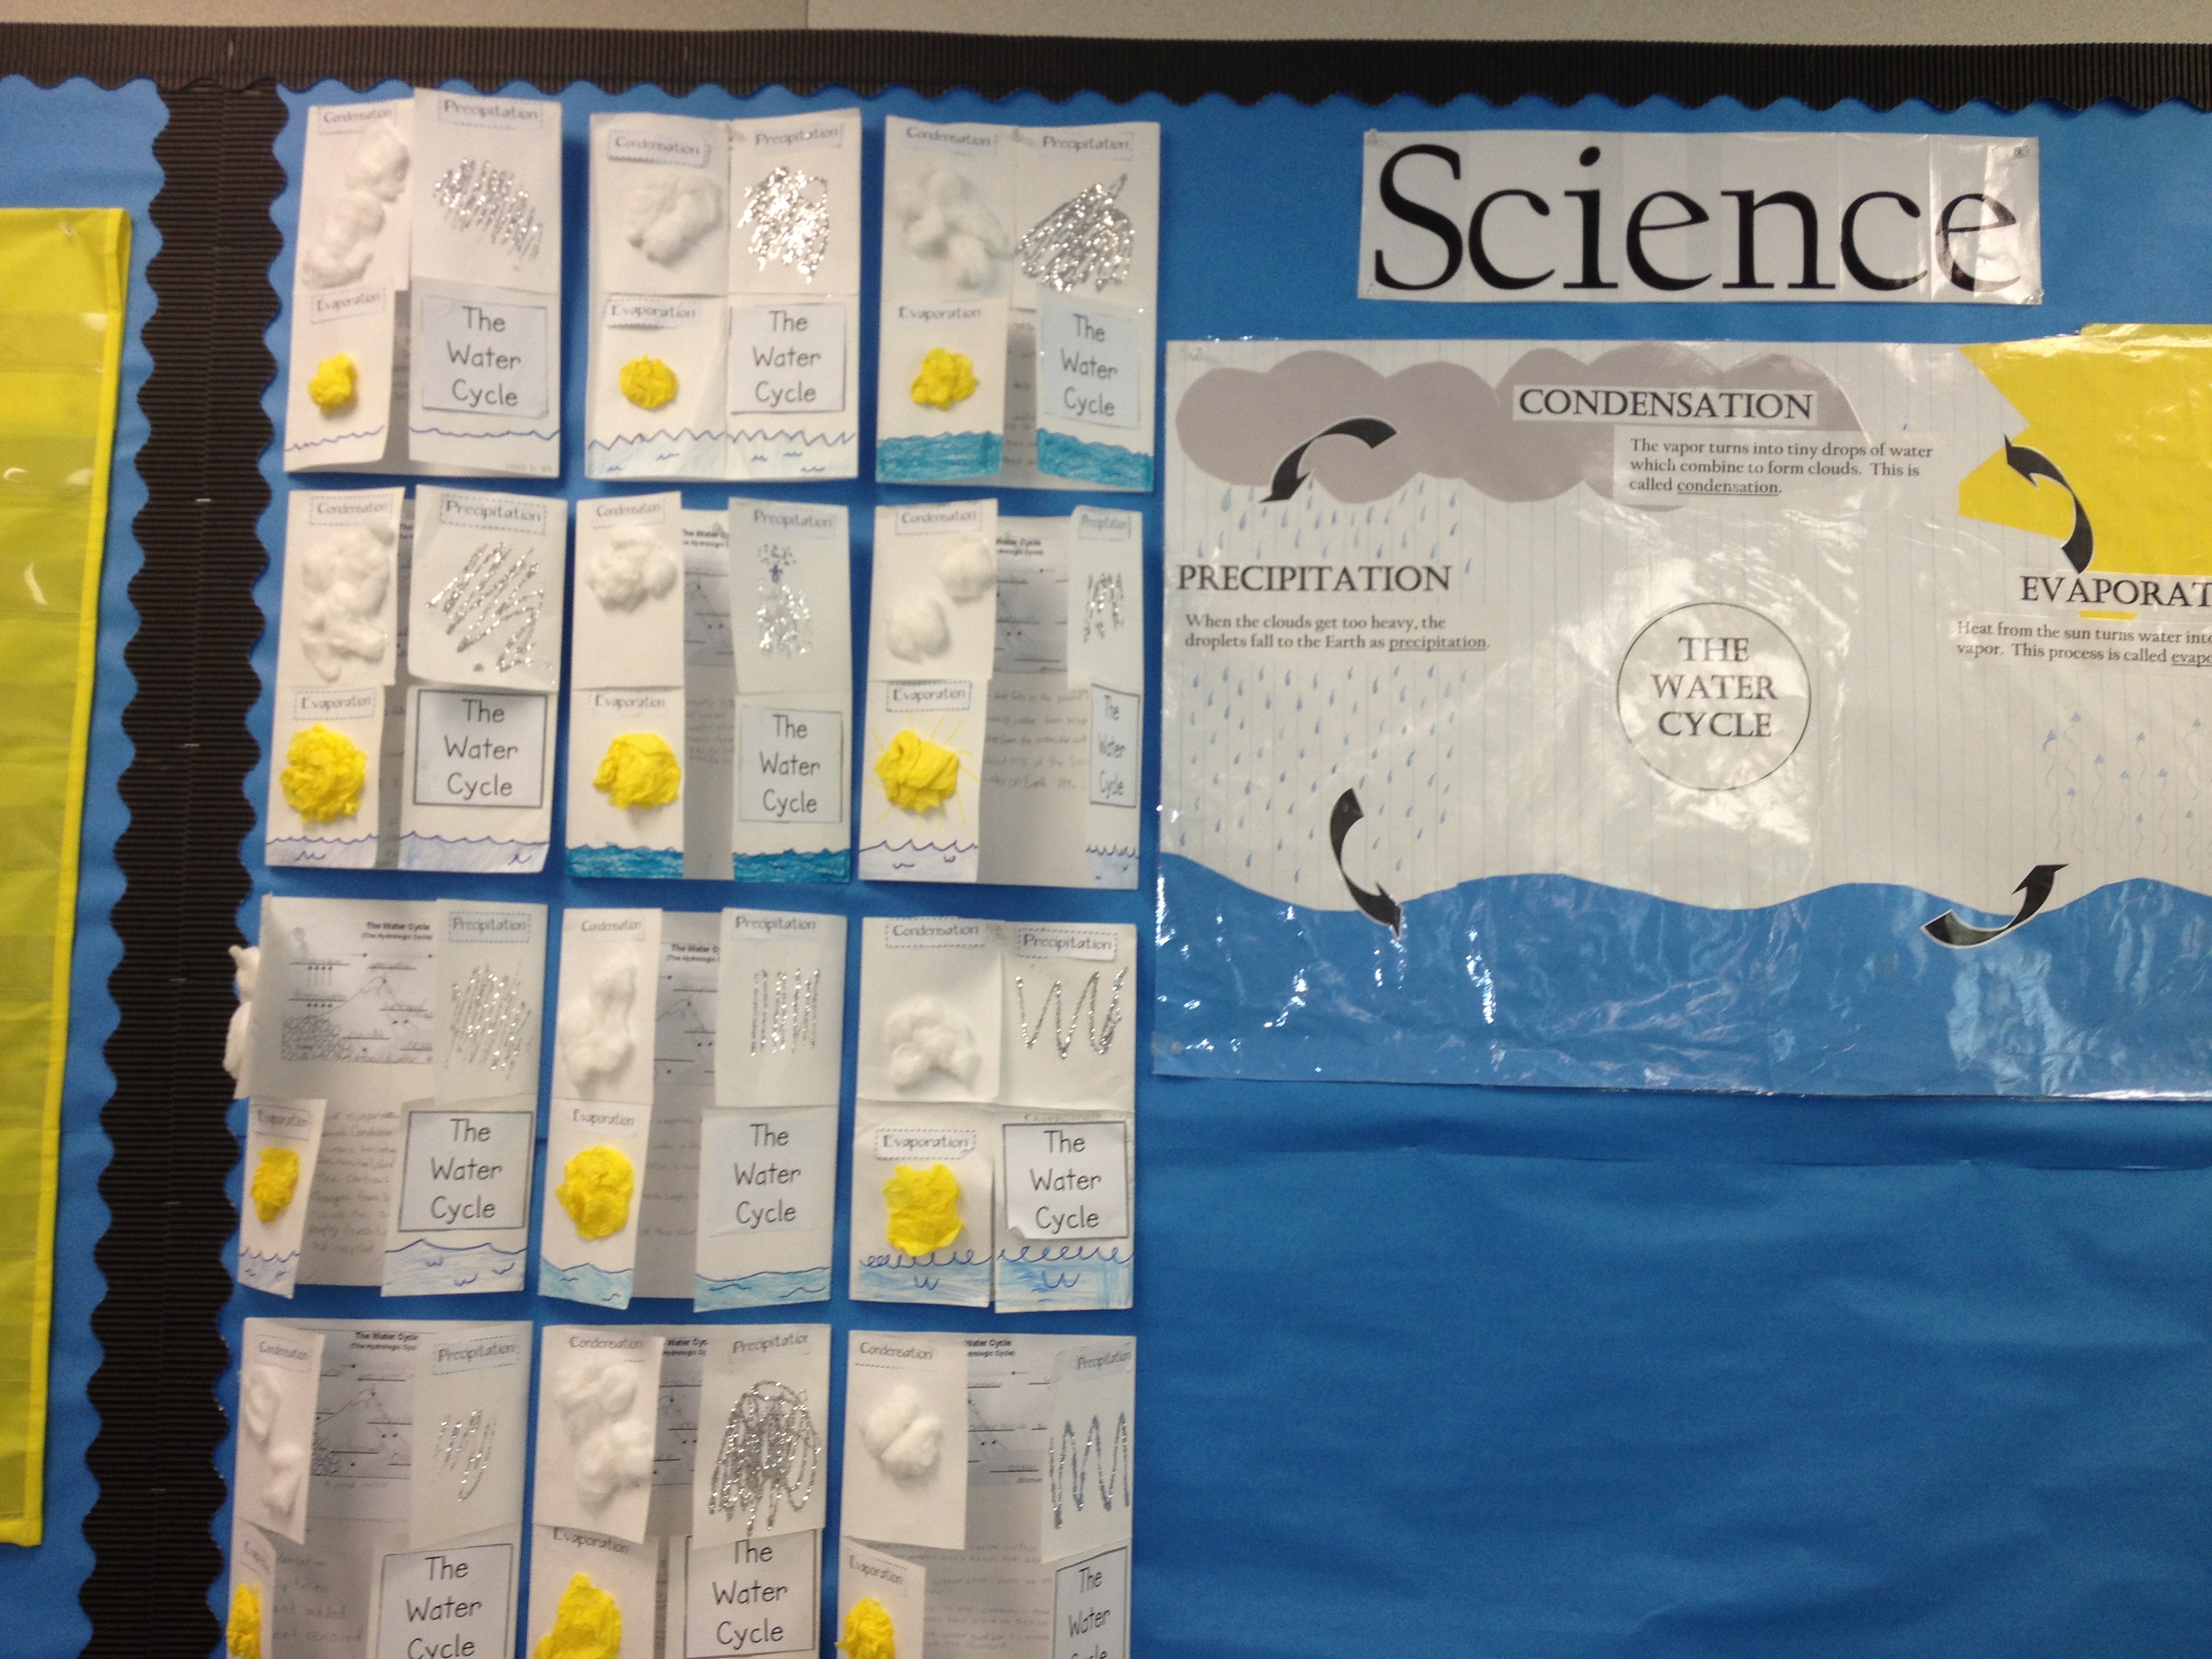
Every year our grade level team chooses to begin science with the water cycle. Why? Because it’s honestly so fun to teach. There are so many different activities and lessons that go with it, I just can’t get enough. After watching videos and researching it in our textbooks, I love showing the students Mr. Parr’s video. If you haven’t looked him up on youtube, I highly suggest it. He puts current songs with the lyrics to different educational concepts. The water cycle one is awesome!
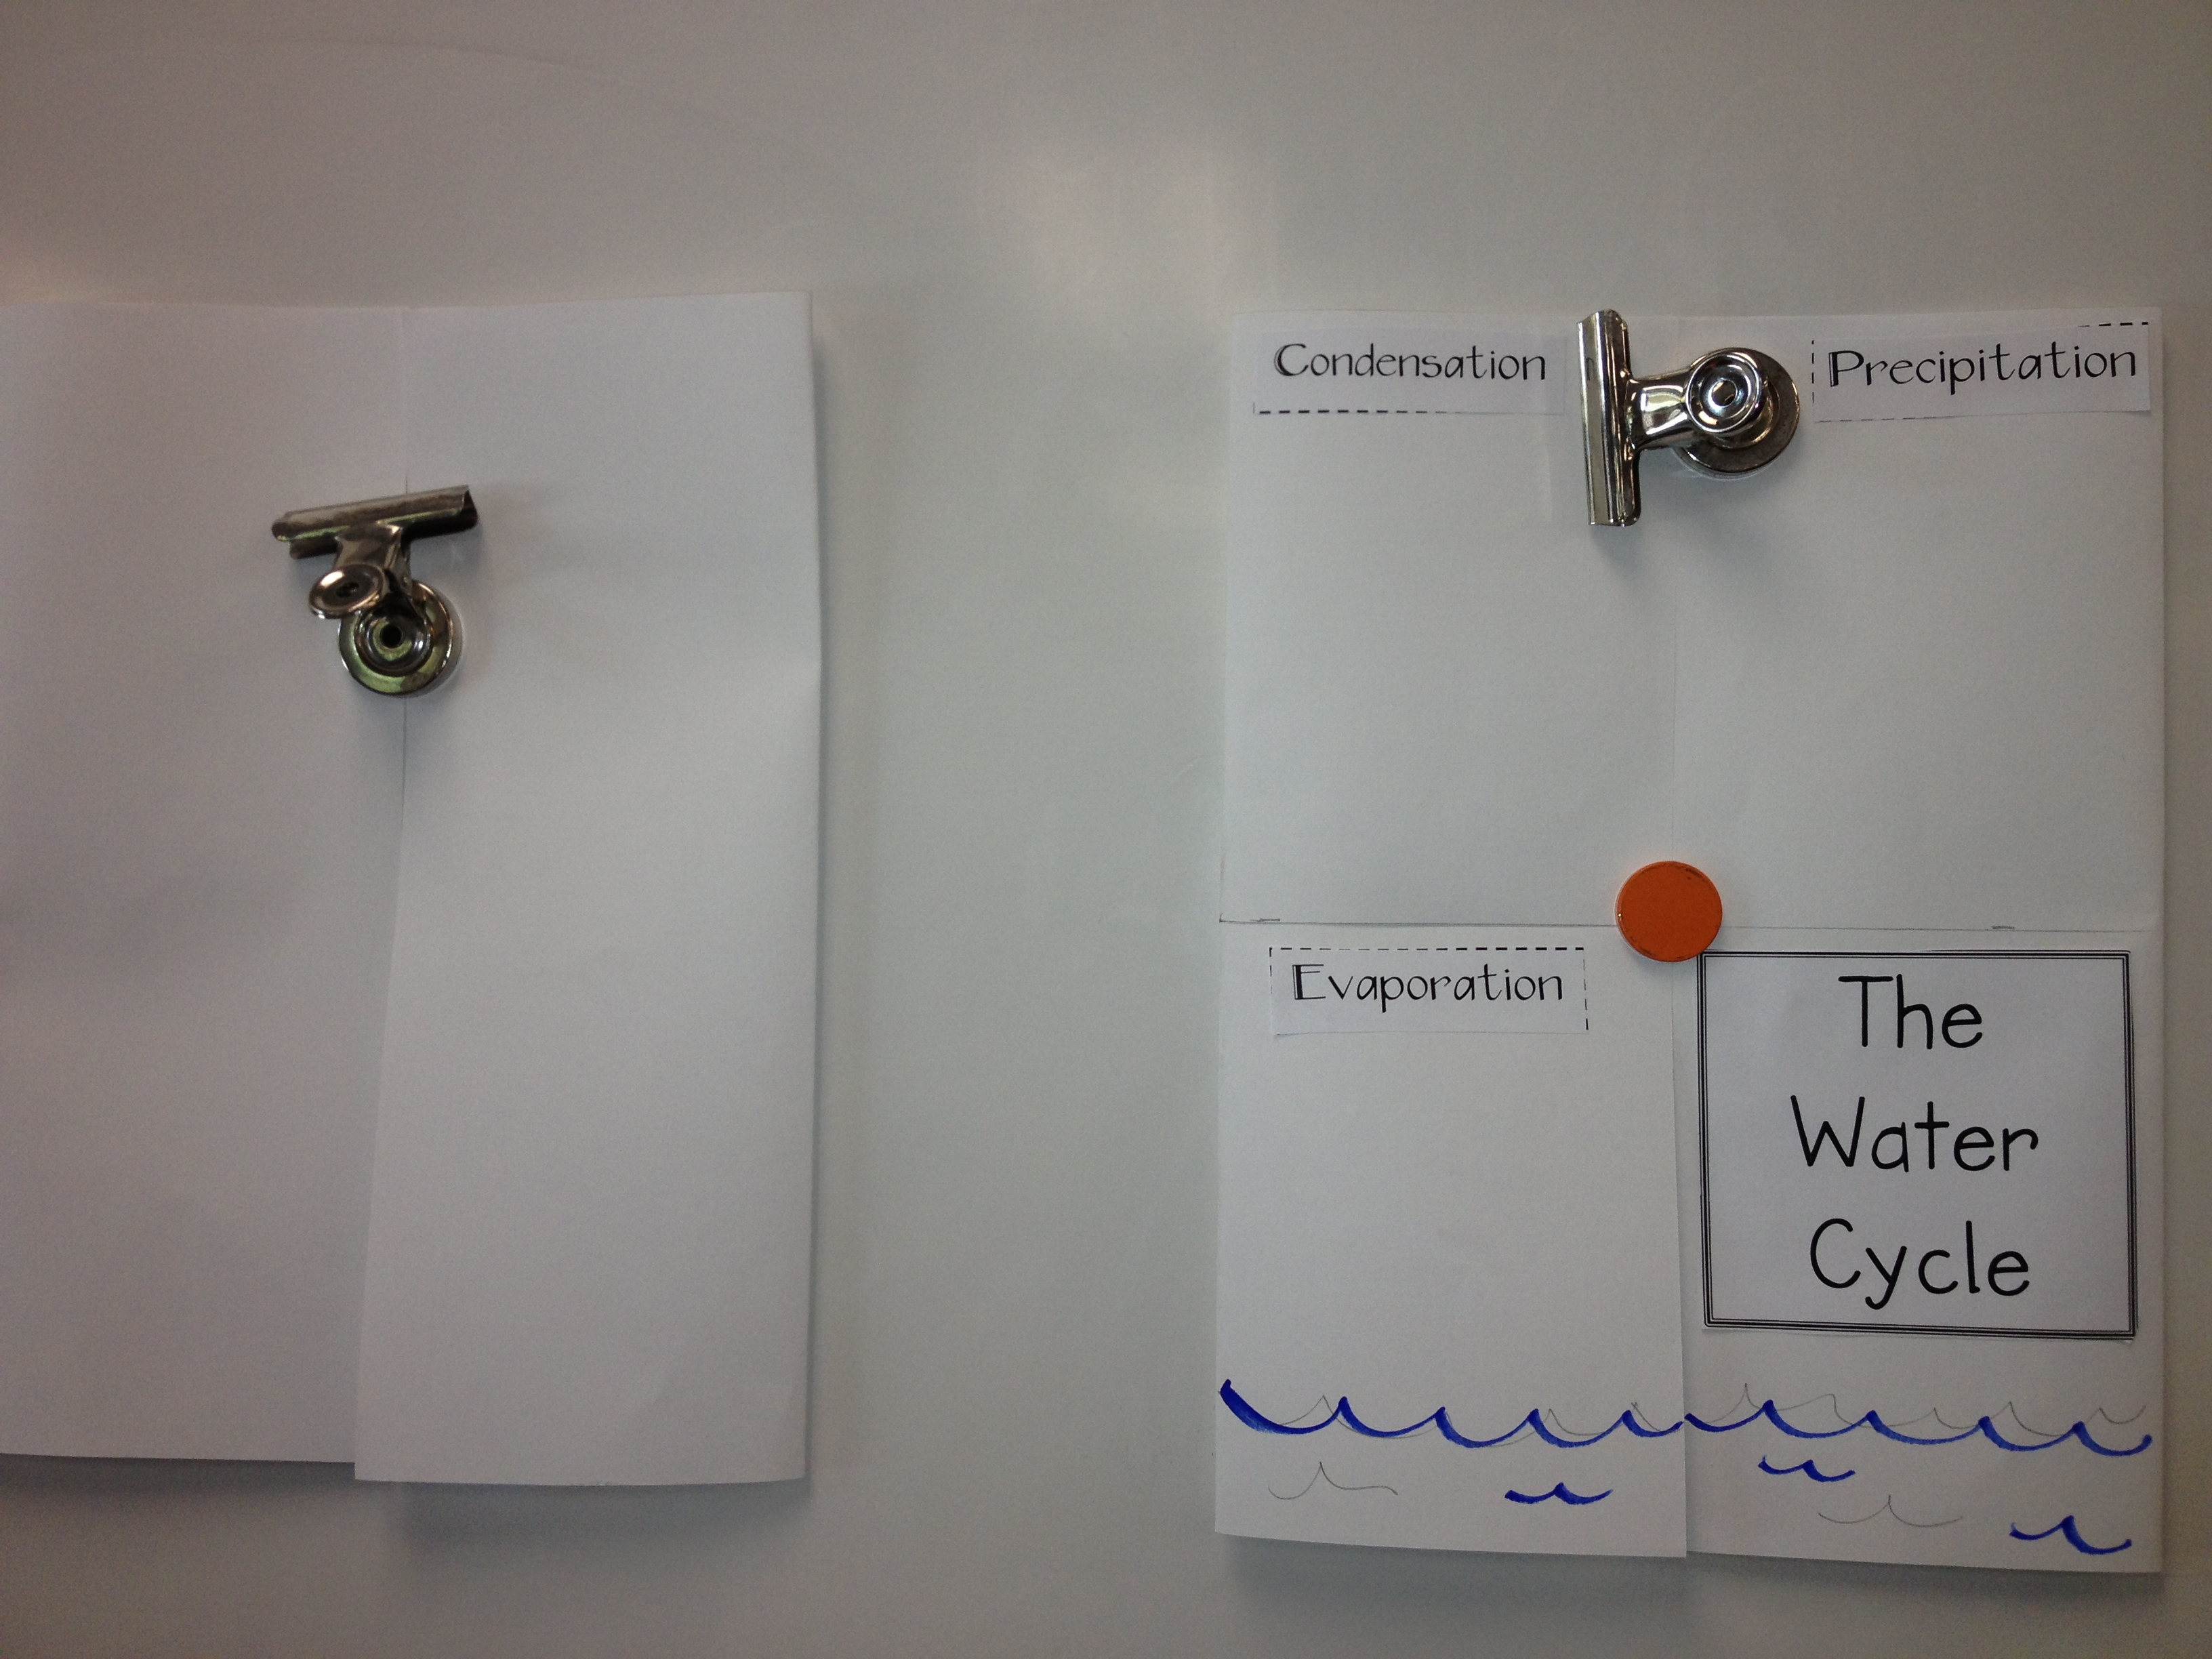
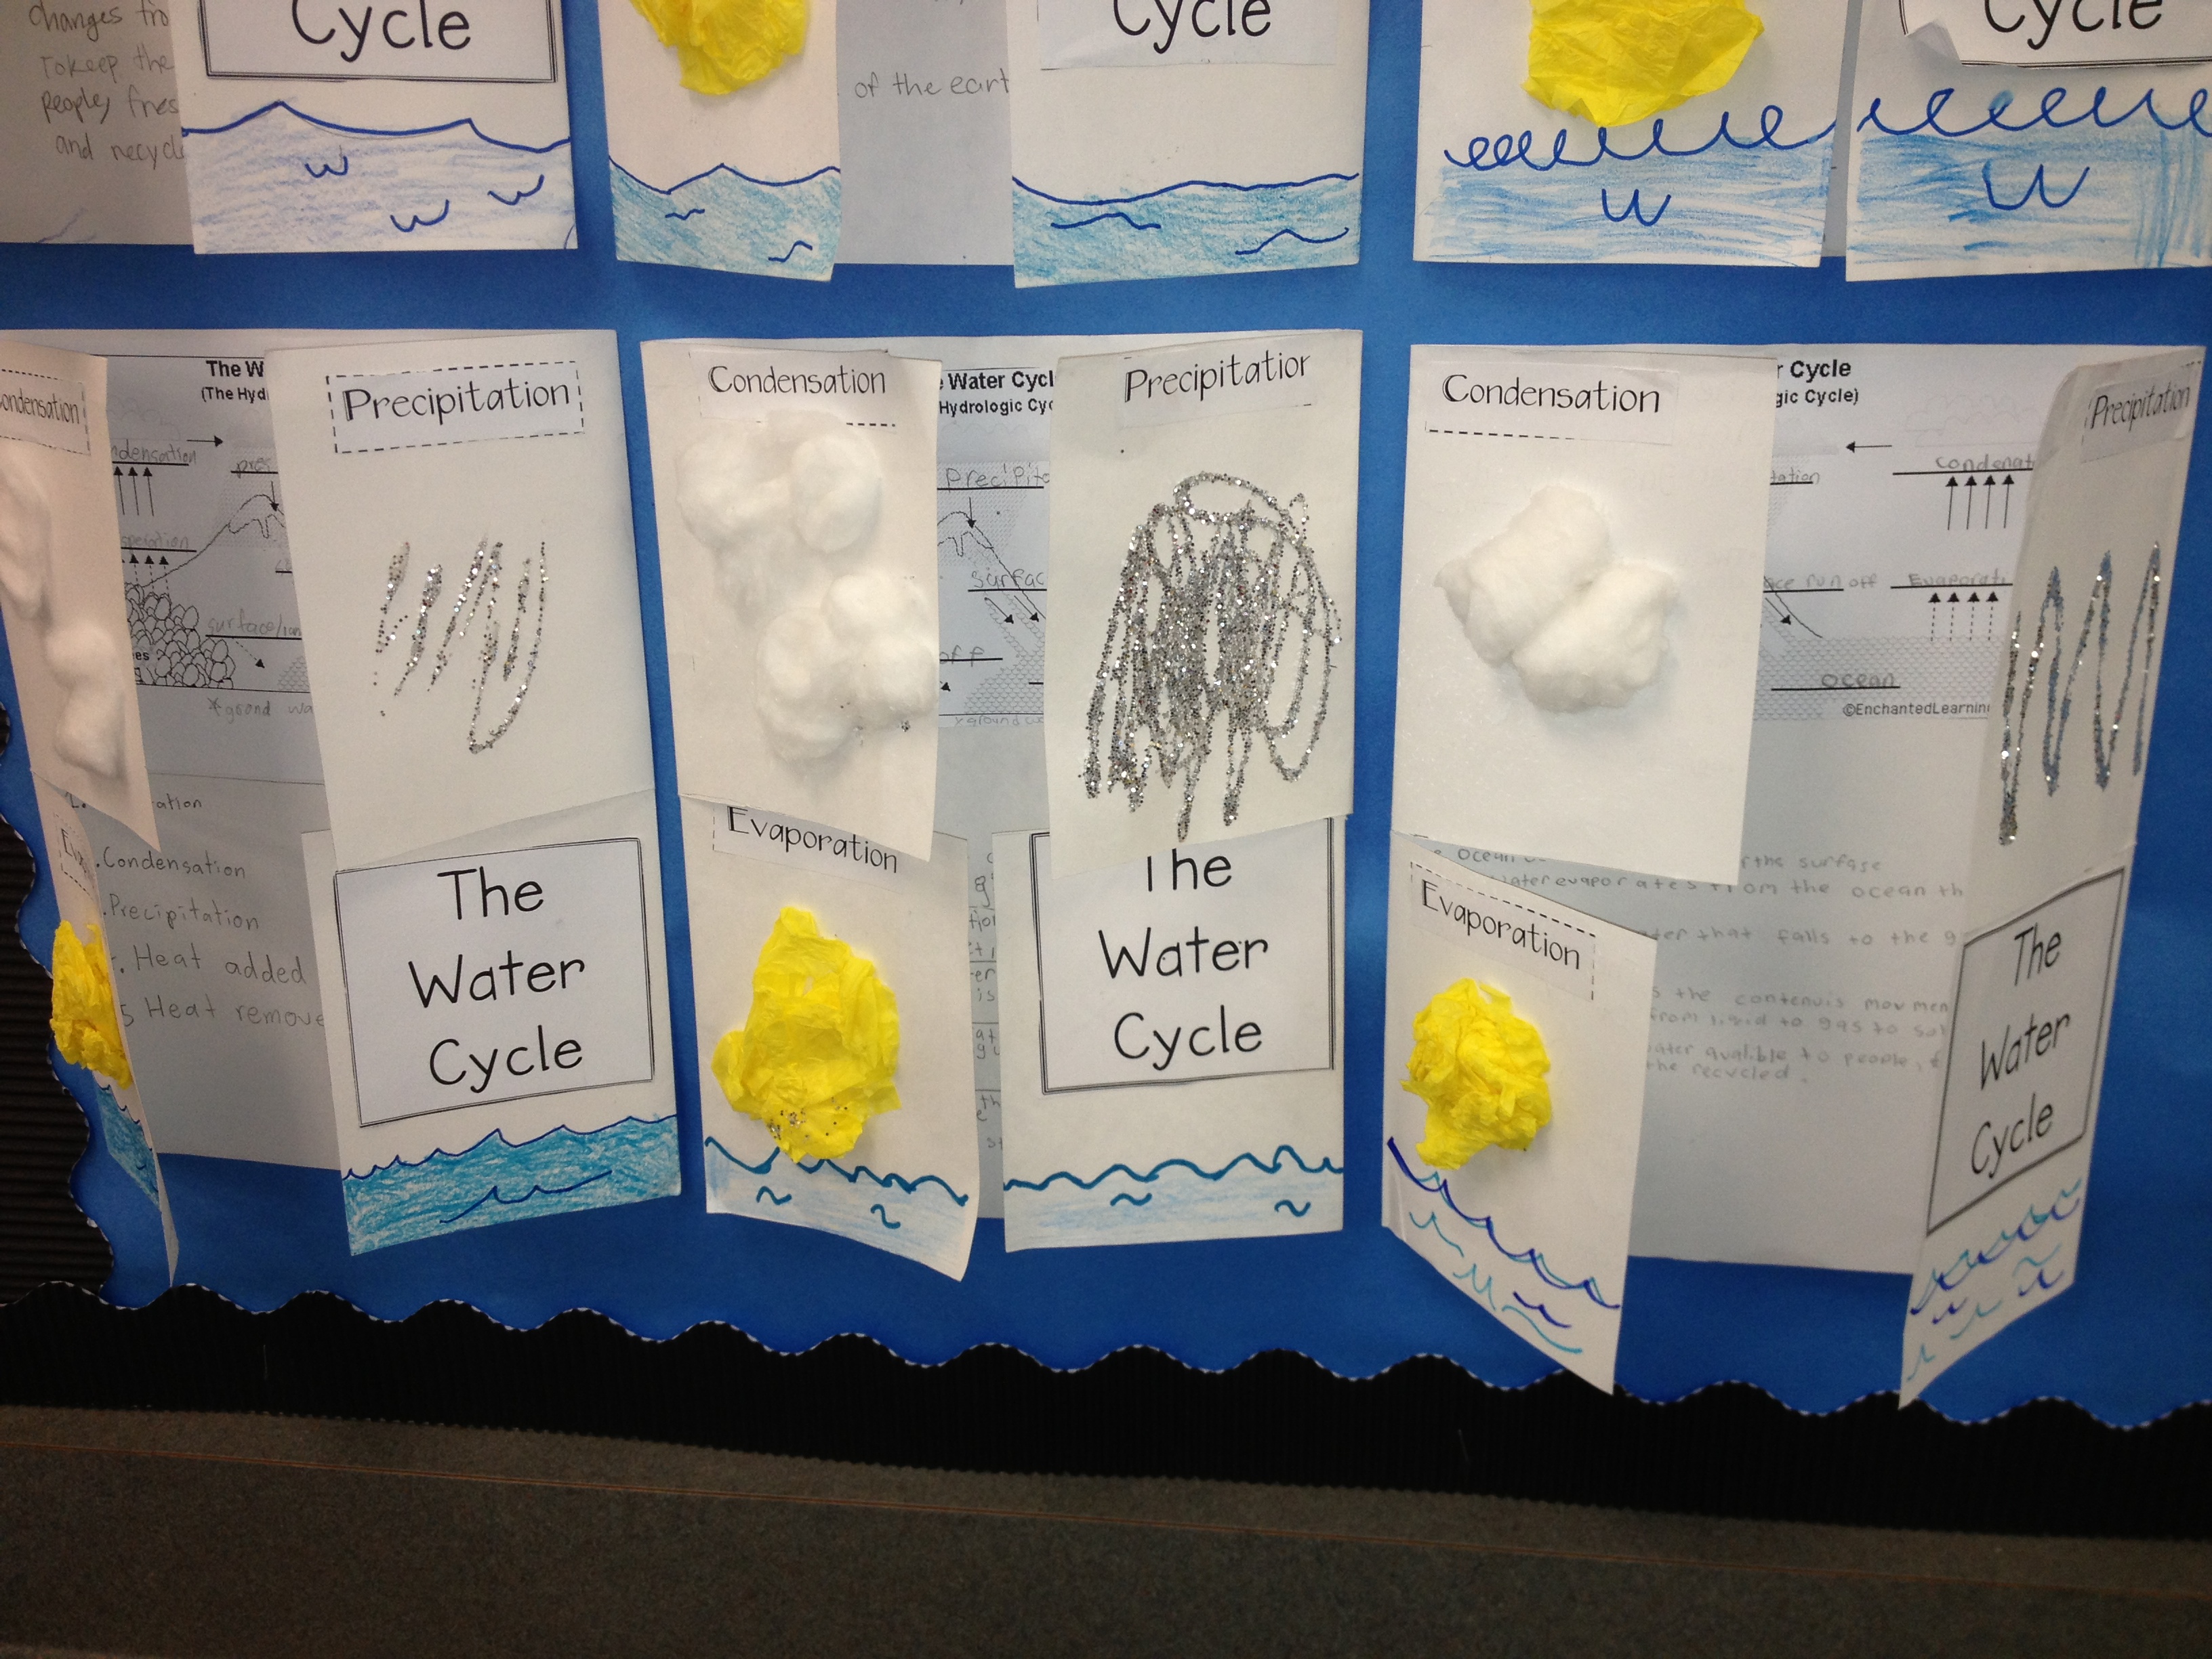
All you need for this flipbook is white construction paper, some glitter, tissue paper, cotton balls, and the headings included in the pdf below.
Start with a 9.5 by 12 white construction paper. Fold in half. Then have students draw a line across the middle to cut flaps.Clouds-cotton balls. Rain-glitter and glue. Sun-yellow tissue paper.
Behind each flap the students wrote the exact definition for each process (found in their textbooks). Then as a class we added more detail and explanation to the steps of each process. The class is going to be writing their first informational summary on the water cycle so I told them this information would help them and be sure to do a quality job.
The center section of the book is changed up every year. Some years they have drawn a diagram, others they have written their summary right there, but this year I printed out a diagram from enchantedlearning.com and the students simply labeled it.
For the section below the diagram, I tried something new. I gave the students a sheet of paper with 10 important facts regarding Earth’s water (the chapter of study). The students had to circle what they believed to be the five most important facts. Then, they had to rank the facts in order–#1 being “most important” to “least important”. I asked the students, “If you were going to teach about Earth’s water, what are the 5 things that we HAVE to know?” and “What’s the most important thing you learned about Earth’s water?” The students then had to be able to justify why they picked certain facts over another….always very interesting to hear their reasoning.
The diagram fill-in on top and the sorted facts on the bottom. Inside the flap: definition and important detailsWater Cycle FlipbookWater Cycle Flipbooks
Here is the pdf of headings and the diagram. (The 10 important facts are on my flash drive at school—so sorry!)


 Today was one of the first and many trainings I will receive this year. (We are in year 4 of a technology/writing grant and have ongoing trainings to help us to use the myaccess.com writing program to better service our kids’ writing needs.) And while I truly appreciate the technology we were given (a laptop cart per grade level), it is a little overwhelming.